30 Creative Ways to Teach with Interactive Image-Based Lessons
 Lucie Renard —
Today, the power of images meets the dynamism of interactive learning. The overhead projector was one of the first devices to teach with images for an entire classroom. And now, with the power of the internet and new technologies, you can do even more with images in your classroom.
In this comprehensive guide, I’ll show you 30 innovative ways to infuse your classroom with interactive images. From leveraging multimedia resources to fostering collaboration and critical thinking, these strategies are designed to elevate teaching and learning experiences to new heights.
As BookWidgets will be at the root of all the shared lesson examples in this blog post, it’s important to know that you’ll be able to use all the digital lessons, for free, if you have a BookWidgets account. You can find all the lesson examples in this BookWidgets group folder. This way, you can duplicate these visual and interactive lessons, make changes if needed, and share them with your students.
I will share inspiration and lesson ideas using the Pictures and videos widget types BookWidgest has to offer. When you start creating lessons from scratch, they are just 3 steps away:
- Create an account on bookwidgets.com or log in to your existing account.
- Click the button Create a widget.
- Select one of the Pictures and Videos widget types from the list. I’ll show all the different activity types below, so you get an understanding of what you can do with the different photo and video lesson templates.
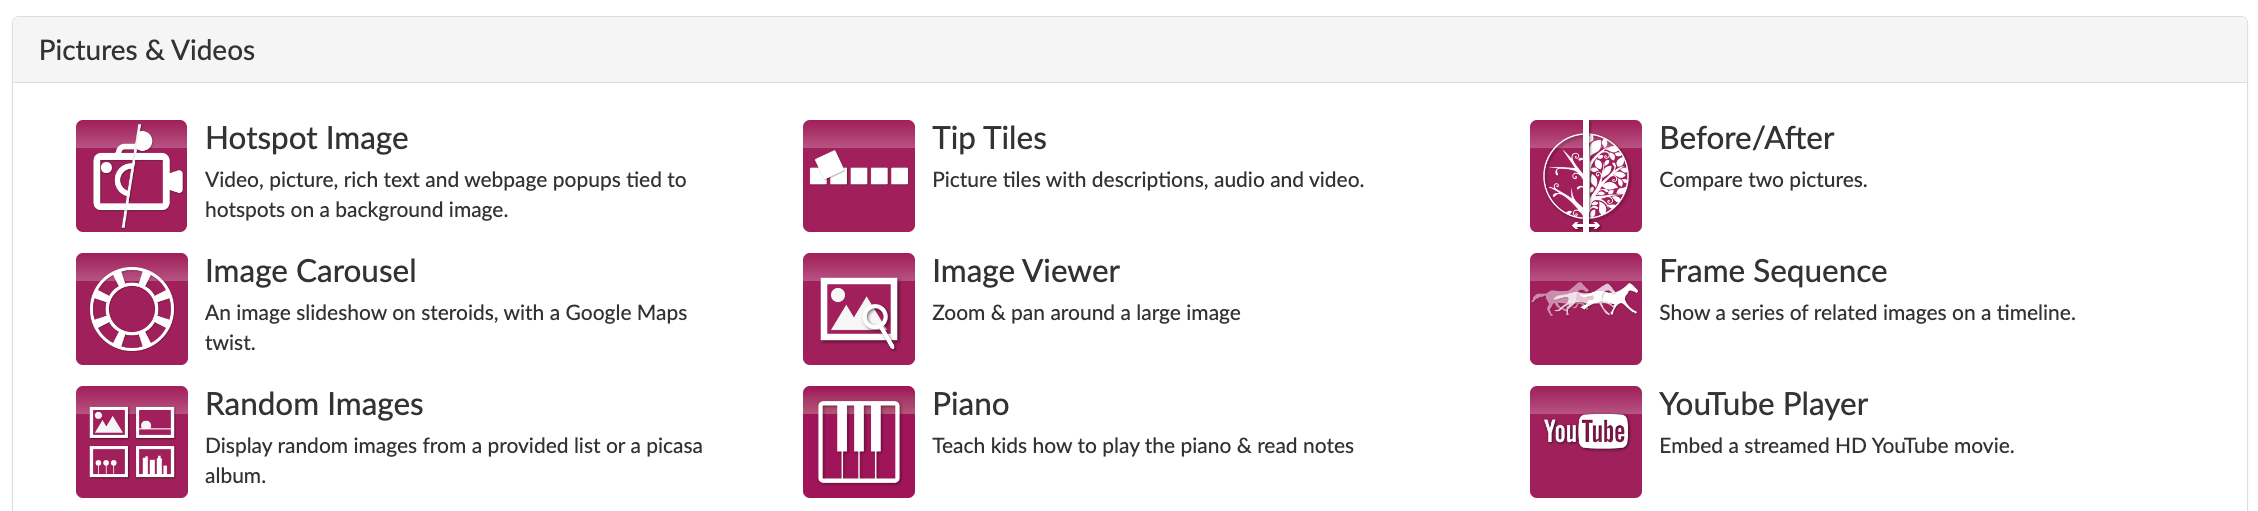
For every activity type you see here, I’ll explain what they do and give some lesson ideas for different subjects and lesson purposes.

The Hotspot Image Widget
Let’s dive right in with my all-time favorite! Hotspot Images are a type of interactive images incorporating hotspot icons within the image itself leading a variety of activities such as providing additional information, playing a sound or video, another widgets and much more. In short, it’s an interactive image with hotspots or popups leading students to even more information on that image. You can create an entire lesson that begins from one image! Make sure to watch our 1-hour webinar and learn all about creating your first Hotspot Image Widget. Or read our blog post with many more Hotspot Image ideas for your lessons.
💡 Pro tip: Use image authoring tools, like Canva or Adobe Express, to create compelling images you’re using as the start image.
1. Create interactive learning paths for students
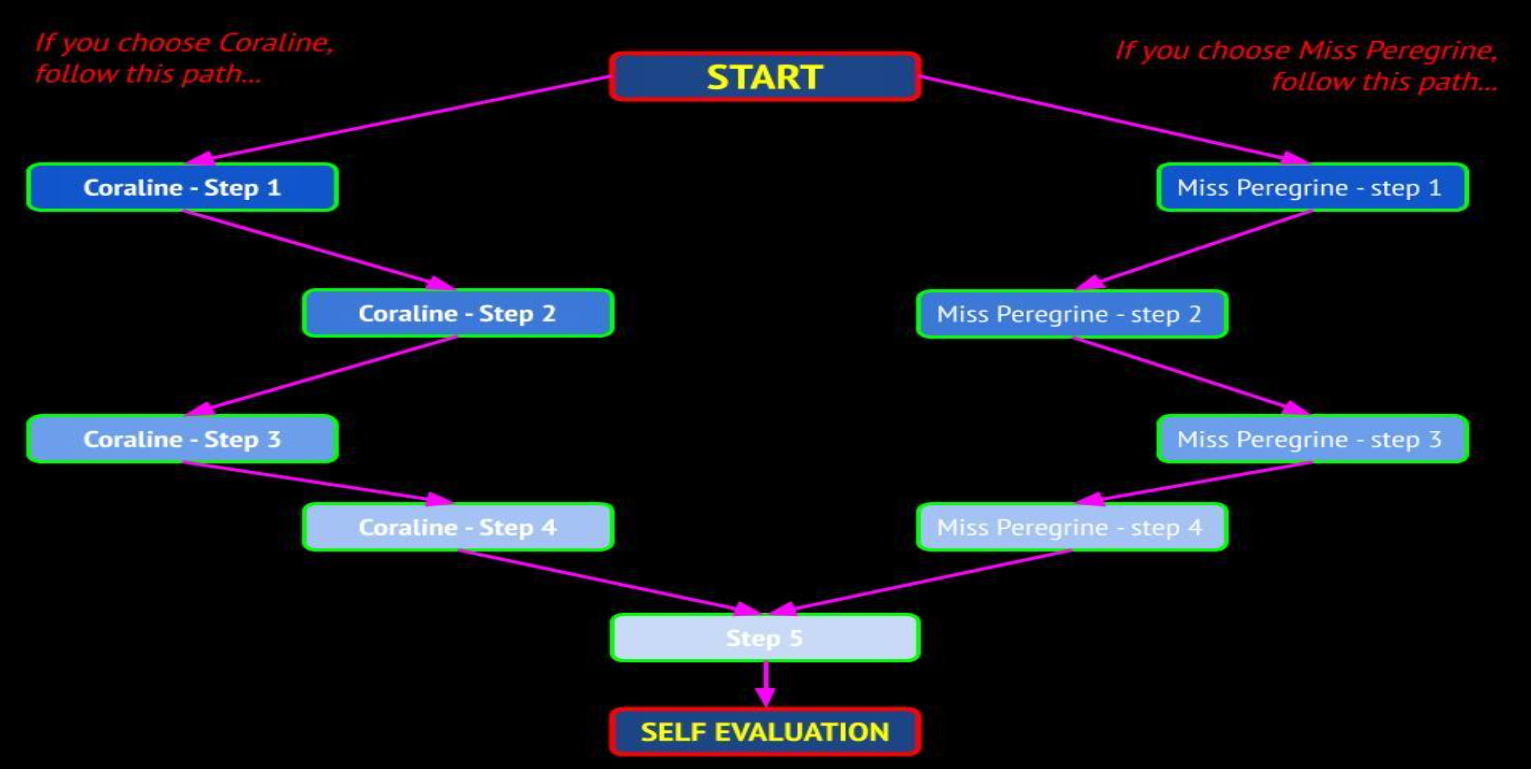
Your starting image will visually guide students through a process or a learning path. The image will be your lesson structure and must be clear so your students know what to do. In the example below, an English high school teacher in Belgium, Lize Vliegen, uses a Hotspot Image Widgets to create two learning paths for her students. Research shows us the importance of student choice in learning. Lize’s students are in control of their learning as they choose a story to read. Depending on the story, there is another learning path with exercises. As you can see, you can guide students to other BookWidgets activities behind a hotspot/ popup. These can be quizzes, worksheets, or any kind of widget.
2. Create multimedia posters
Make an image come to life when students click on it. Behind the spots where students click, you can show a popup with an explanation, play audio, or show an image. In the example below, the teacher creates a practice activity by using multimedia elements, as it’s much more valuable to hear something. Hearing sounds is a part of the lesson. This way, students can practice at home, too, when the teacher is not there to speak or to let students listen to the answers.
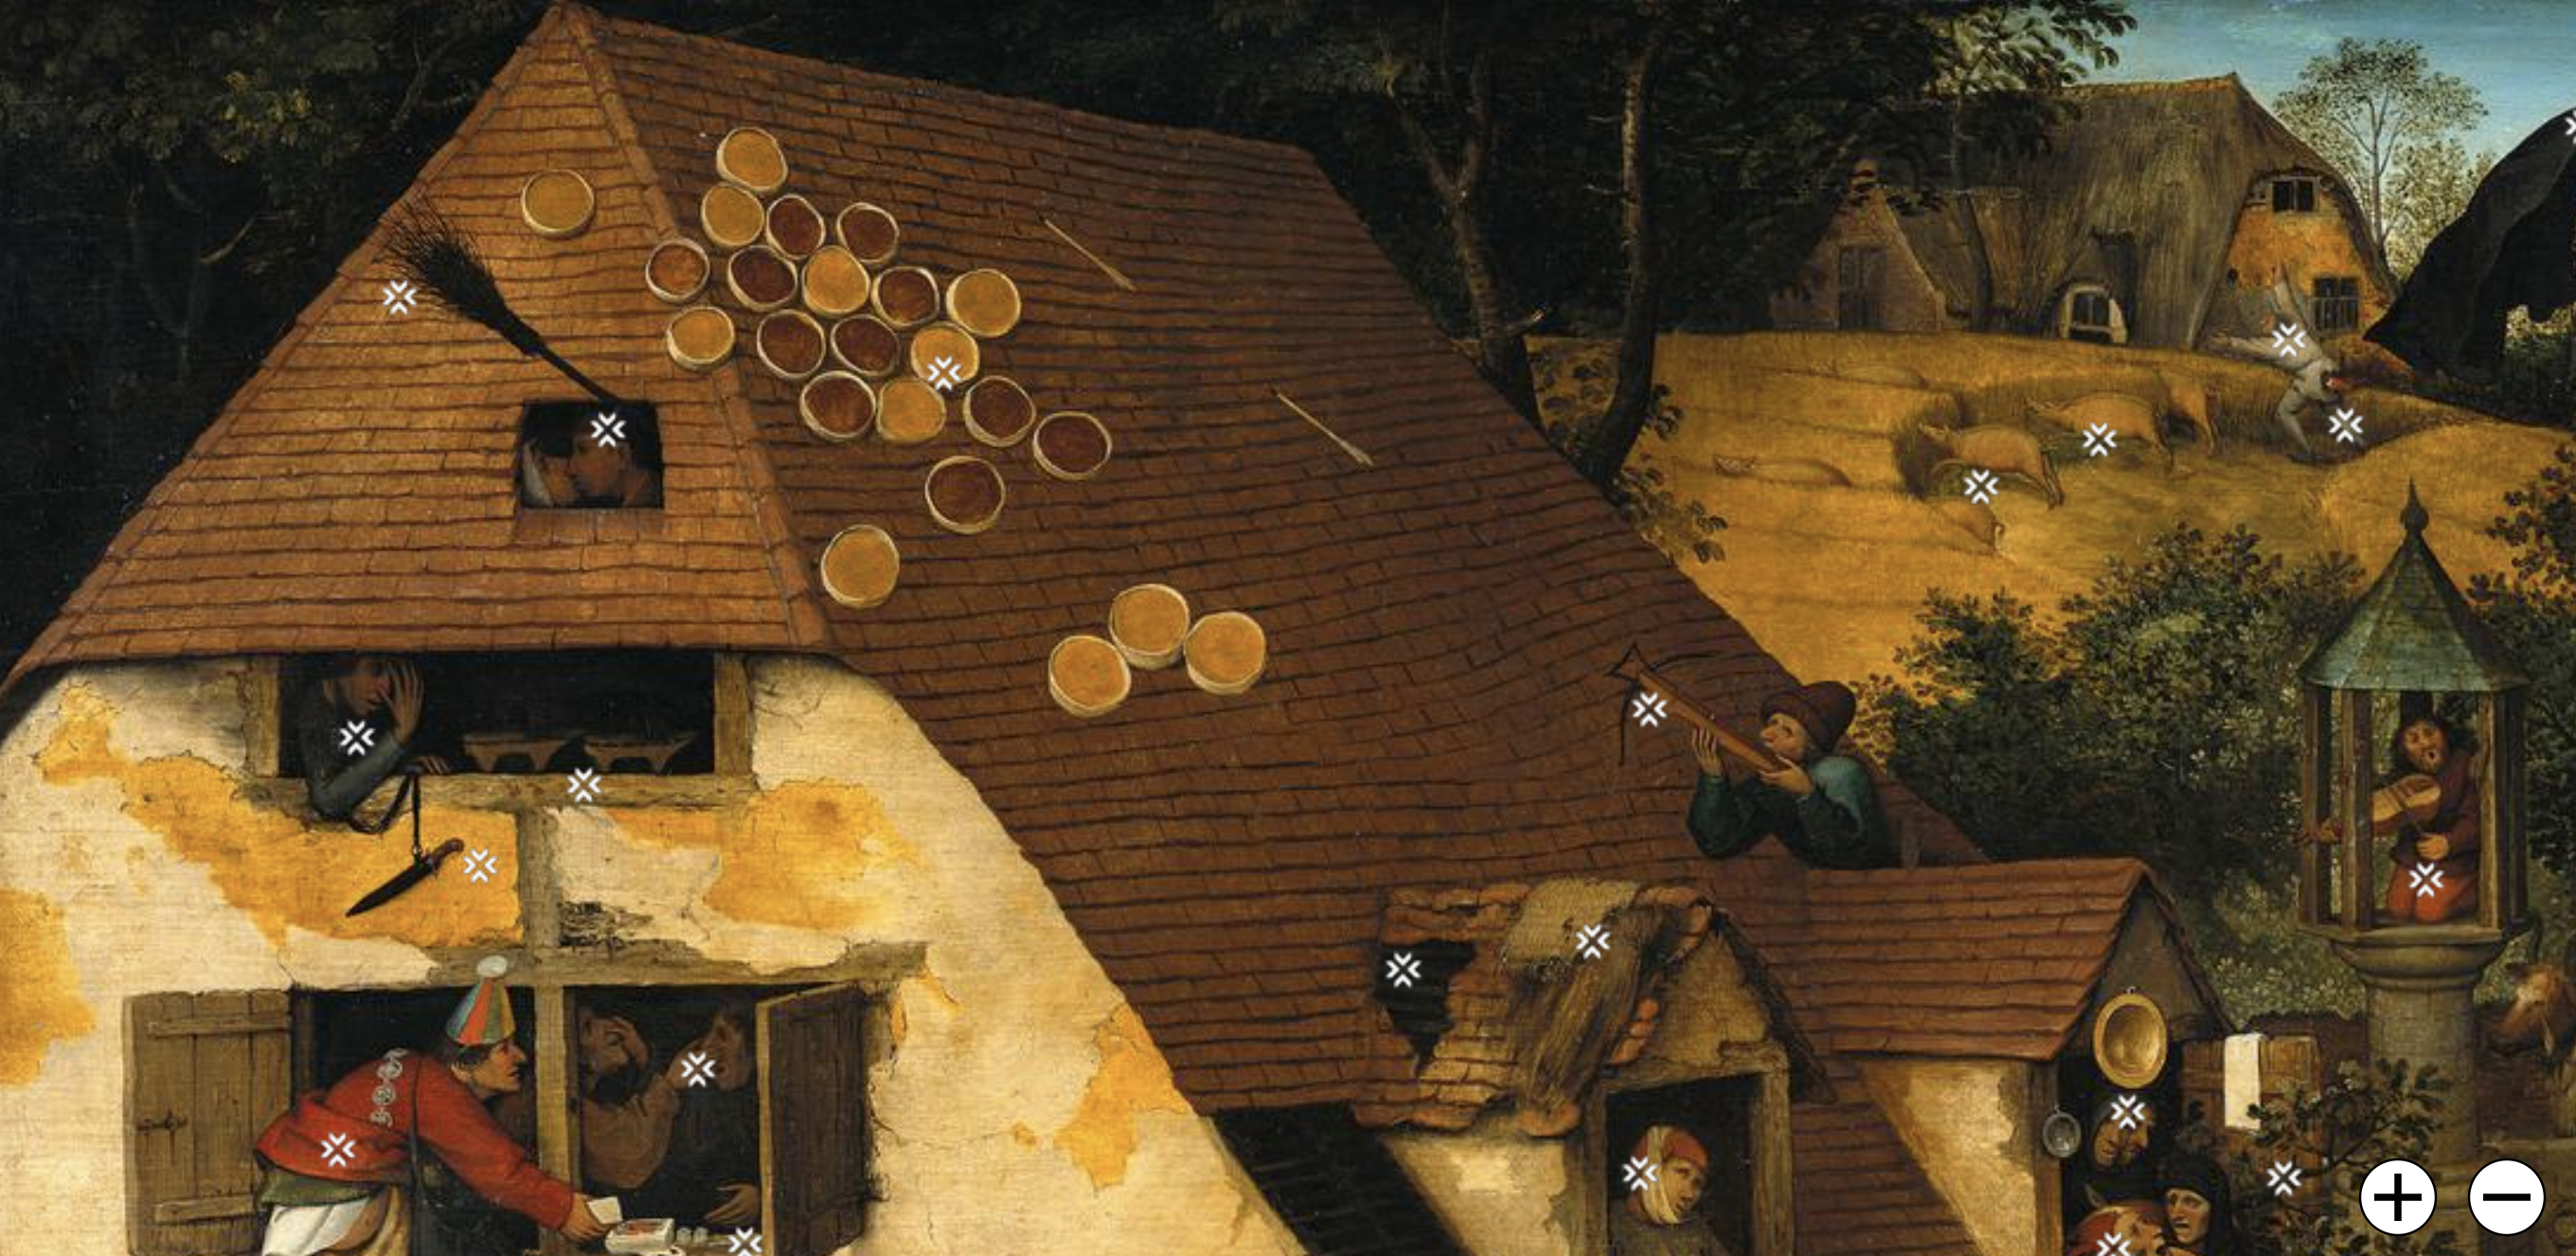
3. Create discovery images
Start the image-based activity at a certain focus point. Now, your students can pan around, zoom in and out to discover details of the image. Besides the visual details, your students can click indicated parts of the image to see an explanation.
Go check out the example below and discover this interactive poster or image. 👇
4. Create fun game boards
You can create incredible board games using a Hotspot Image. This game incorporates tasks such as creating a puzzle, drawing something, and solving a word search puzzle. All of these were also created with BookWidgets and added to the Hotspot Image widget. You can find images of board games like this in Canva. All you have to do is tailor it to your needs. Then, add the interactive activities to your game. Make sure to include lesson materials so students can practice newly learned vocabulary or repeat a new topic.
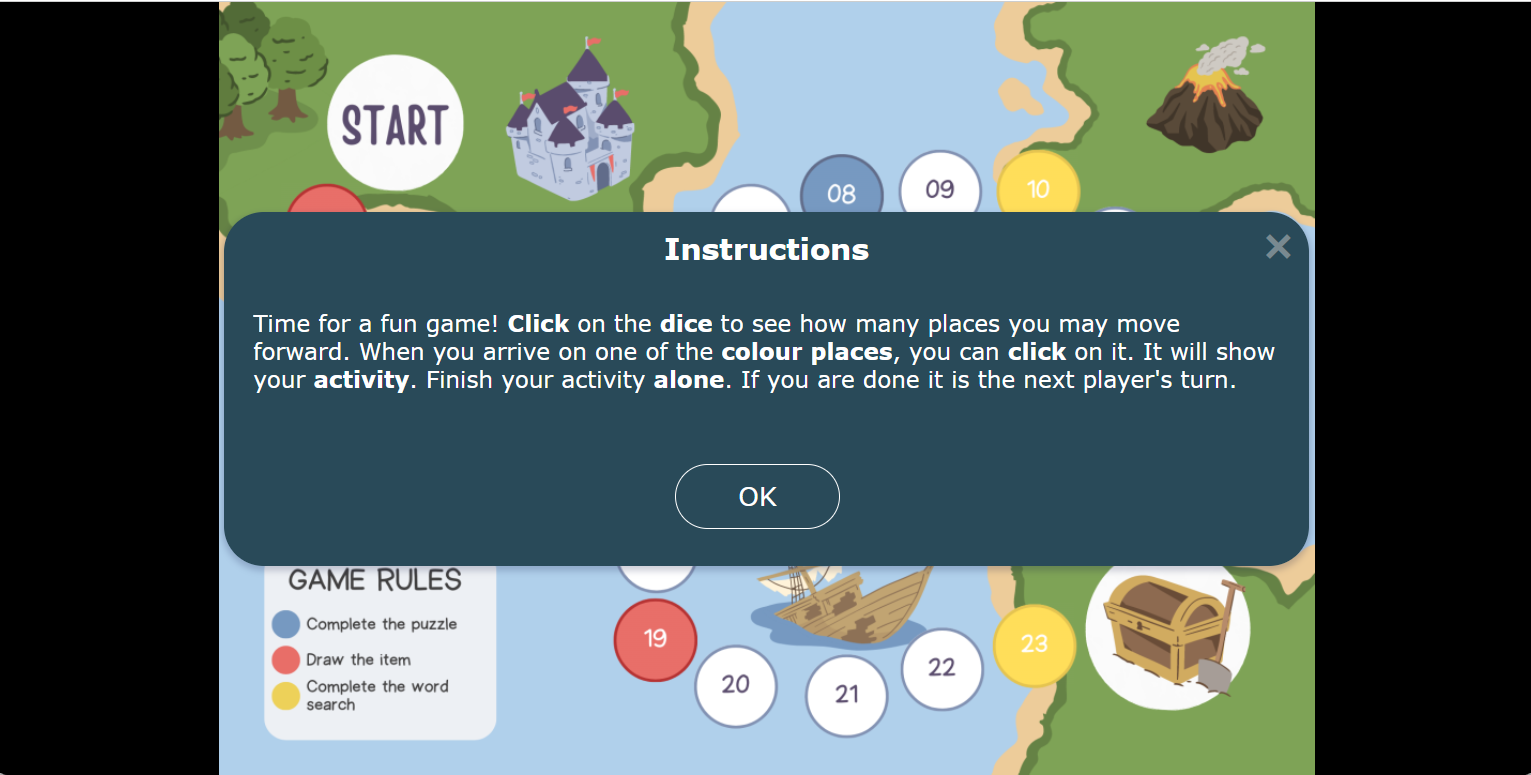
💡 Pro tip: assemble multiple visuals to create an entire game board with rules, card decks, and pawns like in the Easter board game example, made with a Hotspot Image Widget.

The Image carousel Widget
Create an image slideshow on steroids. Add text or image hotspots on multiple images that students can click, and map the images to an associated location on Google Maps.
5. Connect landmarks to a map
Using the Image Carousel Widget in BookWidgets, you can engage students in identifying images of landmarks by matching them with a map. This interactive activity fosters geographical knowledge and cultural awareness. It’s a dynamic way to explore the world’s iconic sites while reinforcing map-reading skills. It’s also perfect for when you’re preparing a field trip!
Make sure to check out the example below to see what this interactive image activity can do 👇
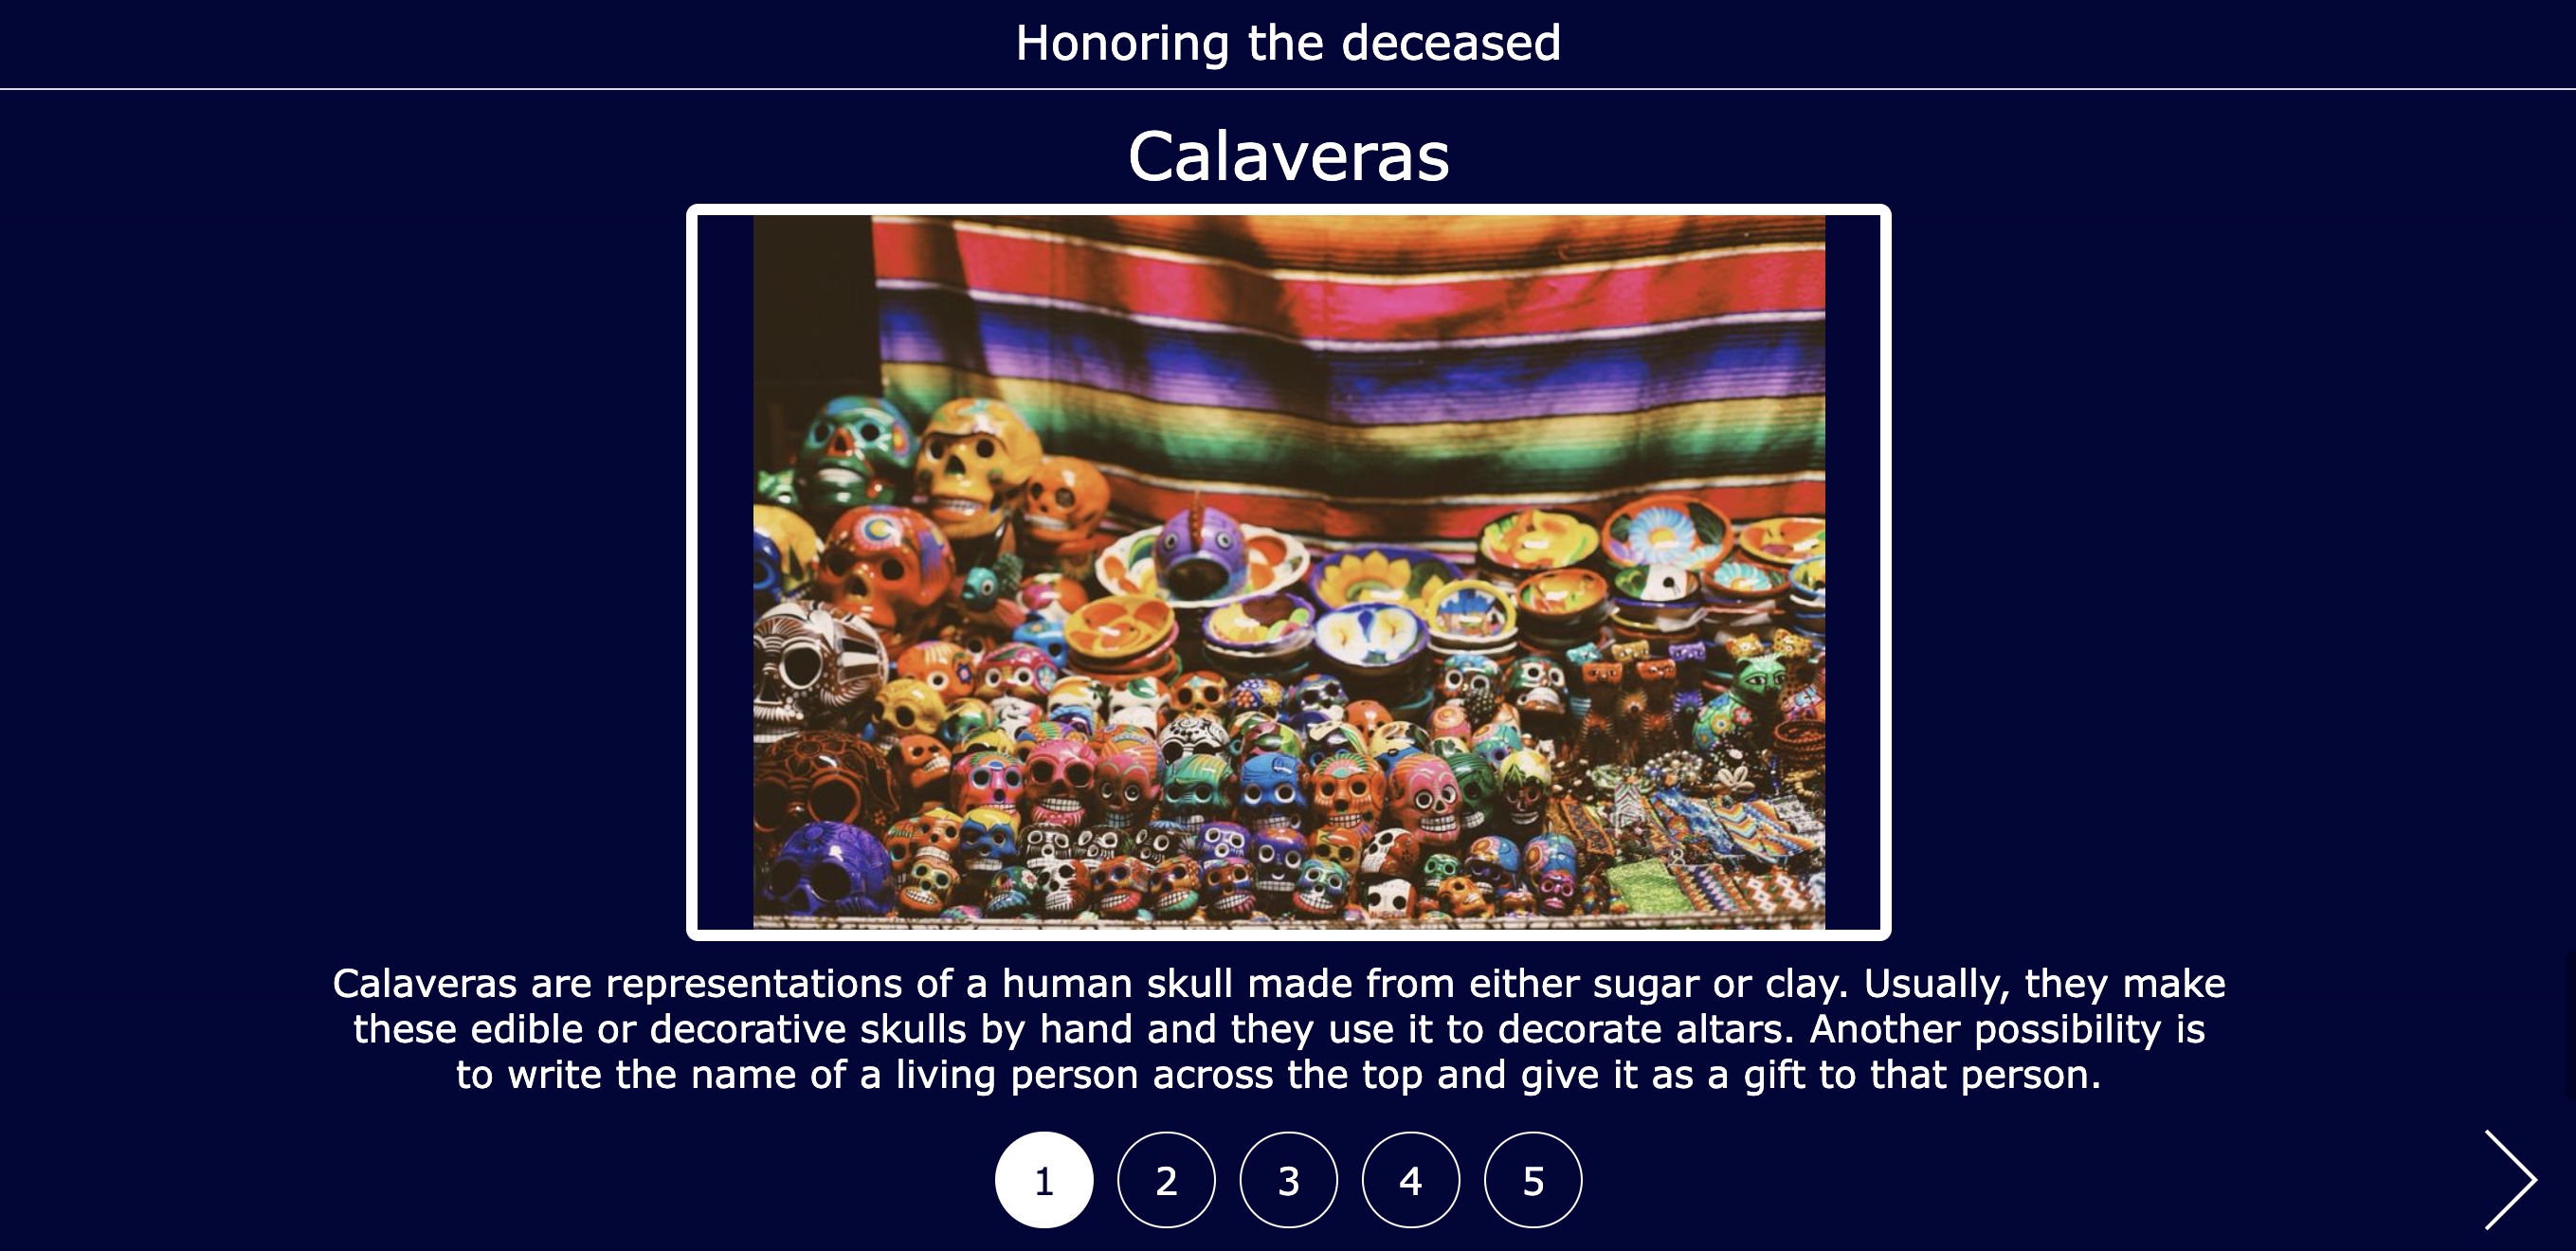
6. Connect natural phenomenons to a map
They can curate a selection of images showcasing various natural phenomena such as waterfalls, volcanoes, and auroras. Using text or image hotspots, teachers can add contextual information or related facts for each phenomenon. Students can then interact with the images, clicking on hotspots to learn more about each phenomenon. Finally, by mapping the images to associated locations on Google Maps, students can visualize the geographical distribution of these natural wonders, enhancing their understanding of Earth’s diverse landscapes.
7. Create a fun slideshow
The Image Carousel activity can also be used by teachers to design an engaging multimedia presentation. They can compile a collection of images representing a theme, topic, or story. By adding text or image hotspots, teachers can incorporate additional context, explanations, or interactive elements into each slide. Students can then navigate through the slideshow, clicking on hotspots to reveal hidden information, ask questions, or multimedia content. This interactive approach not only enhances student engagement but also encourages active participation and a deeper understanding of the subject matter.
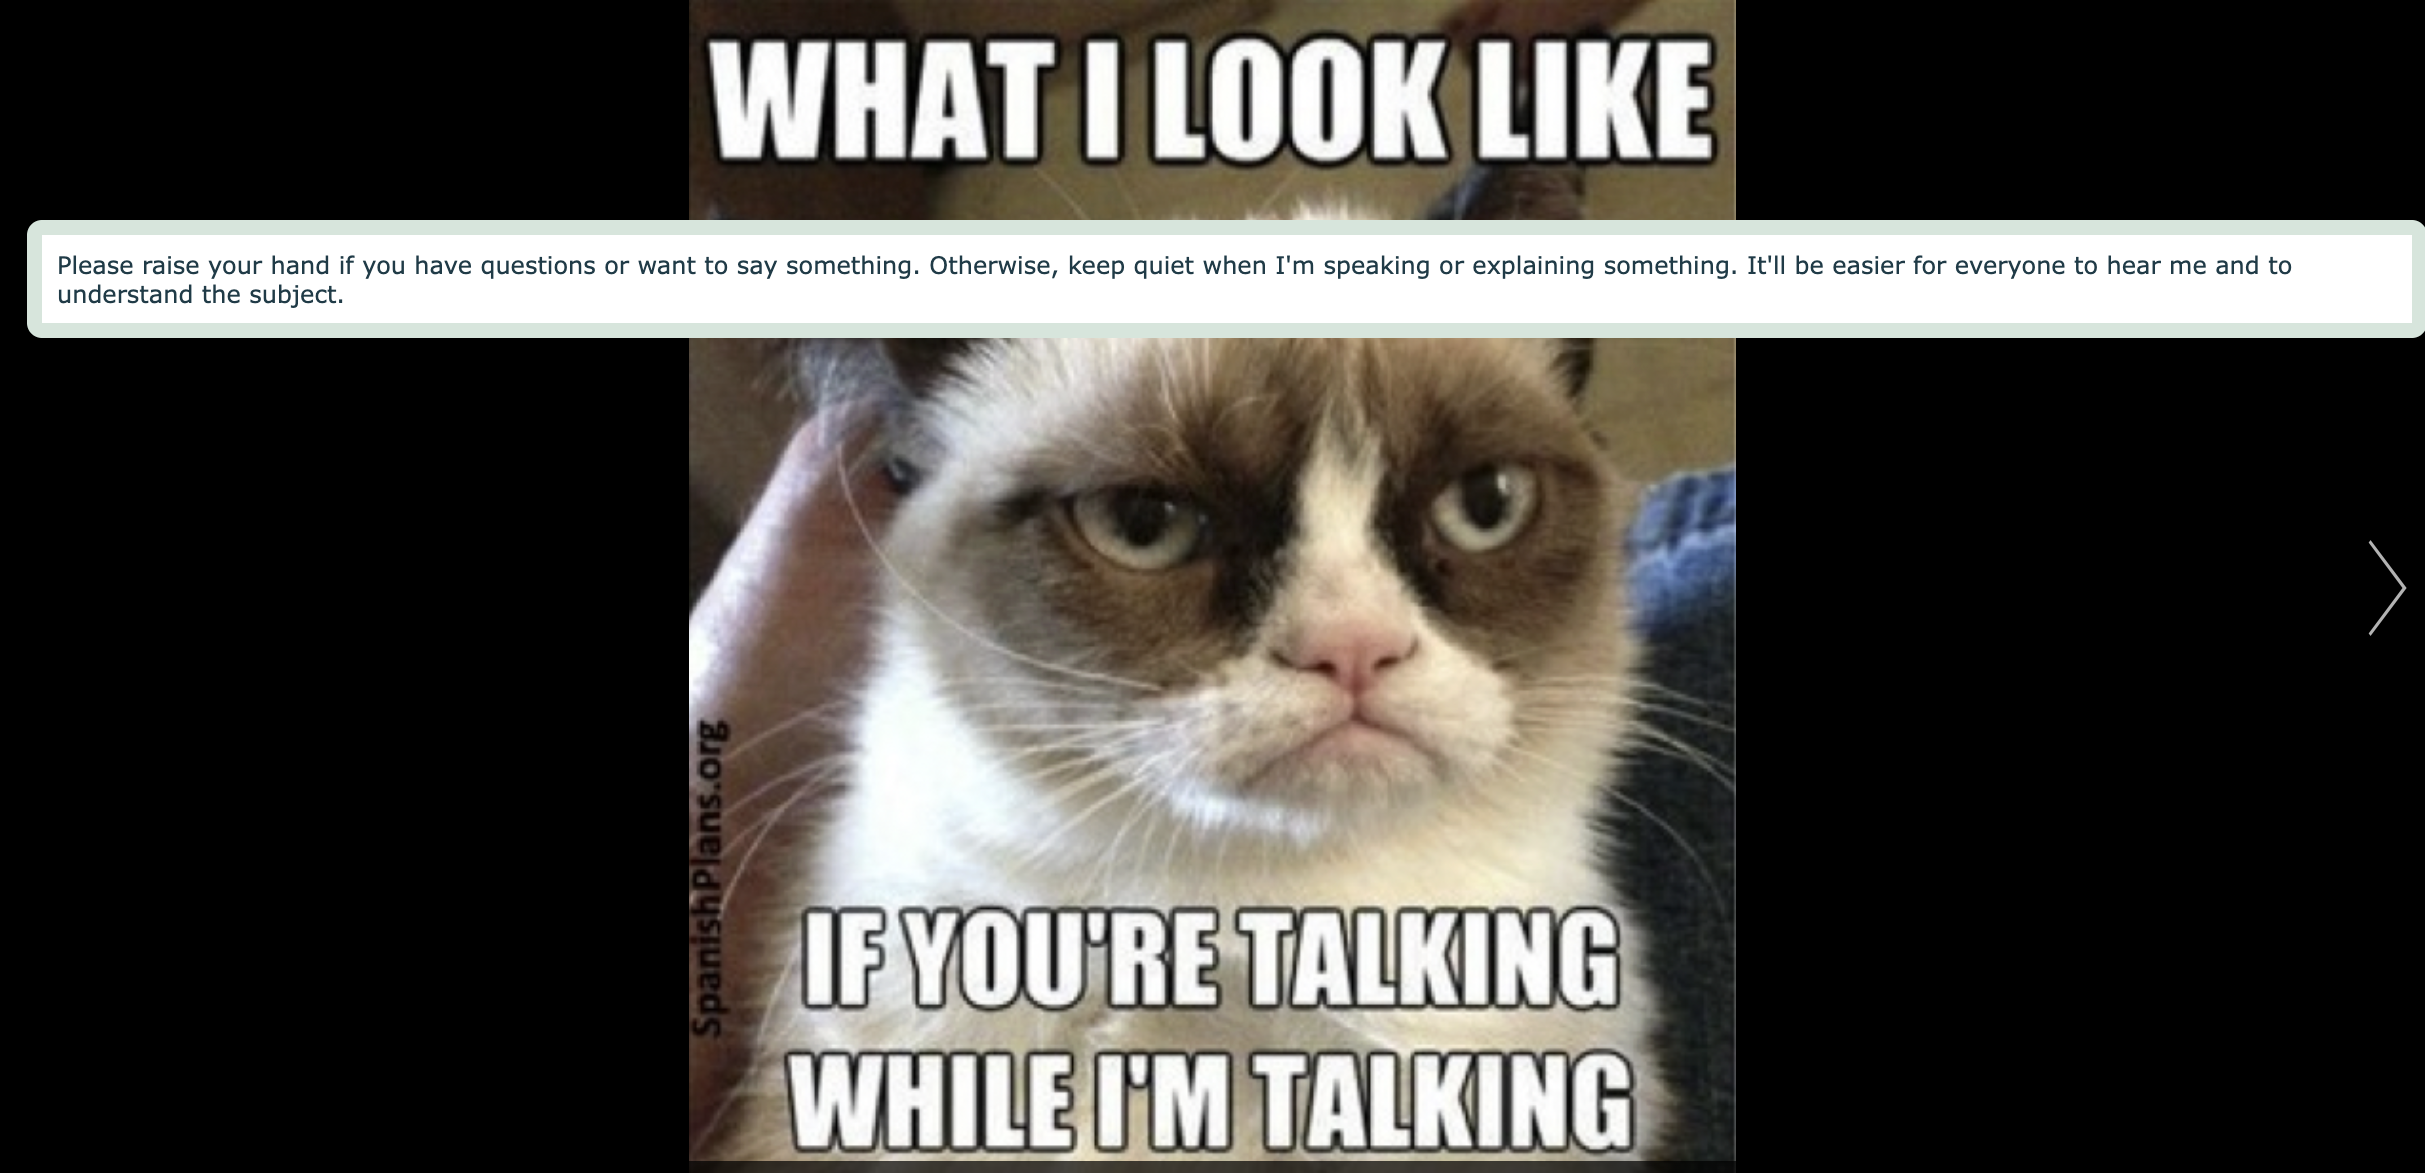
And if you love memes, you’re going to love the interactive slideshow below! Explaining your classroom rules is now a fun thing to do! 👇

The Random Images Widget
Guide fun speaking exercises or discussions by presenting students with one or more random images. Students can click the “randomness” icon that will reveal some new images.
8. Inspire students with random images
Use a simple Random Images widget to spark creativity and critical thinking. Present your students with a series of diverse images, ranging from landscapes to abstract art. Utilizing these images as prompts, teachers can guide speaking or writing exercises and discussions that encourage students to express their thoughts, opinions, and interpretations. This activity fosters imagination, prompts spontaneous conversation, and cultivates observational skills. By engaging with random images, students are inspired to explore new ideas, make connections, and develop their communication abilities in an enjoyable and thought-provoking way.
💡 Pro tip: Add instructions so students understand the assignment. You can also provide more information here, for example, an example of your own.
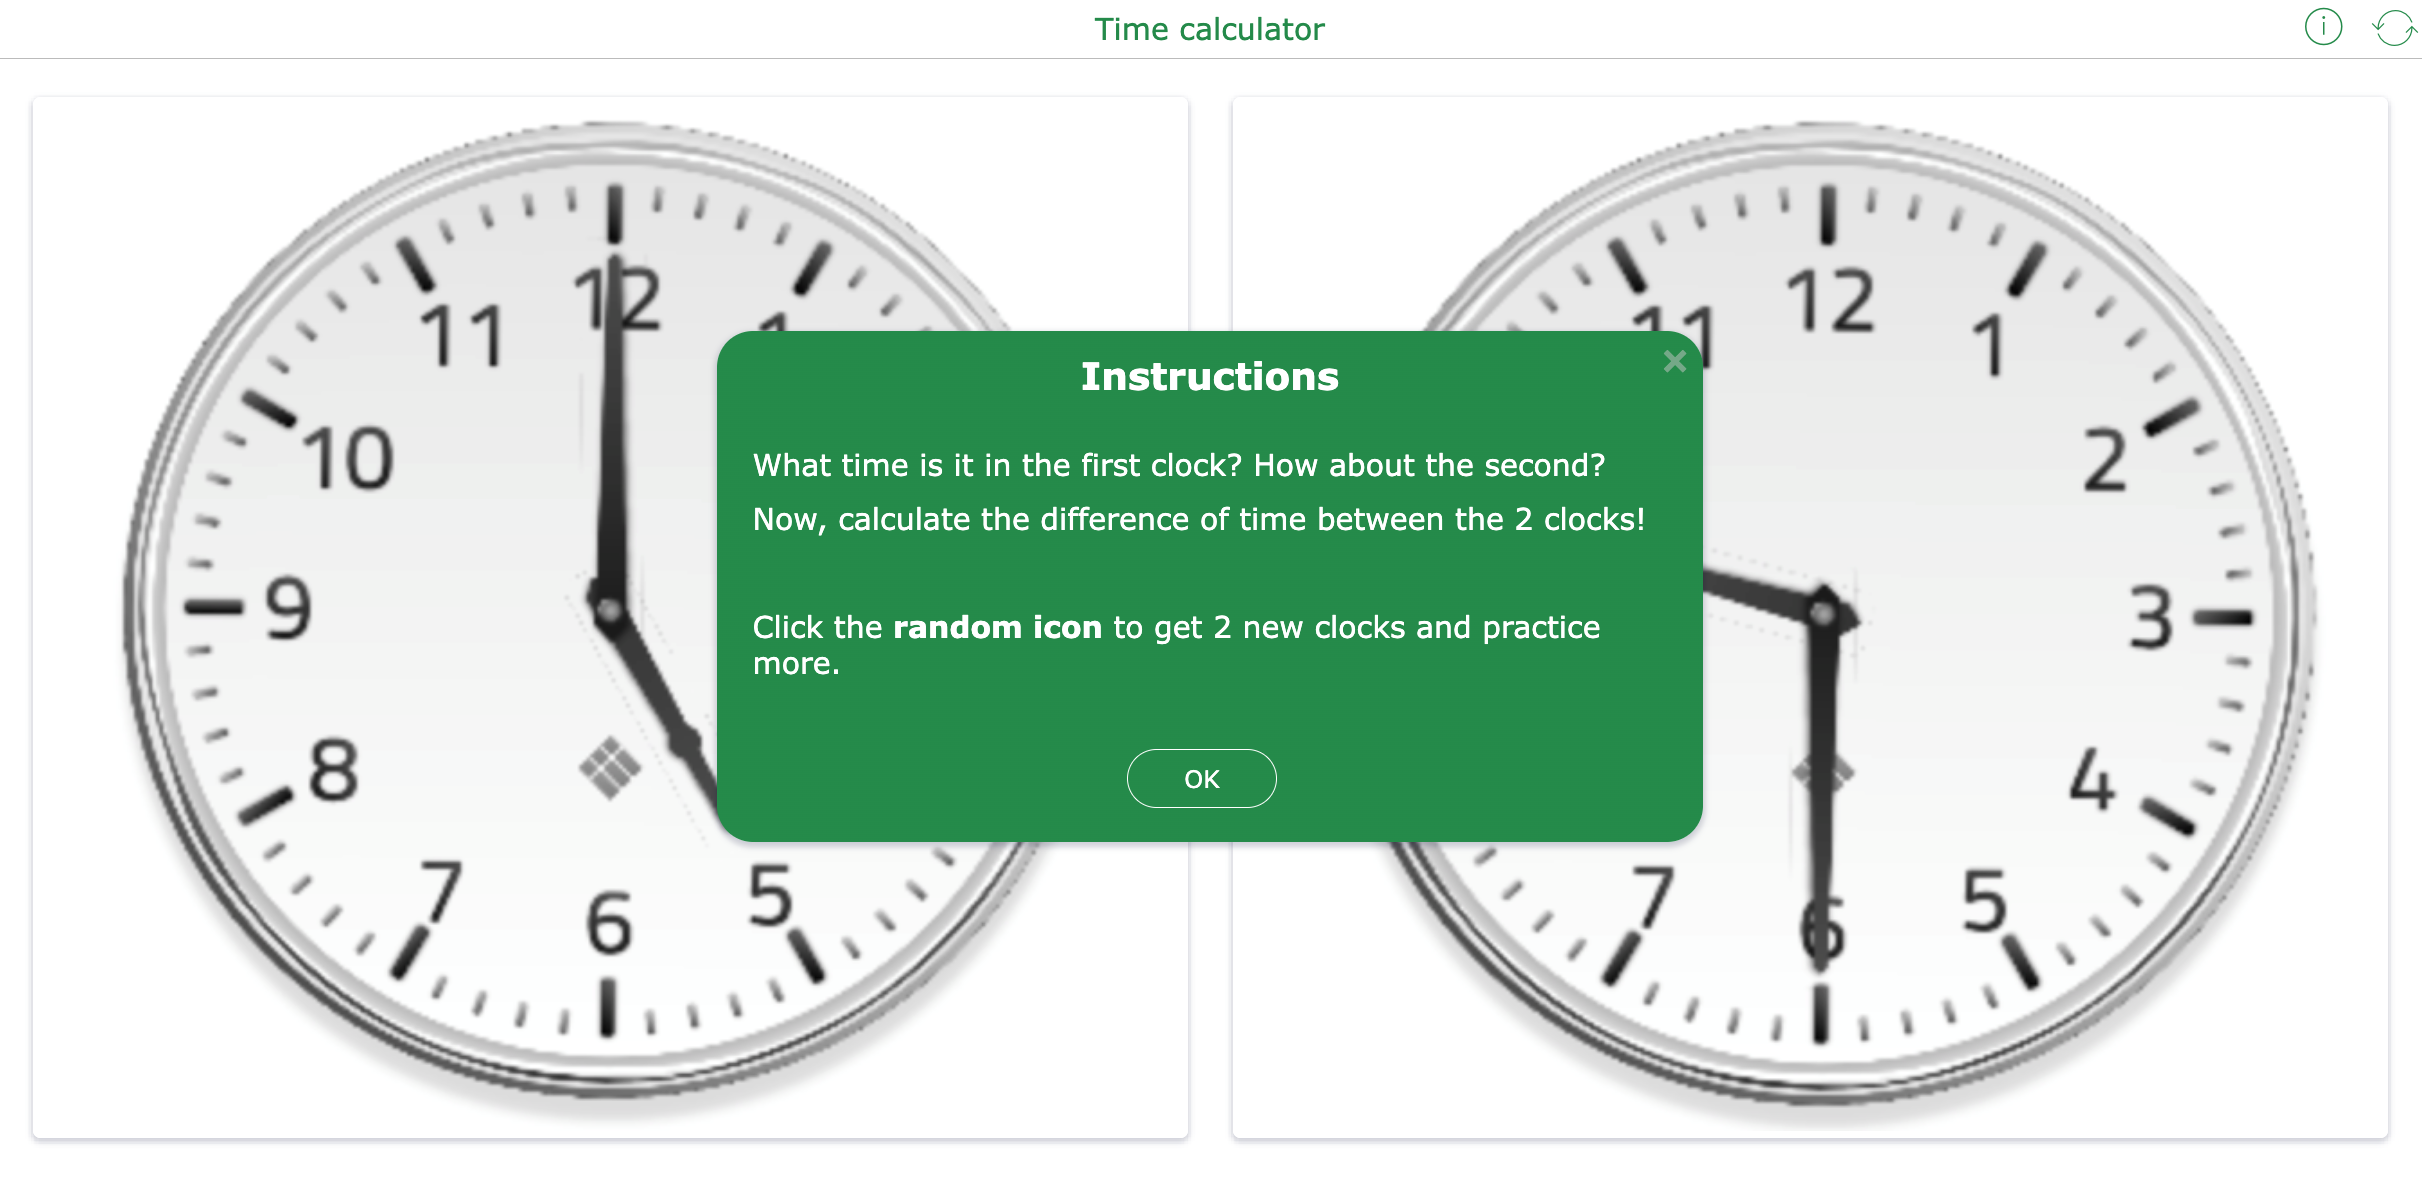
9. Let students indicate differences between images
A simple image activity like this can facilitate comparative analysis of the learning materials and problem-solving. By presenting students with two random images, such as clocks displaying different times, teachers prompt students to identify and calculate the differences between them. This activity encourages critical thinking, time management skills, and mathematical reasoning. Students engage in hands-on learning as they analyze the visual information and apply their knowledge to solve real-world problems.
There are many more differences to discover between random images. In the following topics, your students apply the newly learned lesson materials to random images within a category:
- Landscapes: Show two different landscapes, such as a beach scene and a mountain view. Students can compare elements like terrain, vegetation, and weather conditions.
- Animals: Present images of two different animals, such as a lion and a tiger. Students can observe differences in species characteristics, fur patterns, and habitat preferences.
- Food: Display pictures of two different dishes, like pizza and sushi. Students can identify variations in ingredients, cooking methods, and cultural influences.
- Vehicles: Show images of two different types of vehicles, such as a bicycle and a motorcycle. Students can compare features like wheels, handlebars, and engines.
- Architecture: Present pictures of two different buildings, such as a skyscraper and a historic castle. Students can analyze differences in architectural styles, materials used, and purposes of construction.
- Plants: Display images of two different plants, such as a rose bush and a palm tree. Students can observe variations in leaf shapes, flower types, and growth patterns.
- Weather: Show pictures of two different weather conditions, such as sunny and rainy days. Students can compare elements like sky color, cloud formations, and visibility.
10. Practice speaking skills
To practice speaking skills using the Random Images Widget, teachers can implement various activities that encourage verbal expression and communication. Make sure to check out the example below, where students are encouraged to use their newly learned vocabulary in a speaking activity about pets and animals. 👇
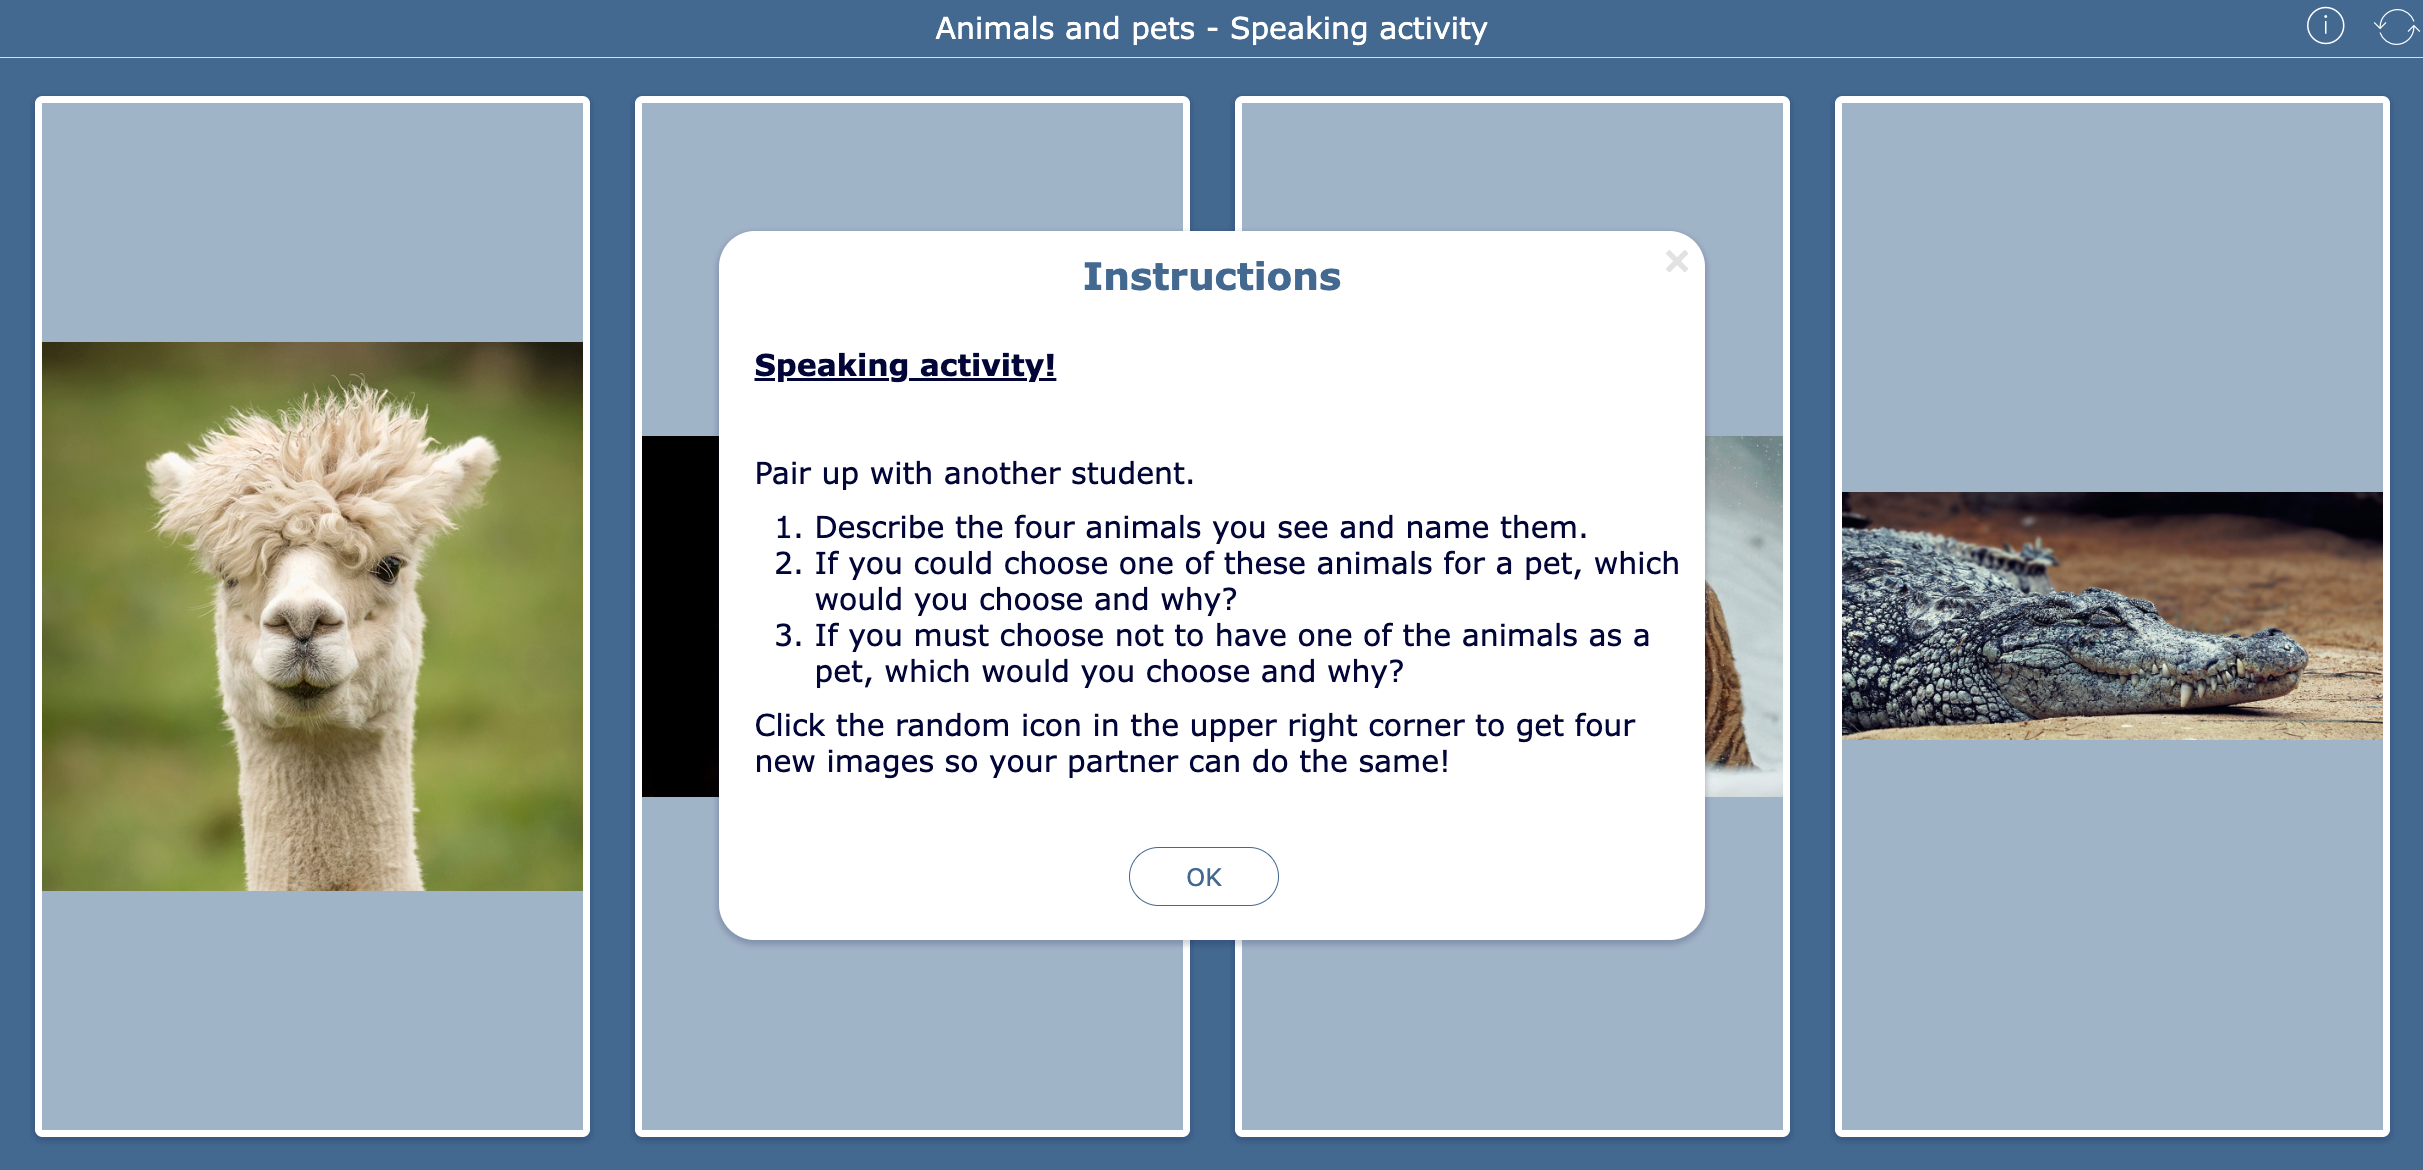
💡 Pro tip: You can show up to 9 random images in one view!
Here are some more ideas for speaking activities using the Random Images widget:
- Describe and Compare: Present two random images depicting different scenes, such as a city skyline and a rural landscape. Students take turns describing each image and then compare and contrast the two scenes, focusing on elements like environment, activities, and atmosphere.
- Tell a Story: Show two unrelated images, such as a beach scene and a snowy mountain. Students are prompted to create a story that connects both images, incorporating elements from each into their narrative. This activity encourages creativity and storytelling skills.
- Role-Playing Scenarios: Display images representing different scenarios or professions, like a doctor’s office and a classroom. Students can role-play conversations based on these settings, practicing language appropriate to each context and improving their interpersonal communication skills.
- Describe Emotions: Present images showing people displaying various emotions, such as happiness and sadness. Students describe the emotions depicted in each image and discuss possible reasons behind them, fostering empathy and emotional intelligence.
- Debate Topics: Show images representing opposing viewpoints or situations, such as a crowded city street and a peaceful park. Students can debate the advantages and disadvantages of each scenario, practicing persuasive speaking and critical thinking skills.
- Predict and Explain: Display images hinting at potential outcomes or consequences, such as a stormy sky and a person holding an umbrella. Students predict what might happen next based on each image and then explain their reasoning, enhancing their ability to make logical deductions and articulate their thoughts.

The Tip Tiles Widget
Create picture tiles with descriptions and multimedia elements like audio, video, or another widget.
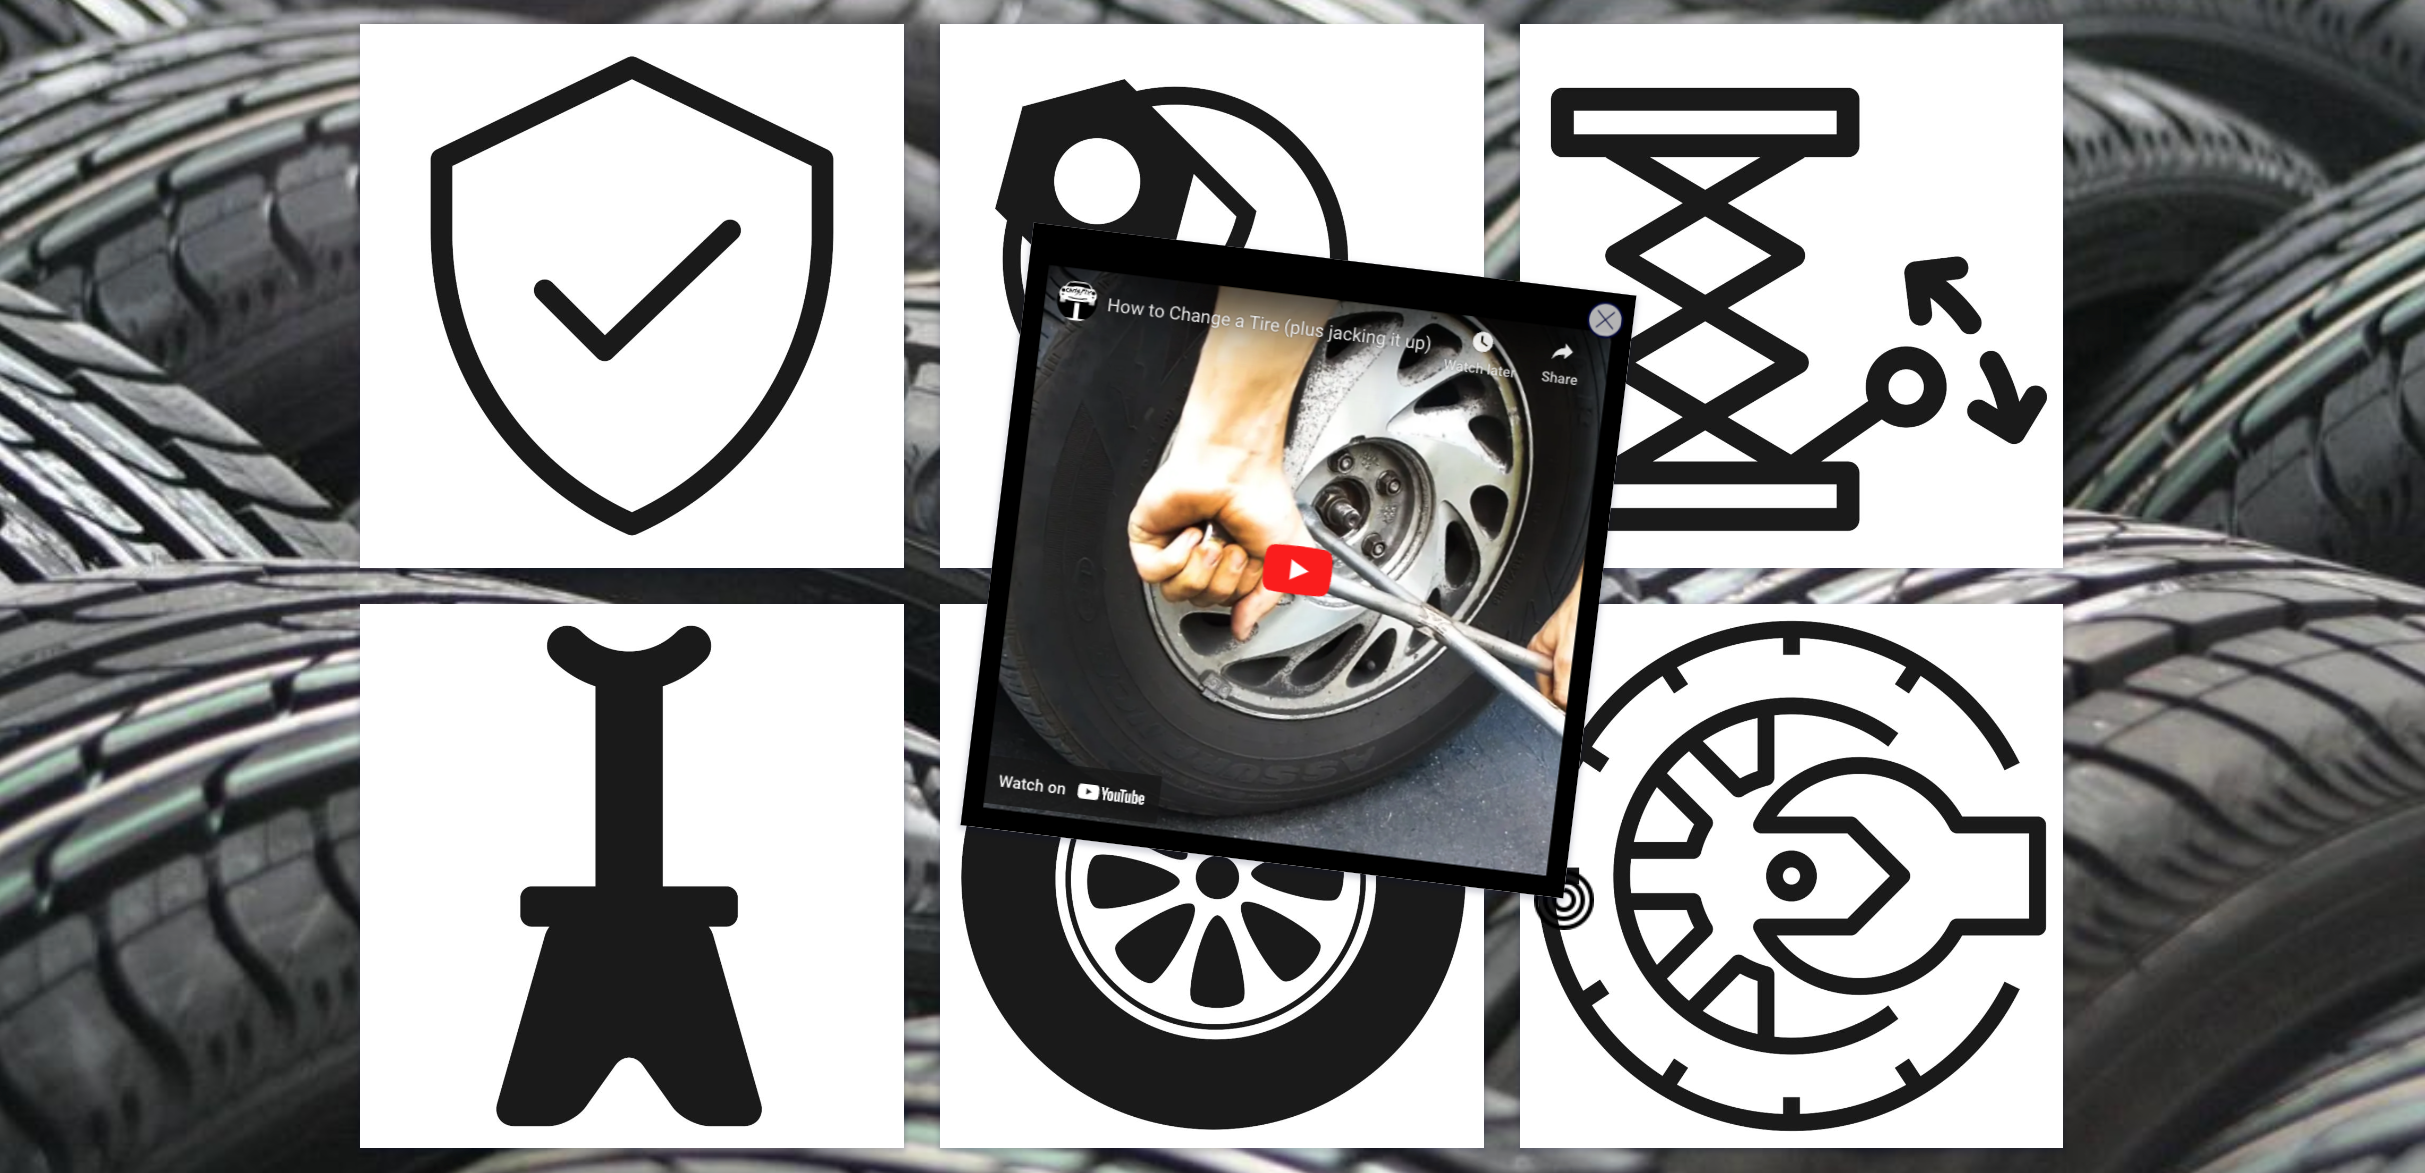
11. Create step-by-step video tutorials for students
Use a Tip Tiles widget to craft engaging and interactive instructional materials. Each picture tile serves as a step in the tutorial process, featuring detailed descriptions and multimedia elements such as audio or video instructions. Teachers can sequentially guide students through complex tasks or concepts, breaking them down into easily digestible segments. Students can explore the tutorial at their own pace, accessing additional resources or clarifications as needed. This activity fosters independent learning and empowers students to master new skills through immersive and dynamic educational content.
Make sure to check out this interactive Tip Tiles example widget showcasing a tutorial on changing a tire. 👇
12. Create video summaries for students
You can also use a Tip Tiles widget to develop concise and engaging video summaries of educational content. Each picture tile represents a key concept or section of the material, accompanied by descriptive text and multimedia elements like audio or video clips. Teachers can organize the tiles to provide a structured overview of the topic or course, ensuring students grasp the main points effectively. Students can navigate through the summary at their own pace — by tapping the tiles — to review specific sections or access additional resources as needed.
This activity facilitates comprehension and retention by presenting complex information in a visually appealing and accessible format. Click the example below for a History course summary!

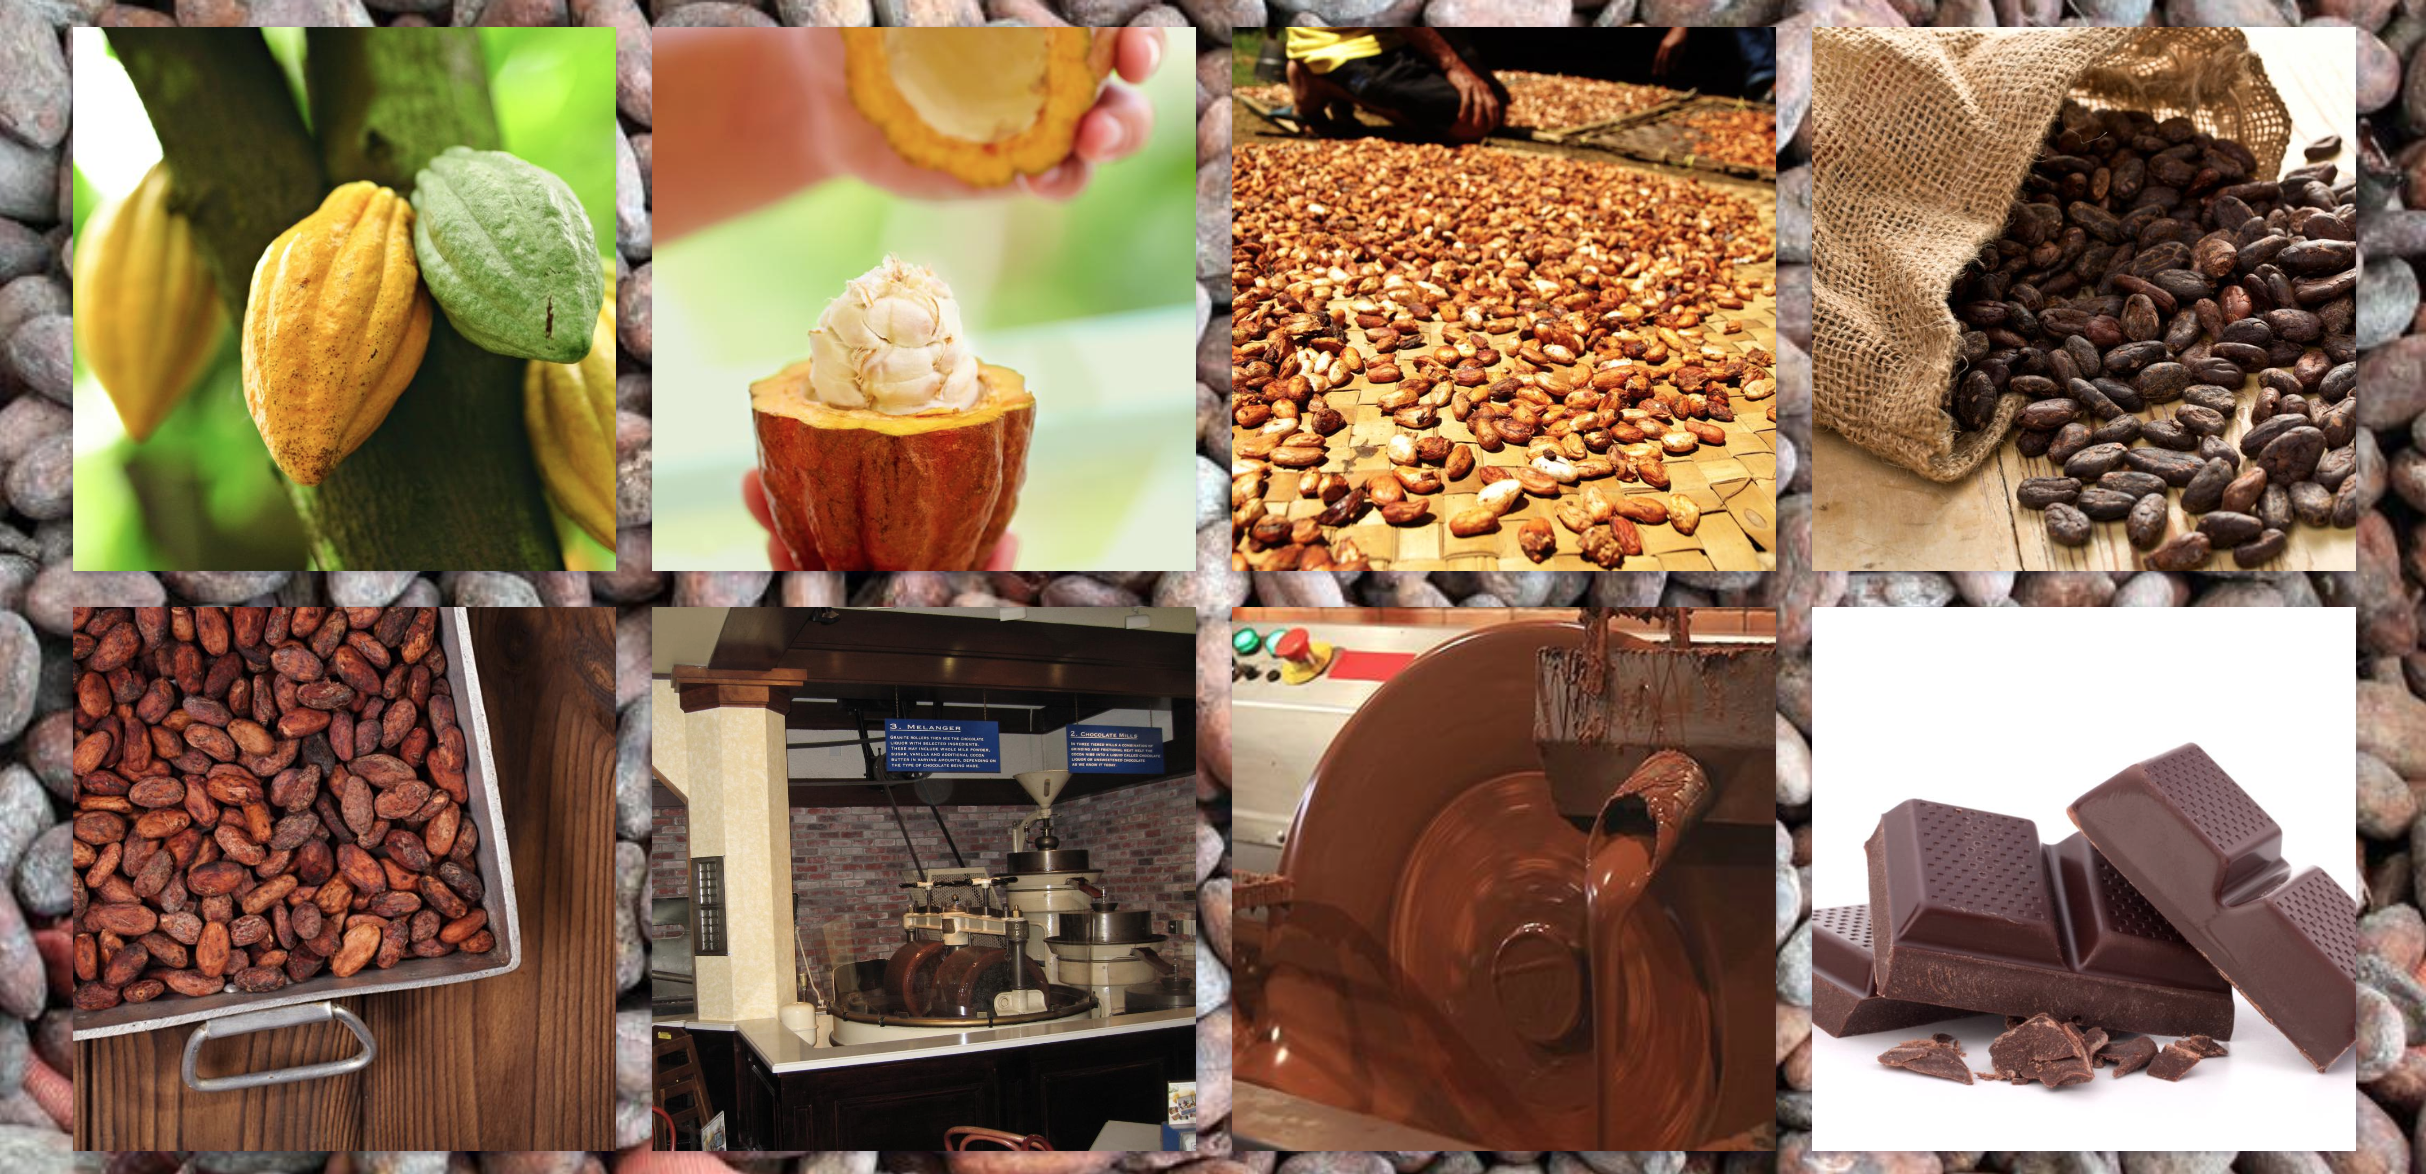
13. Visualize step-by-step processes
Using the interactive Tip Tiles widget, you can also create interactive guides for understanding sequential procedures or workflows. Each picture tile illustrates a specific step in the process, accompanied by descriptive text and multimedia elements like images or videos demonstrating the action. By arranging the tiles in chronological order, teachers can visually represent the entire sequence from start to finish. Students can follow along with the process at their own pace, reinforcing their understanding of each step through visual cues and supplementary materials.
This activity promotes hands-on learning and enhances comprehension by breaking down complex tasks into manageable, visually engaging components. Check out this image-based Tip Tiles lesson about the creation process of Chocolate.👇
💡 Pro tip: Break up 1 long video into multiple steps by defining a start and end stop time into the YouTube URL.

The Image Viewer Widget
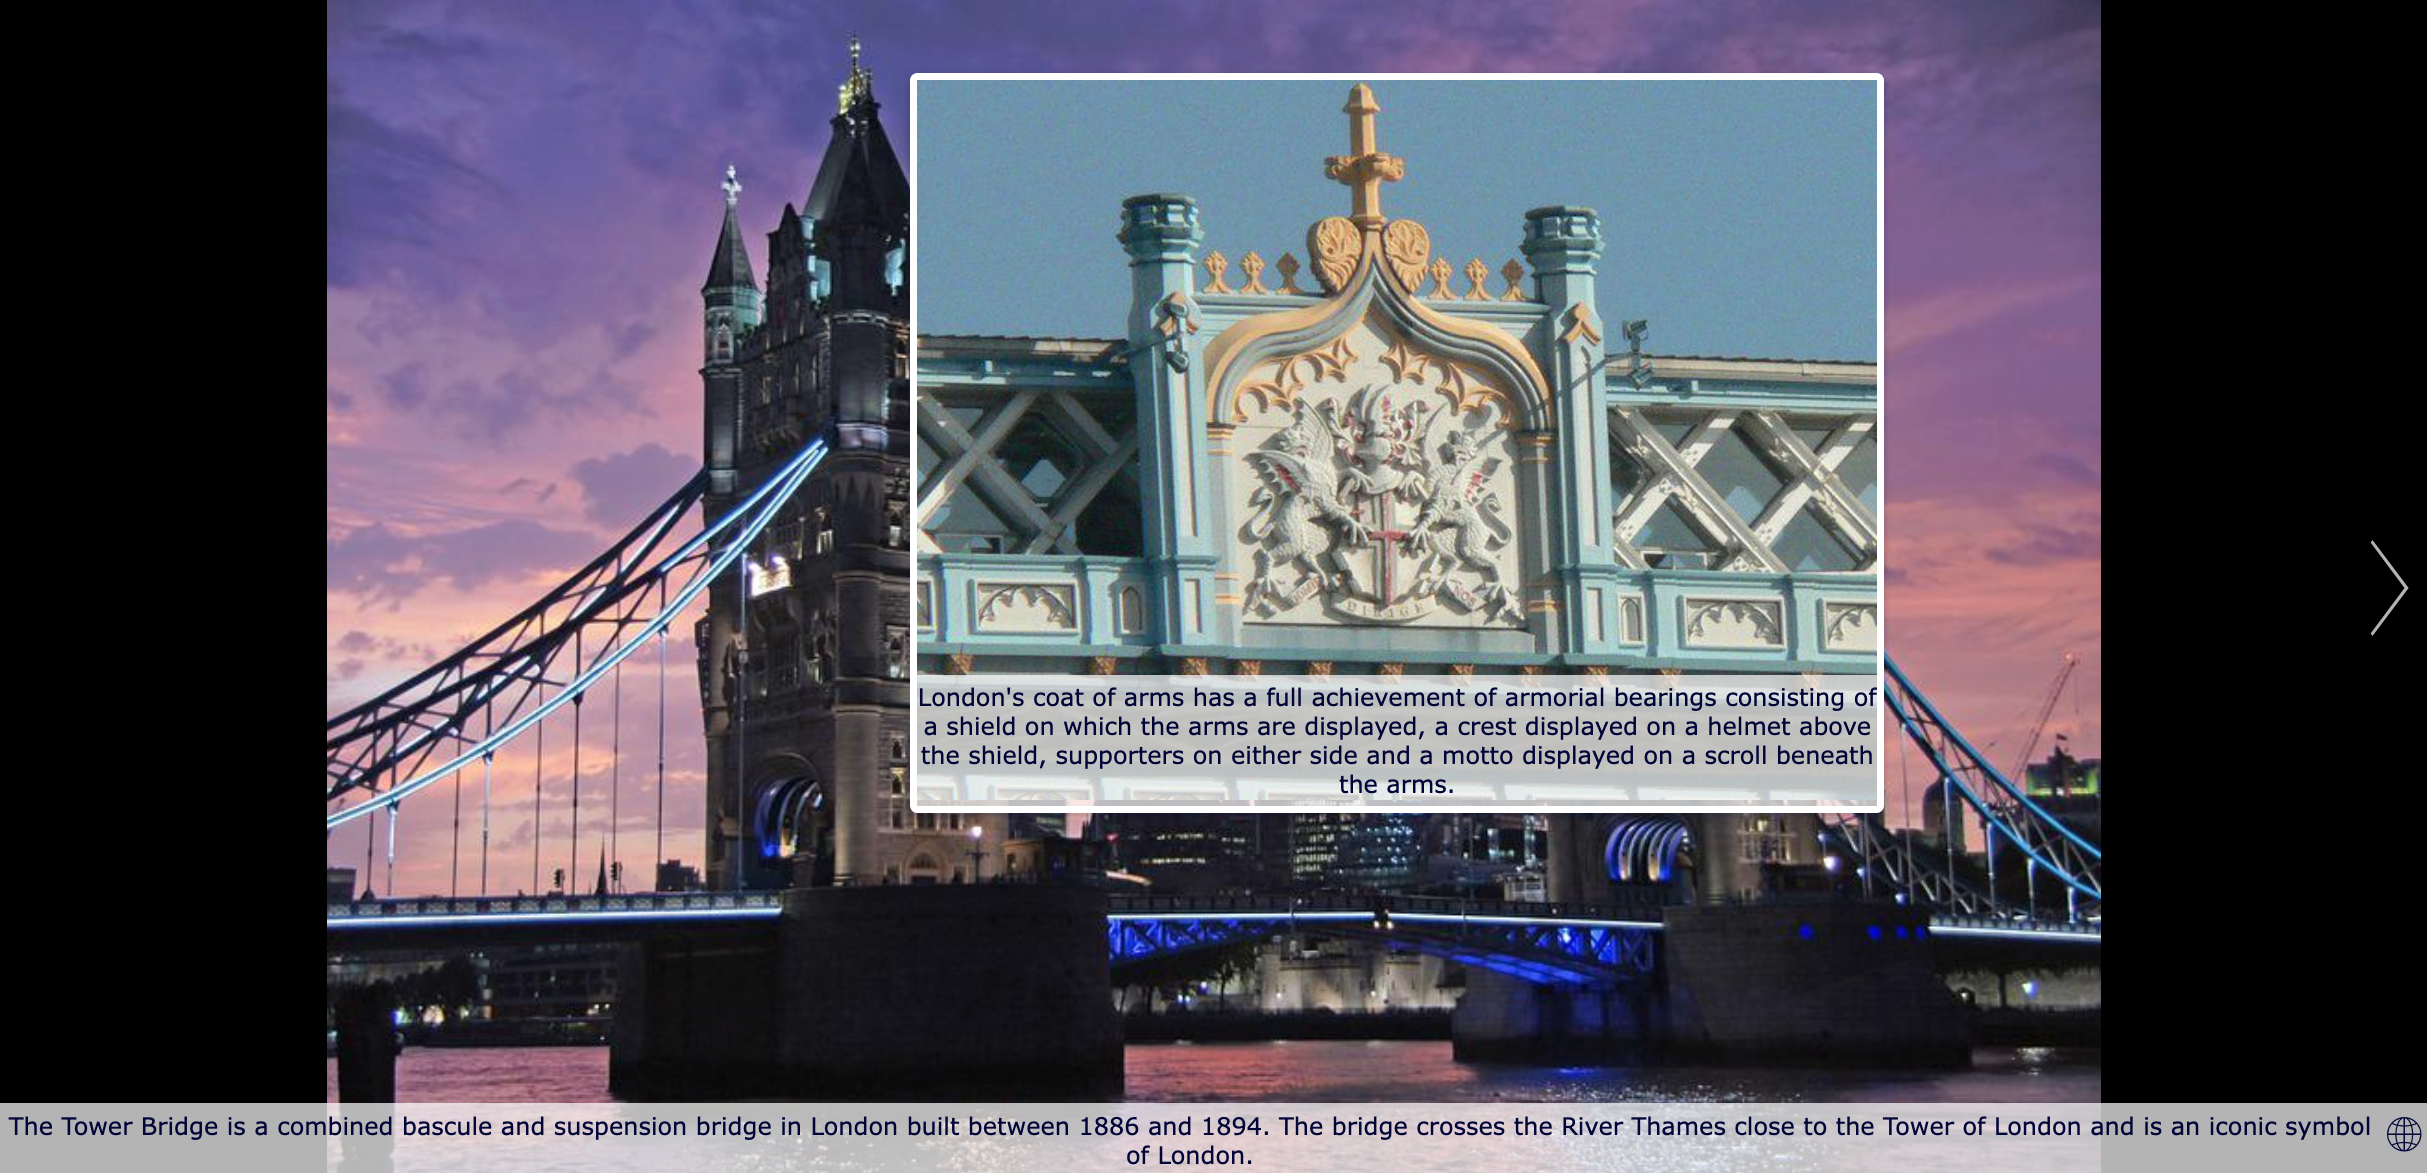
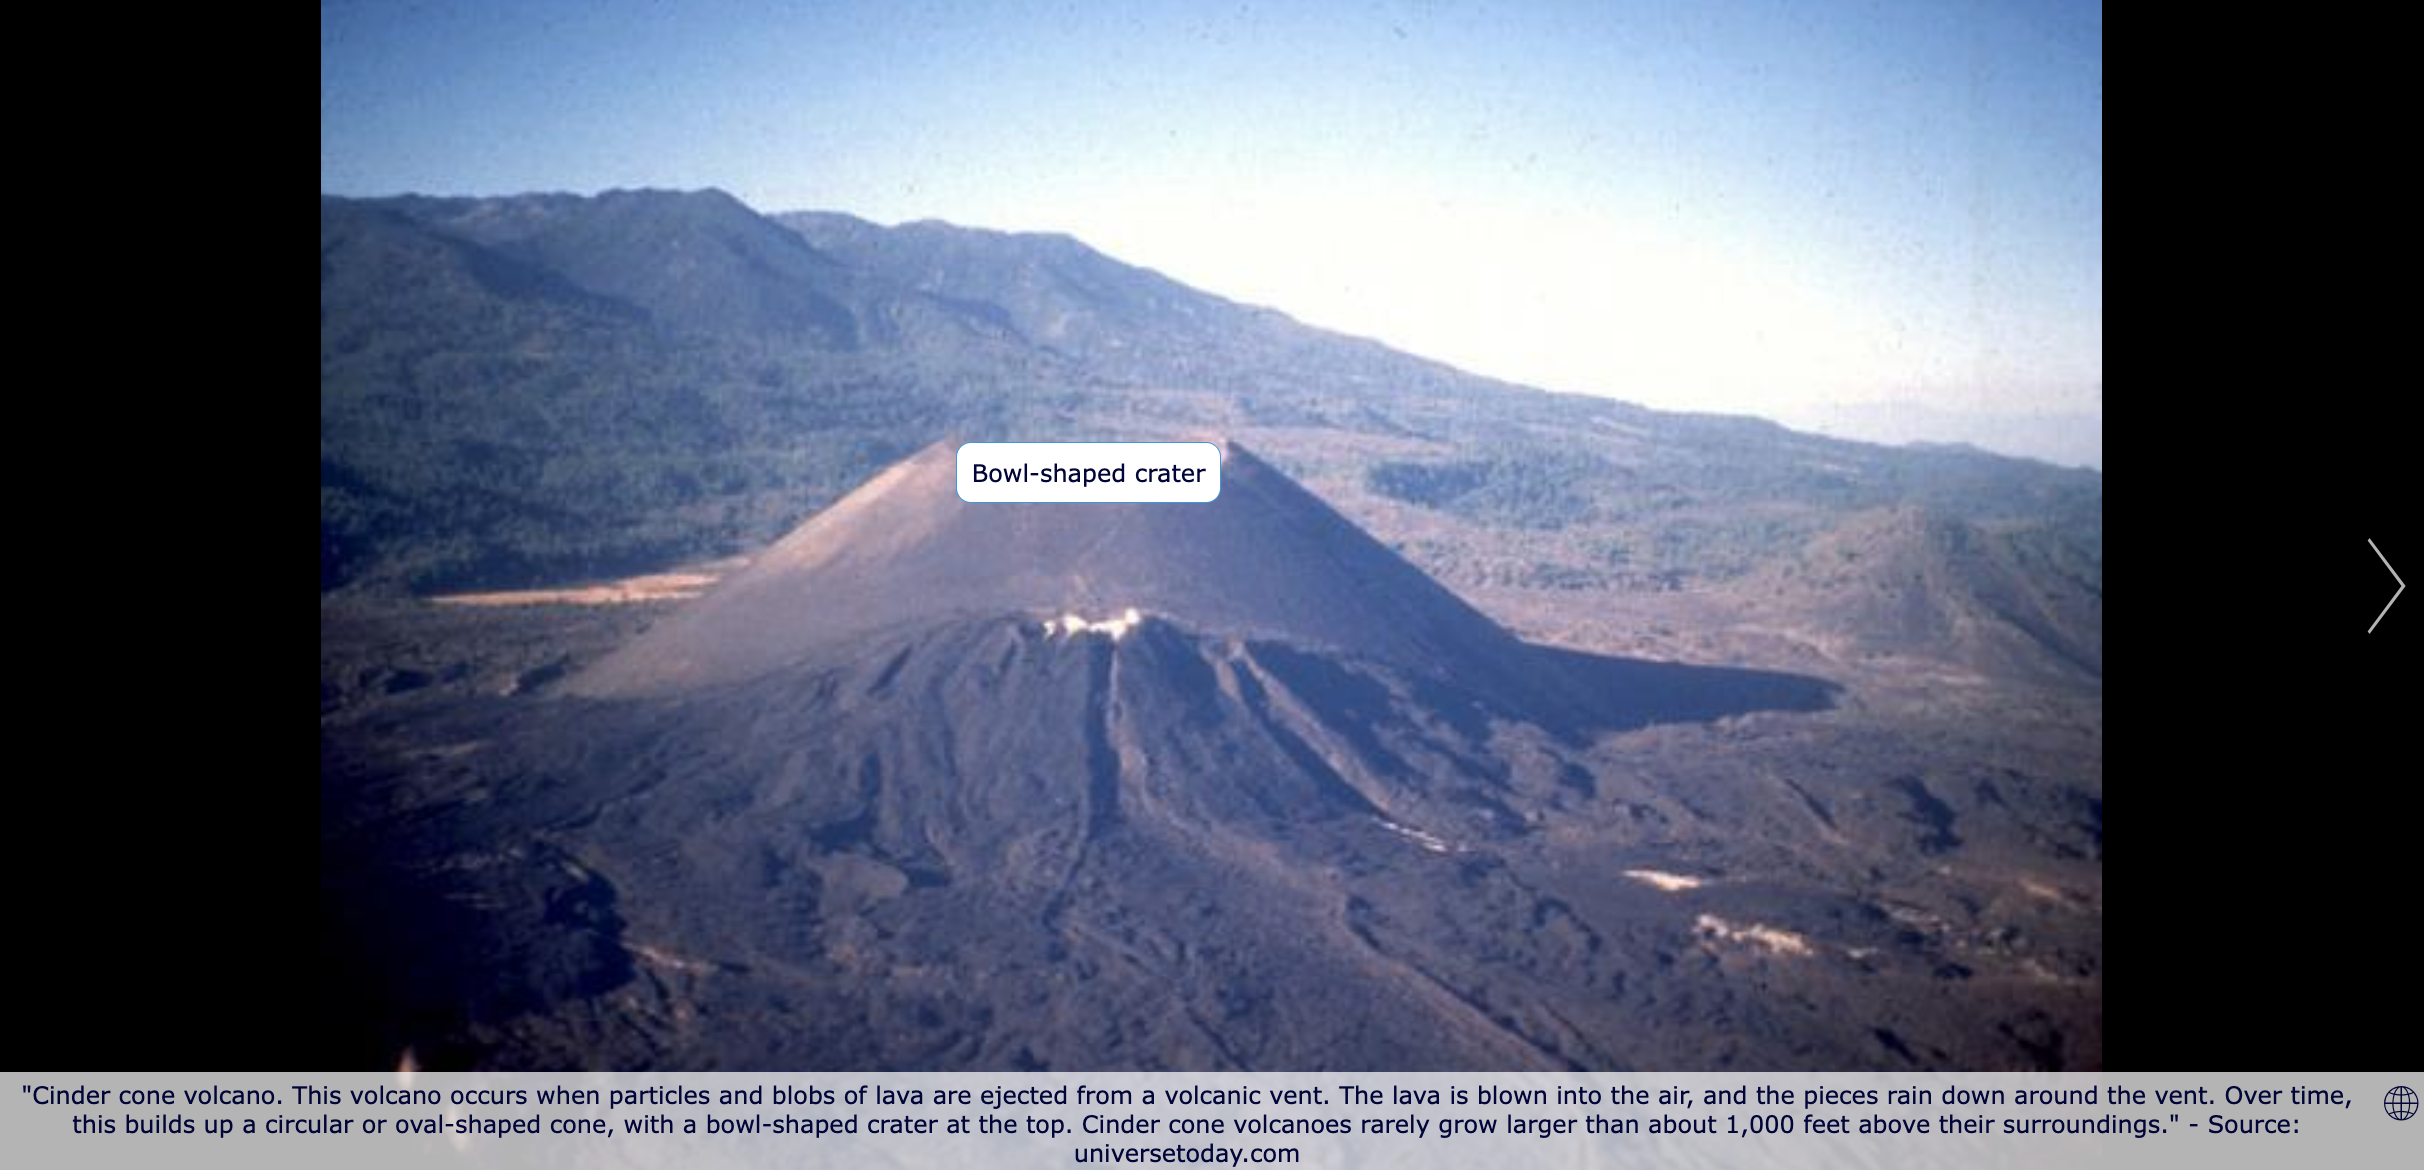
Let your students explore a large, high-resolution image. This image-based widget allows them to pan around and zoom in and out on specific areas.
14. Introduce a lesson topic with 1 meaningful image
Captivate your students’ attention from the start by presenting a single impactful image related to the lesson topic. This high-resolution image serves as a visual focal point, inviting students to explore its details through panning and zooming functionalities. Add a carefully selected image to encapsulate key themes, concepts, or historical events relevant to your lesson.
By immersing students in the visual representation of the topic, teachers set the stage for meaningful discussions and deeper engagement with the subject matter. This visual activity stimulates curiosity, encourages critical thinking, and lays a foundation for the exploration of complex ideas within the lesson.
In the lesson idea, you start your math lesson with 1 image. Here, students need to recognize the different shapes, and this image will be an introduction to calculating areas and perimeters. 👇
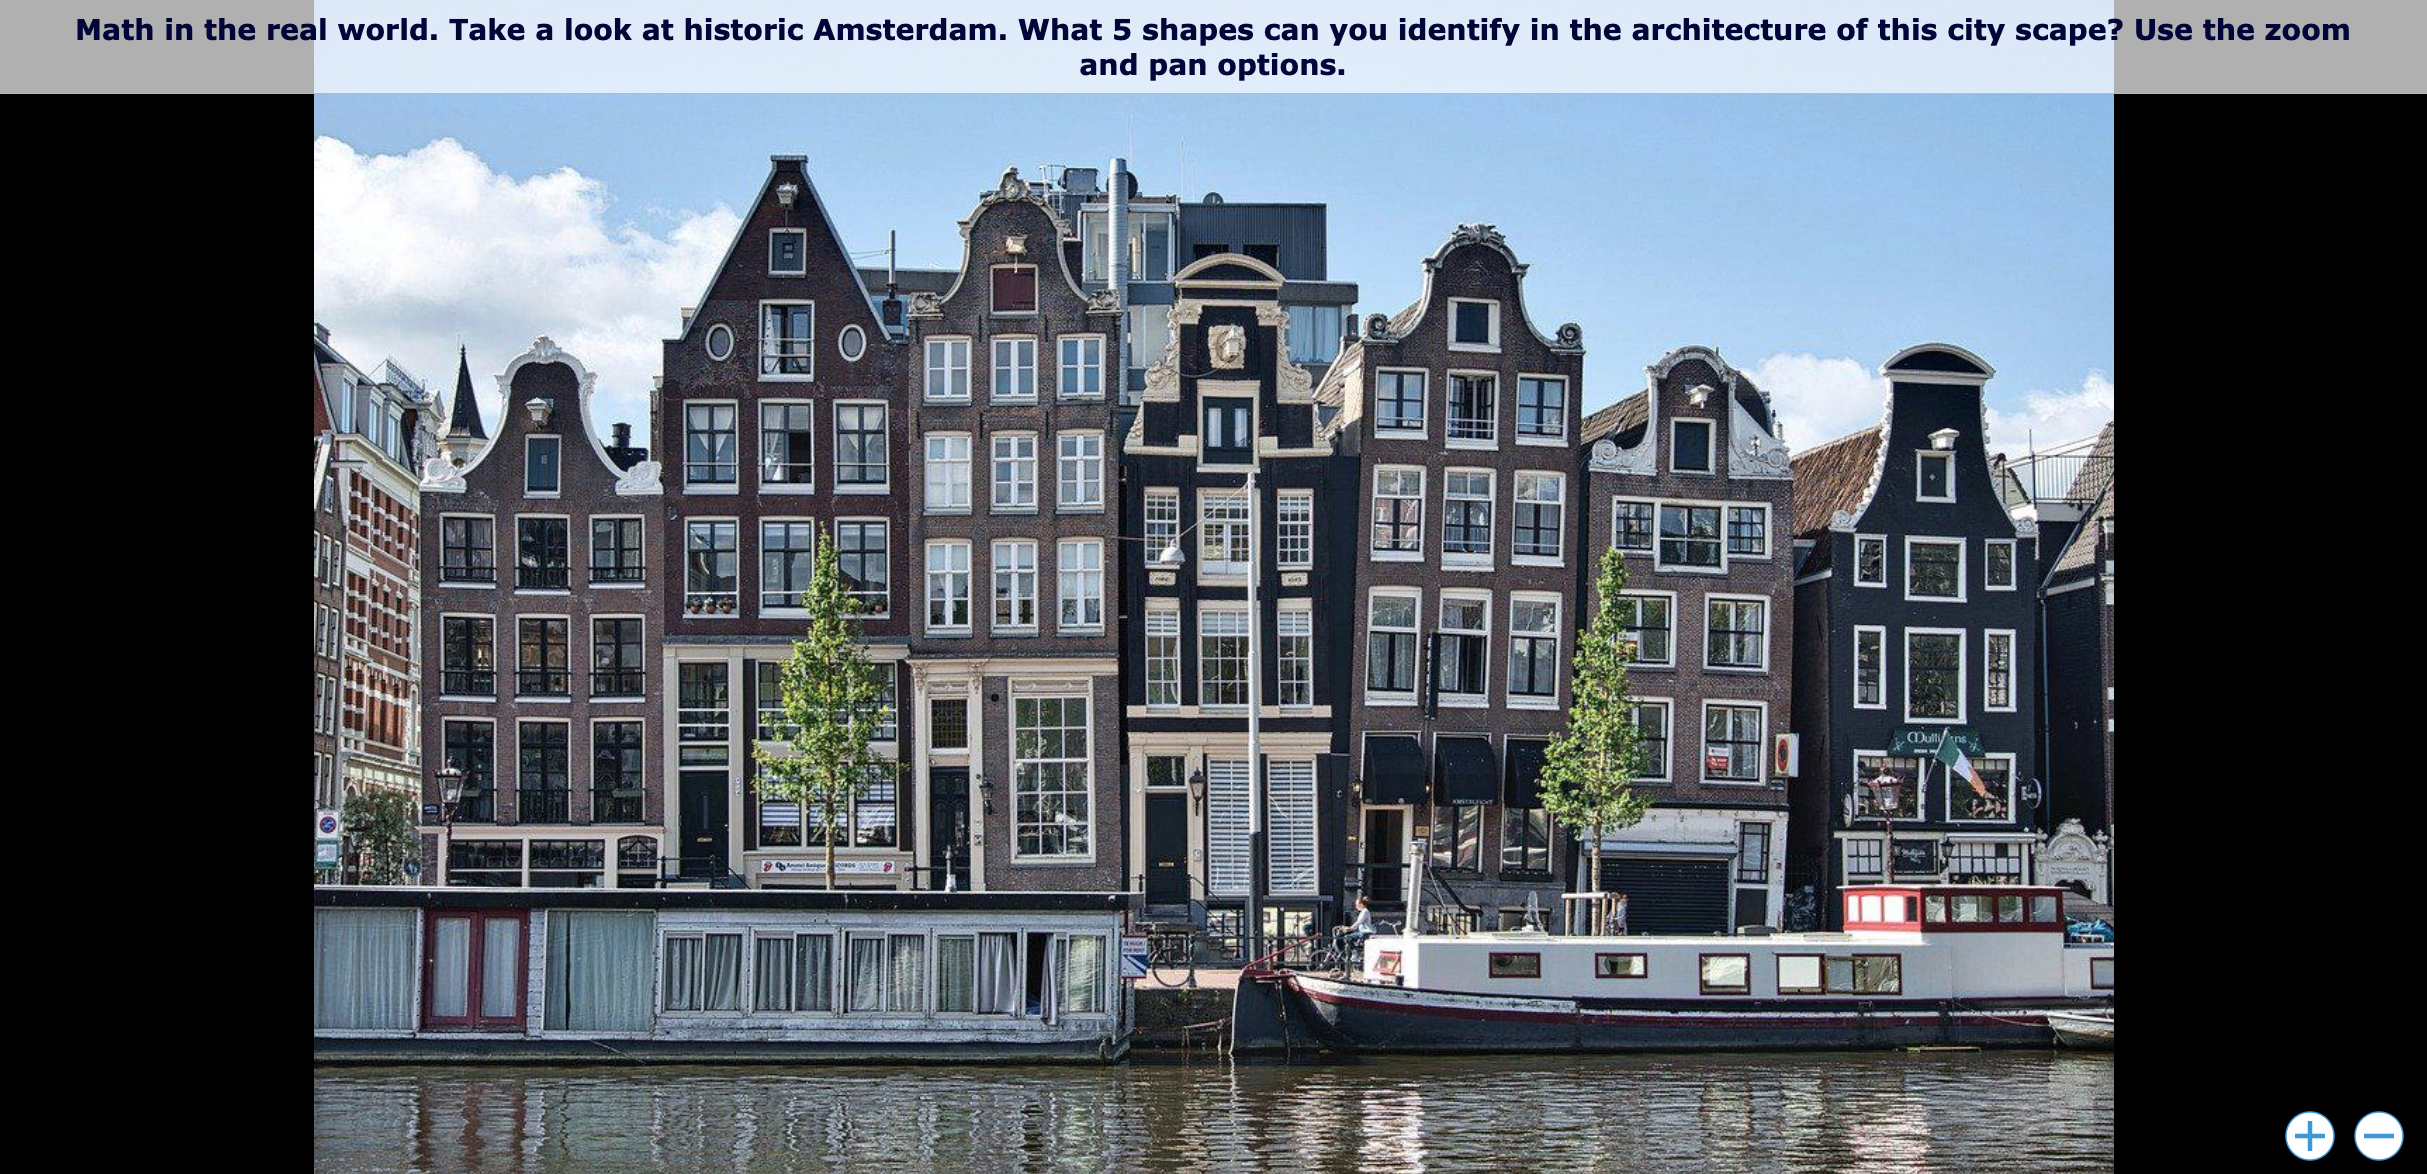
💡 Pro tip: Use the title space to ask your students a question.
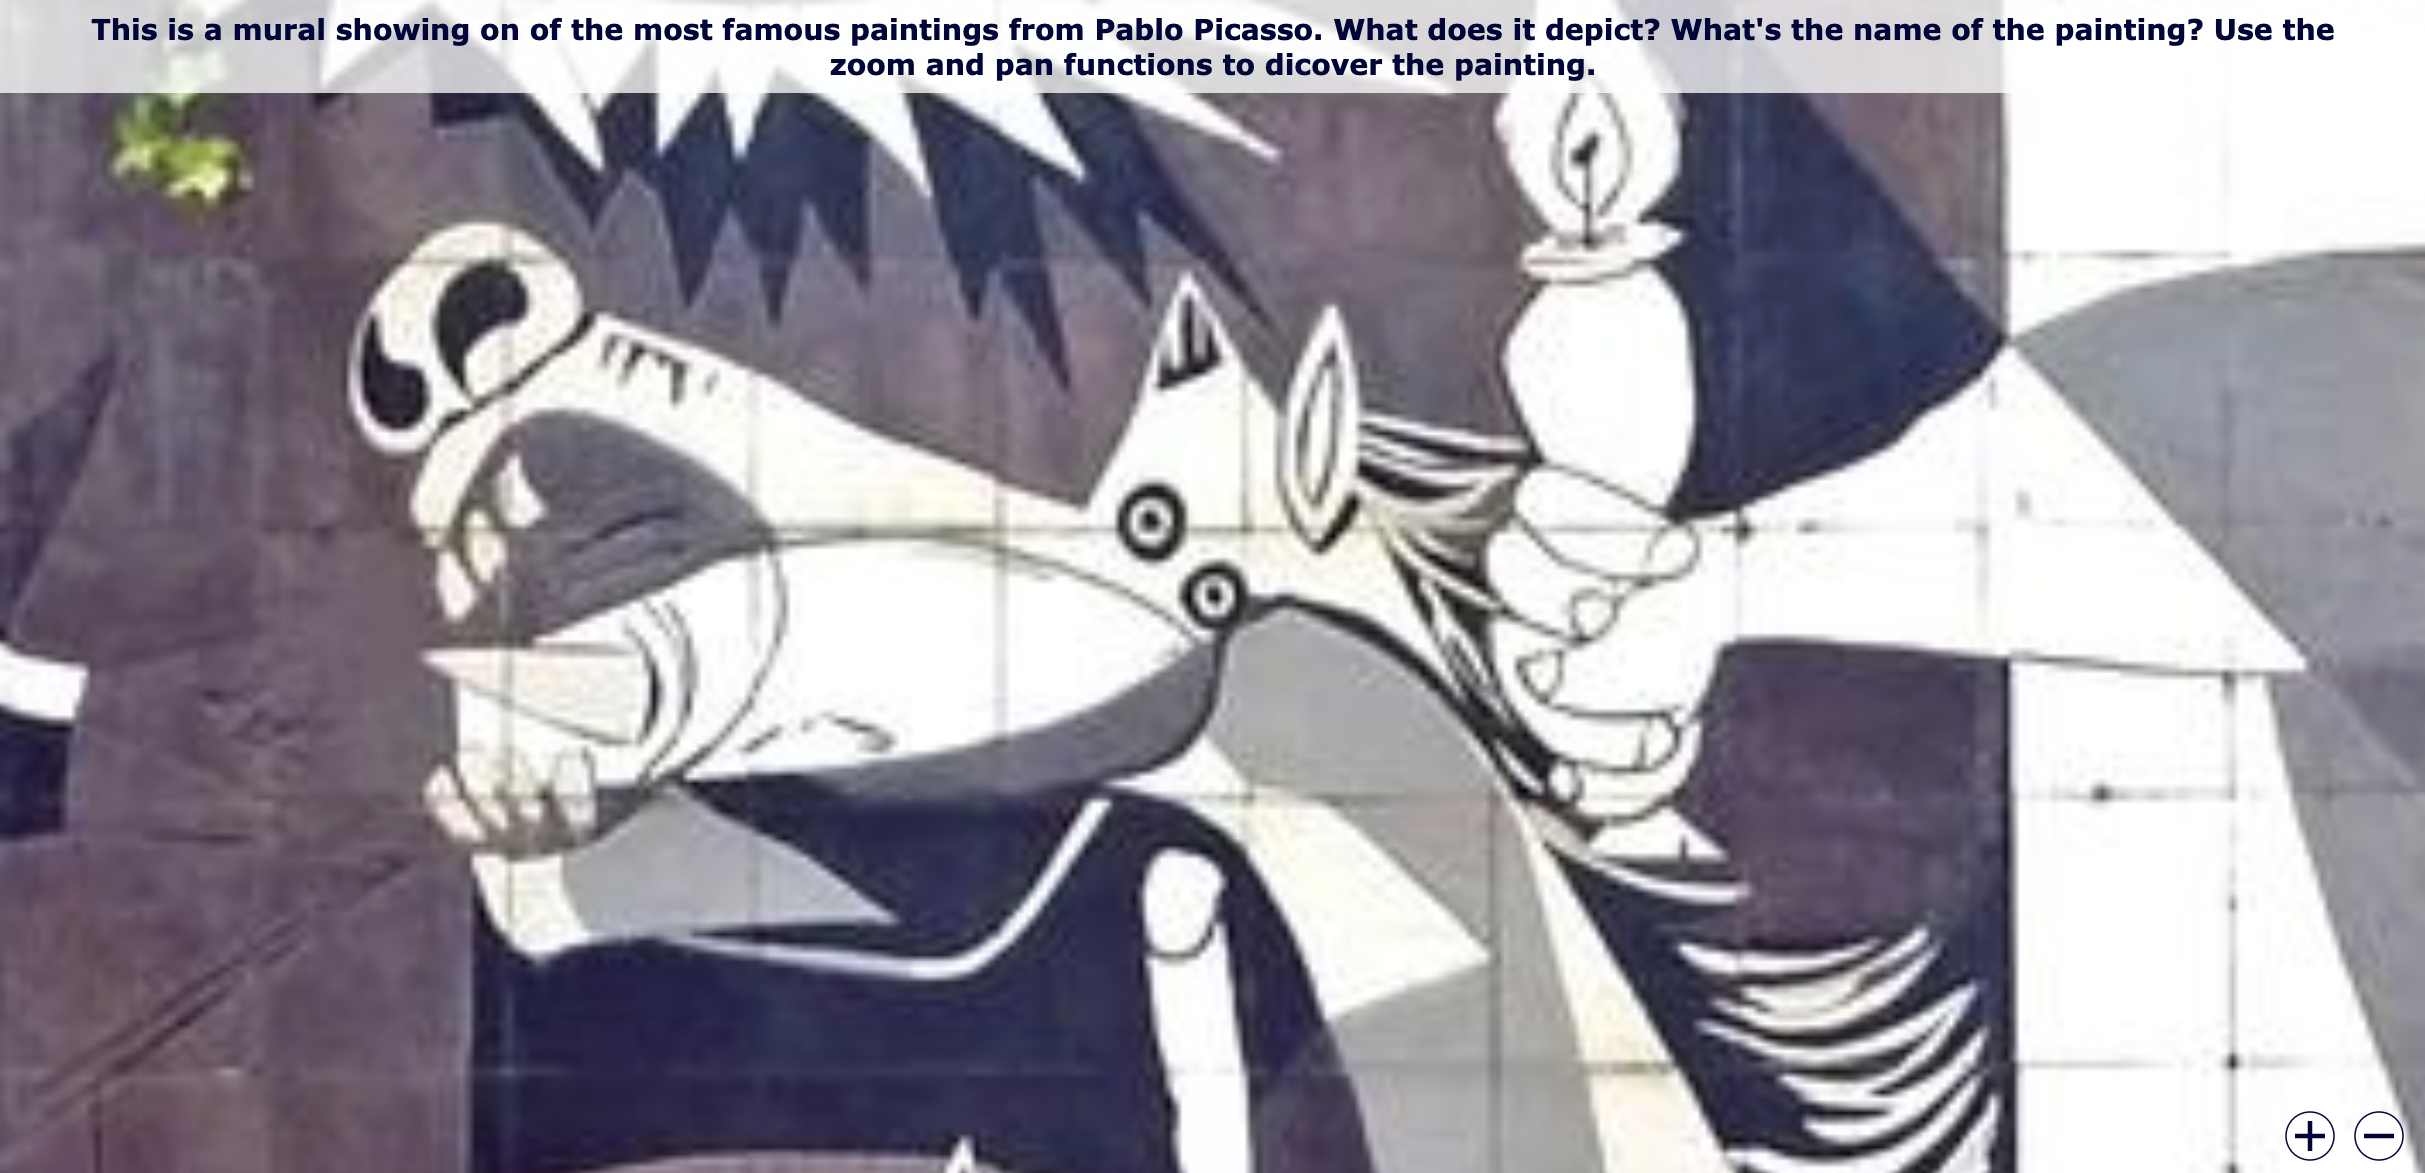
15. One image, a thousand lessons
Harness the power of a single compelling image to inspire a multitude of learning opportunities. This activity encourages students to explore a large, high-resolution image, allowing them to pan around and zoom in and out to uncover hidden details and insights. Each zoom and pan reveals new layers of information, prompting students to engage in close observation and critical analysis.
Through guided exploration, students extract valuable lessons and gain a deeper understanding of the image’s subject matter, whether it be historical events, scientific phenomena, cultural symbols, or artistic elements. By immersing students in a rich visual experience, this activity sparks curiosity, fosters inquiry, and cultivates a deeper appreciation for the complexity and depth of the world around them.
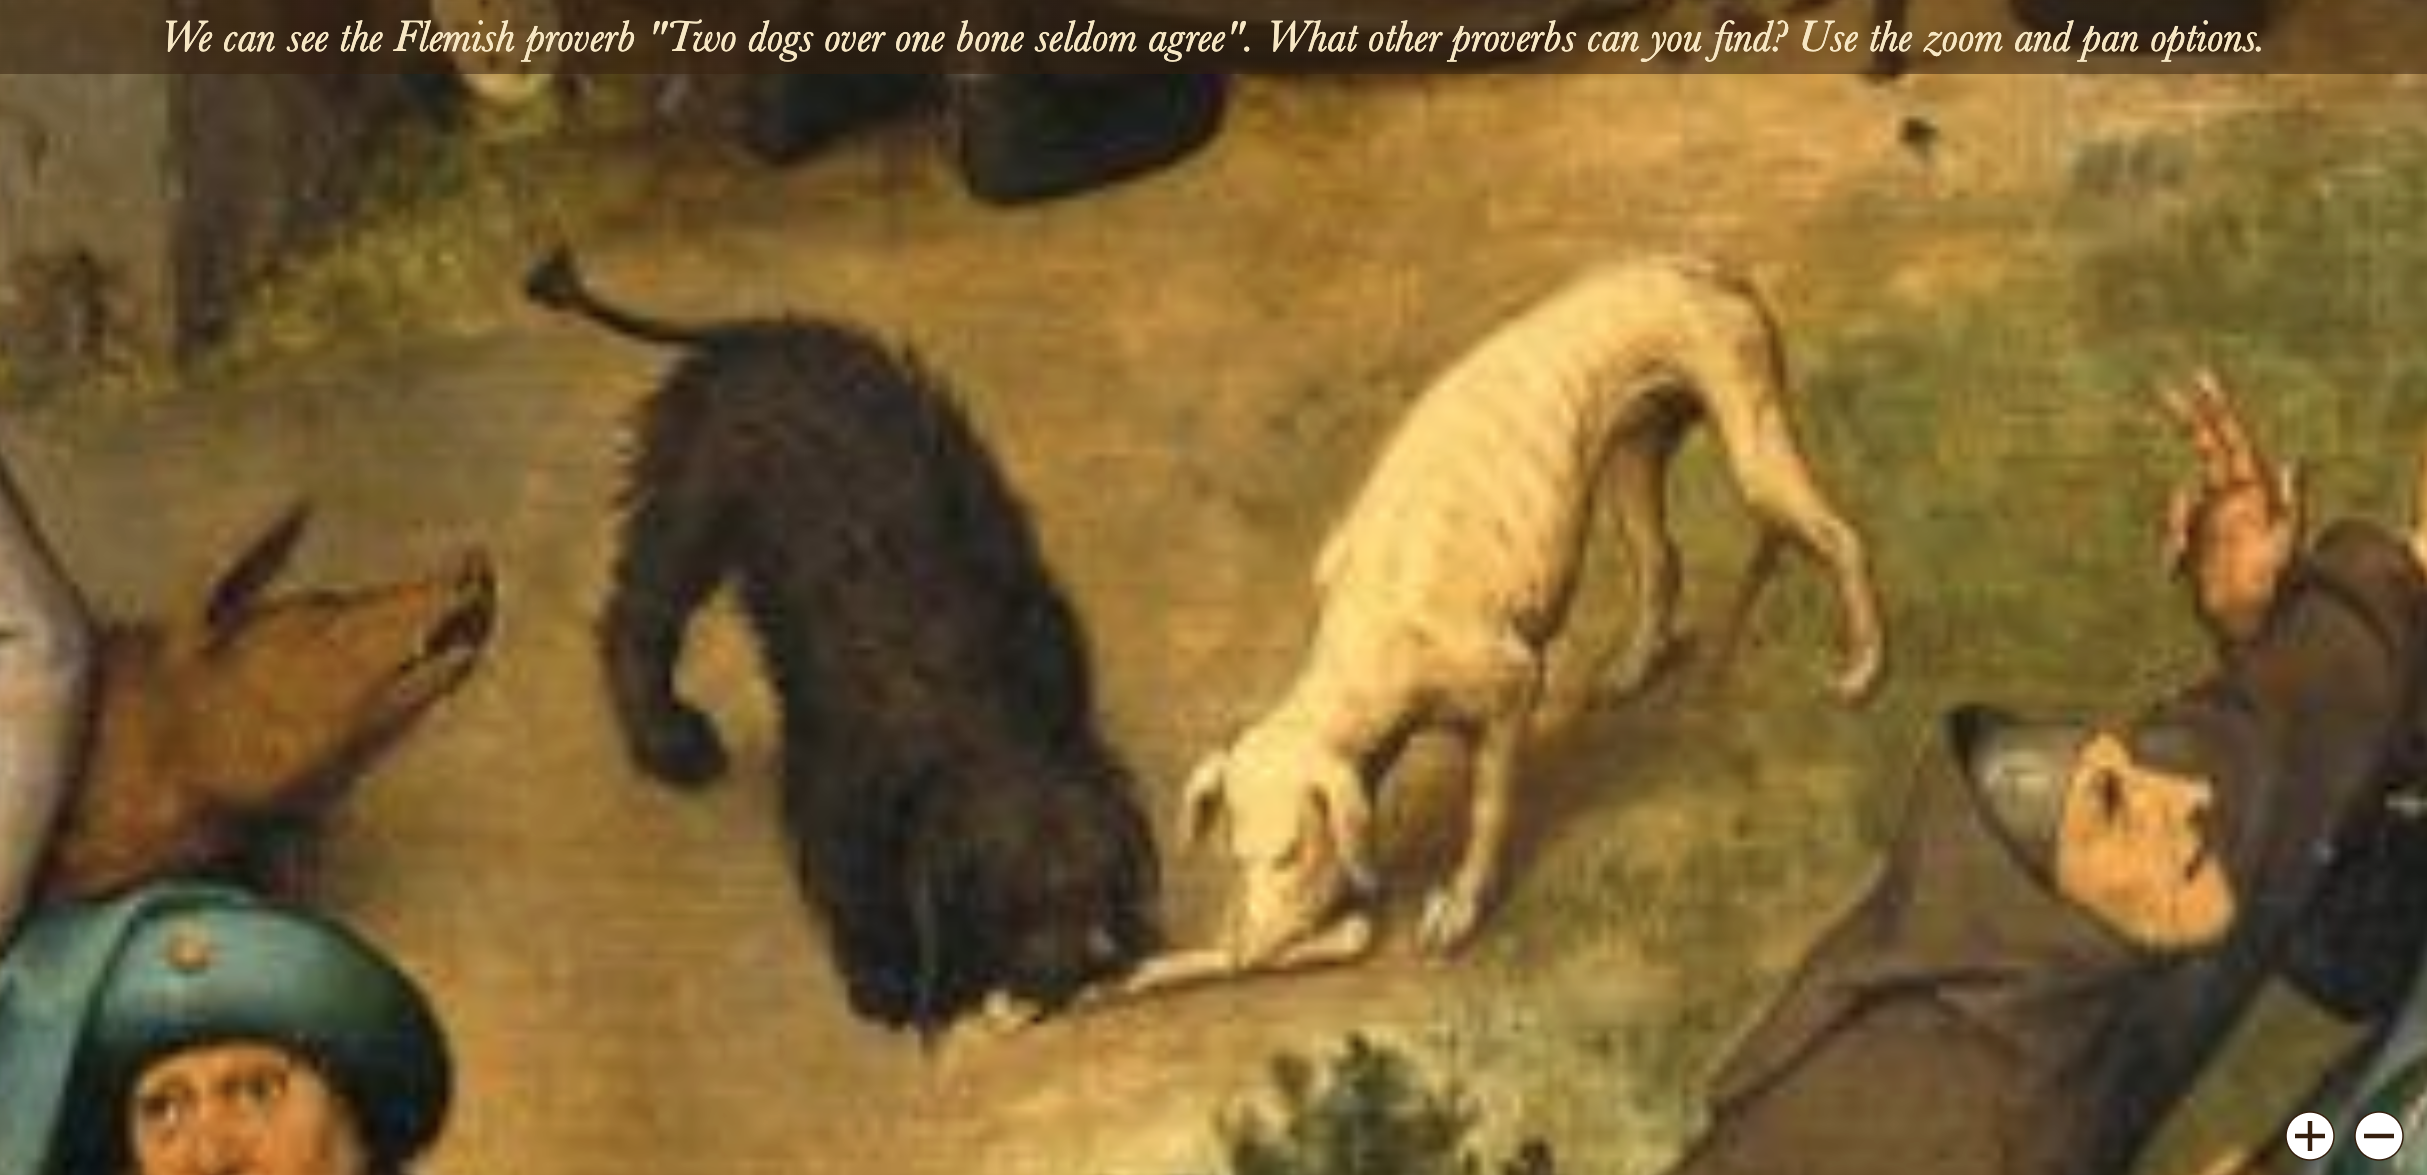
💡 Pro tip: Use a very high-quality image so students can zoom in and out but still see everything clearly.
16. Let students discover new topics in detail
Use the interactive Image Viewer widgets to embark on a journey of exploration and inquiry. By providing a large, high-resolution image related to a new topic, students are encouraged to delve deep into its details. They can utilize the pan and zoom functionalities to examine intricate elements, uncovering nuances and connections that spark curiosity and prompt further investigation.
As students navigate through the image, they encounter new concepts, themes, and perspectives, expanding their understanding of the topic in a visually immersive manner. Ultimately, this interactive approach helps students develop a deeper appreciation for the complexity and richness of the subject matter, fostering a lifelong love for learning and discovery.
💡 Pro tip: Start the activity for students on 1 spot in the image. Students can use the pan optionalities to discover the rest of the activity.

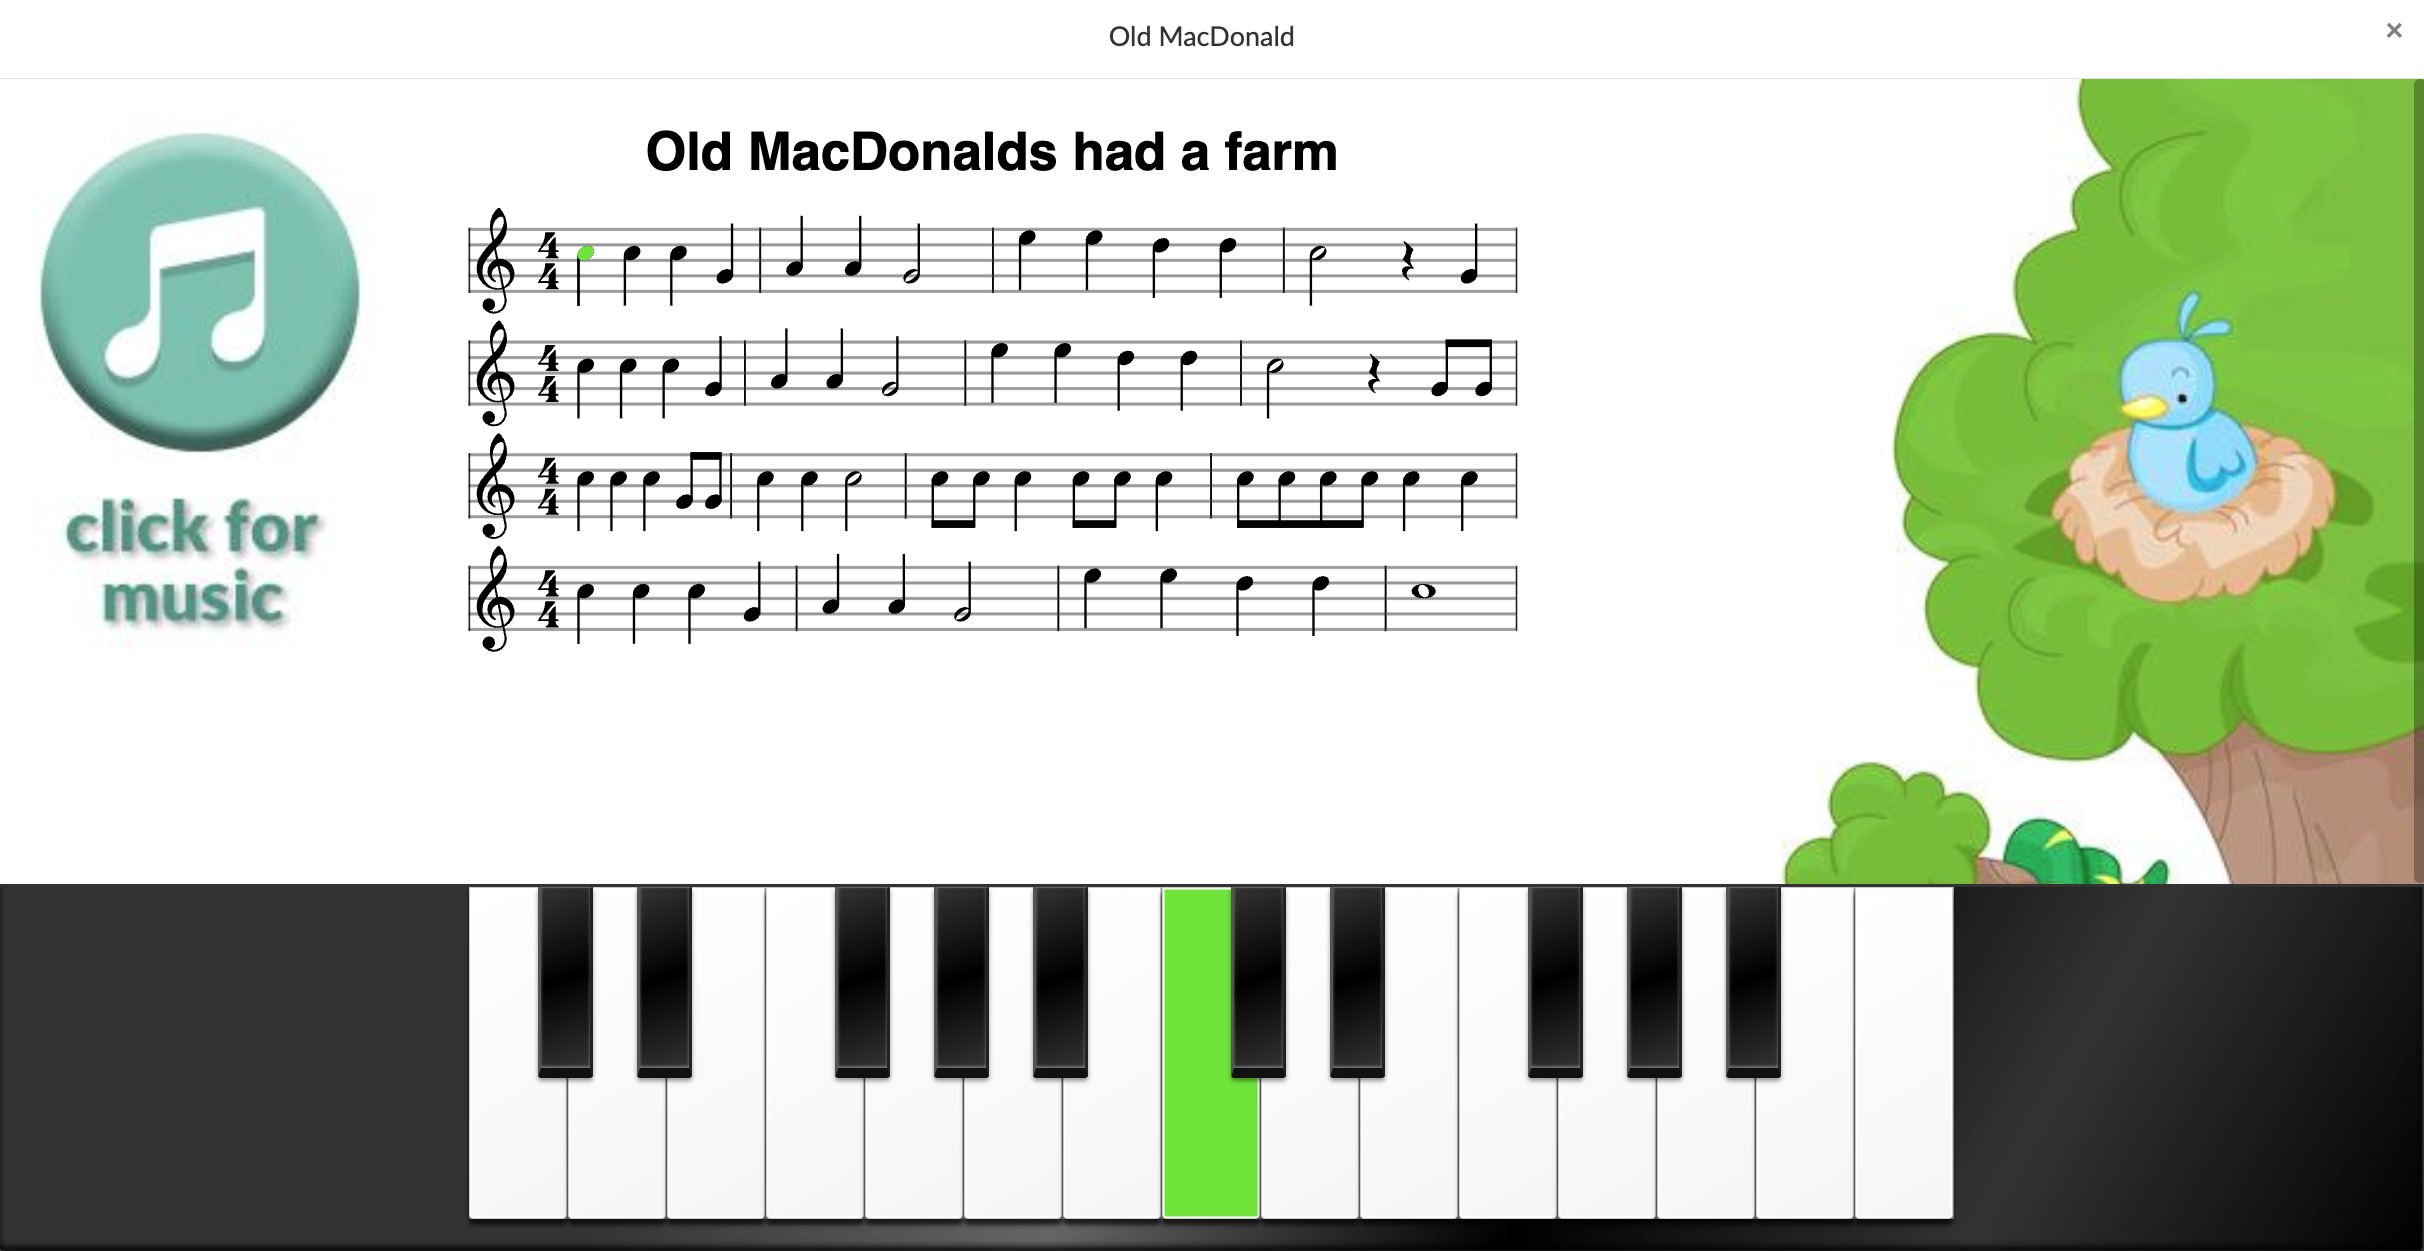
The Piano Widget
Teach students how to play the piano and read notes. Add reference music to make it easier for students to play the piano. This widget works best when students have access to tablets.
💡 Pro tip: Check out this video to convert an MP3 audio file to sheet music so you can use it in a BookWidgets piano activity!
17. Introduce students to piano music
Teachers can provide an immersive introduction to the world of piano playing and music notation. Students are guided through interactive lessons that teach fundamental piano techniques and note-reading skills. Reference music is incorporated to demonstrate concepts and provide examples for students to follow along.
The widget’s interactive features, optimized for tablets, enable students to practice playing piano pieces at their own pace. This hands-on approach fosters musical exploration and appreciation, empowering students to develop their musical abilities and ignite a passion for (piano) music.
Go check out the example of a digital piano activity below 👇
18. Introduce students to rhythm and timing in music
With this interactive piano activity, teachers can also lay the foundation for understanding rhythmic patterns and musical timing. Through the piano widget, students learn to recognize different note durations, time signatures, and rhythmic patterns. The widget provides visual cues to help students grasp concepts such as tempo and rhythm.
By incorporating reference music with varied rhythms, students can practice playing along and internalizing rhythmic structures. This hands-on approach enhances students’ sense of rhythm and timing, fostering musical fluency and confidence in their ability to play music with precision and expression.


The Before/After Widget
With this Before/After image activity, your students can compare two pictures with each other. Students move the slider to reveal more of one or the other picture or set it to blend the pictures.
19. Compare to find similarities and differences
Using the image-based before/after activity, teachers engage students in critical analysis and observation skills. Students are presented with two images, each depicting a different subject, scene, or concept. Using the slider functionality, students can adjust the comparison to reveal more of one image or blend the two together. Teachers can prompt students to identify similarities and differences between the images, encouraging them to analyze details, themes, and visual elements.
Teachers provide context and guide students’ observations by adding short descriptions to each image, fostering deeper understanding and interpretation. This image activity promotes active learning and visual literacy as students develop their ability to compare, contrast, and draw conclusions from visual information.
Go check out the example below. Students need to find the differences and similarities between two geographical concepts: a temperate rainforest and a tropical rainforest. 👇
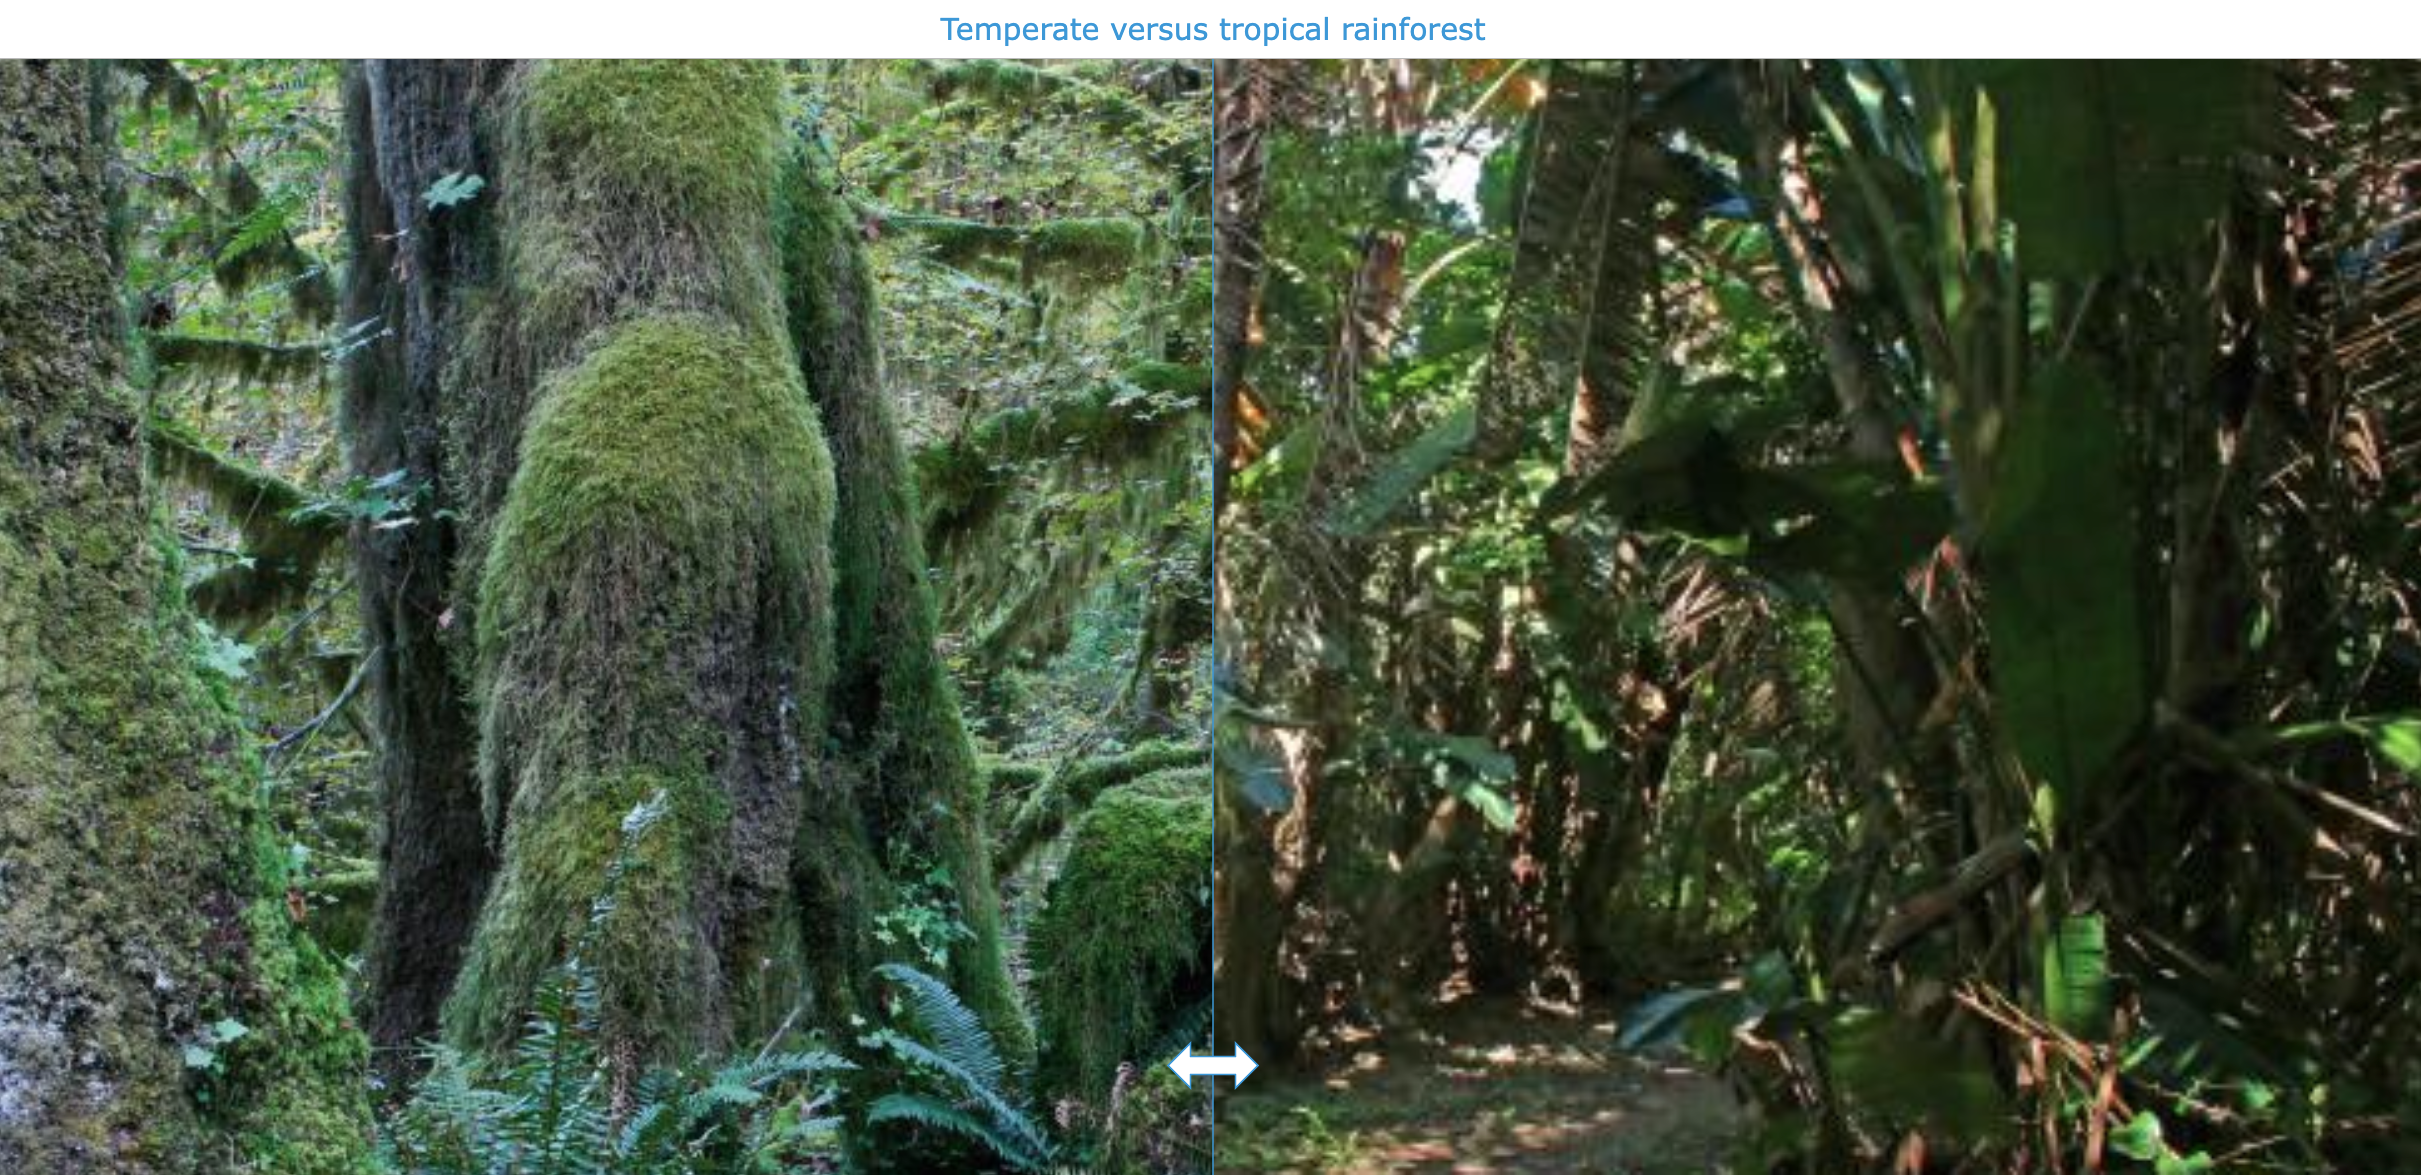
💡 Pro tip: This example proves that your images don’t need to be one image before a certain time period and one image after, even though the widget name tells you otherwise. 🫣
20. Evoke discussions
You can also facilitate interactive discussions by presenting pairs of images for comparison. Each image pair is carefully selected to prompt thought-provoking conversations and critical analysis. Students can explore the differences and similarities between the two pictures by adjusting the slider or blending the images.
Encourage students to articulate their observations, opinions, and interpretations, fostering meaningful dialogue and debate. Adding short descriptions to each image provides context and prompts students to consider various perspectives.
Go check out the example 👇
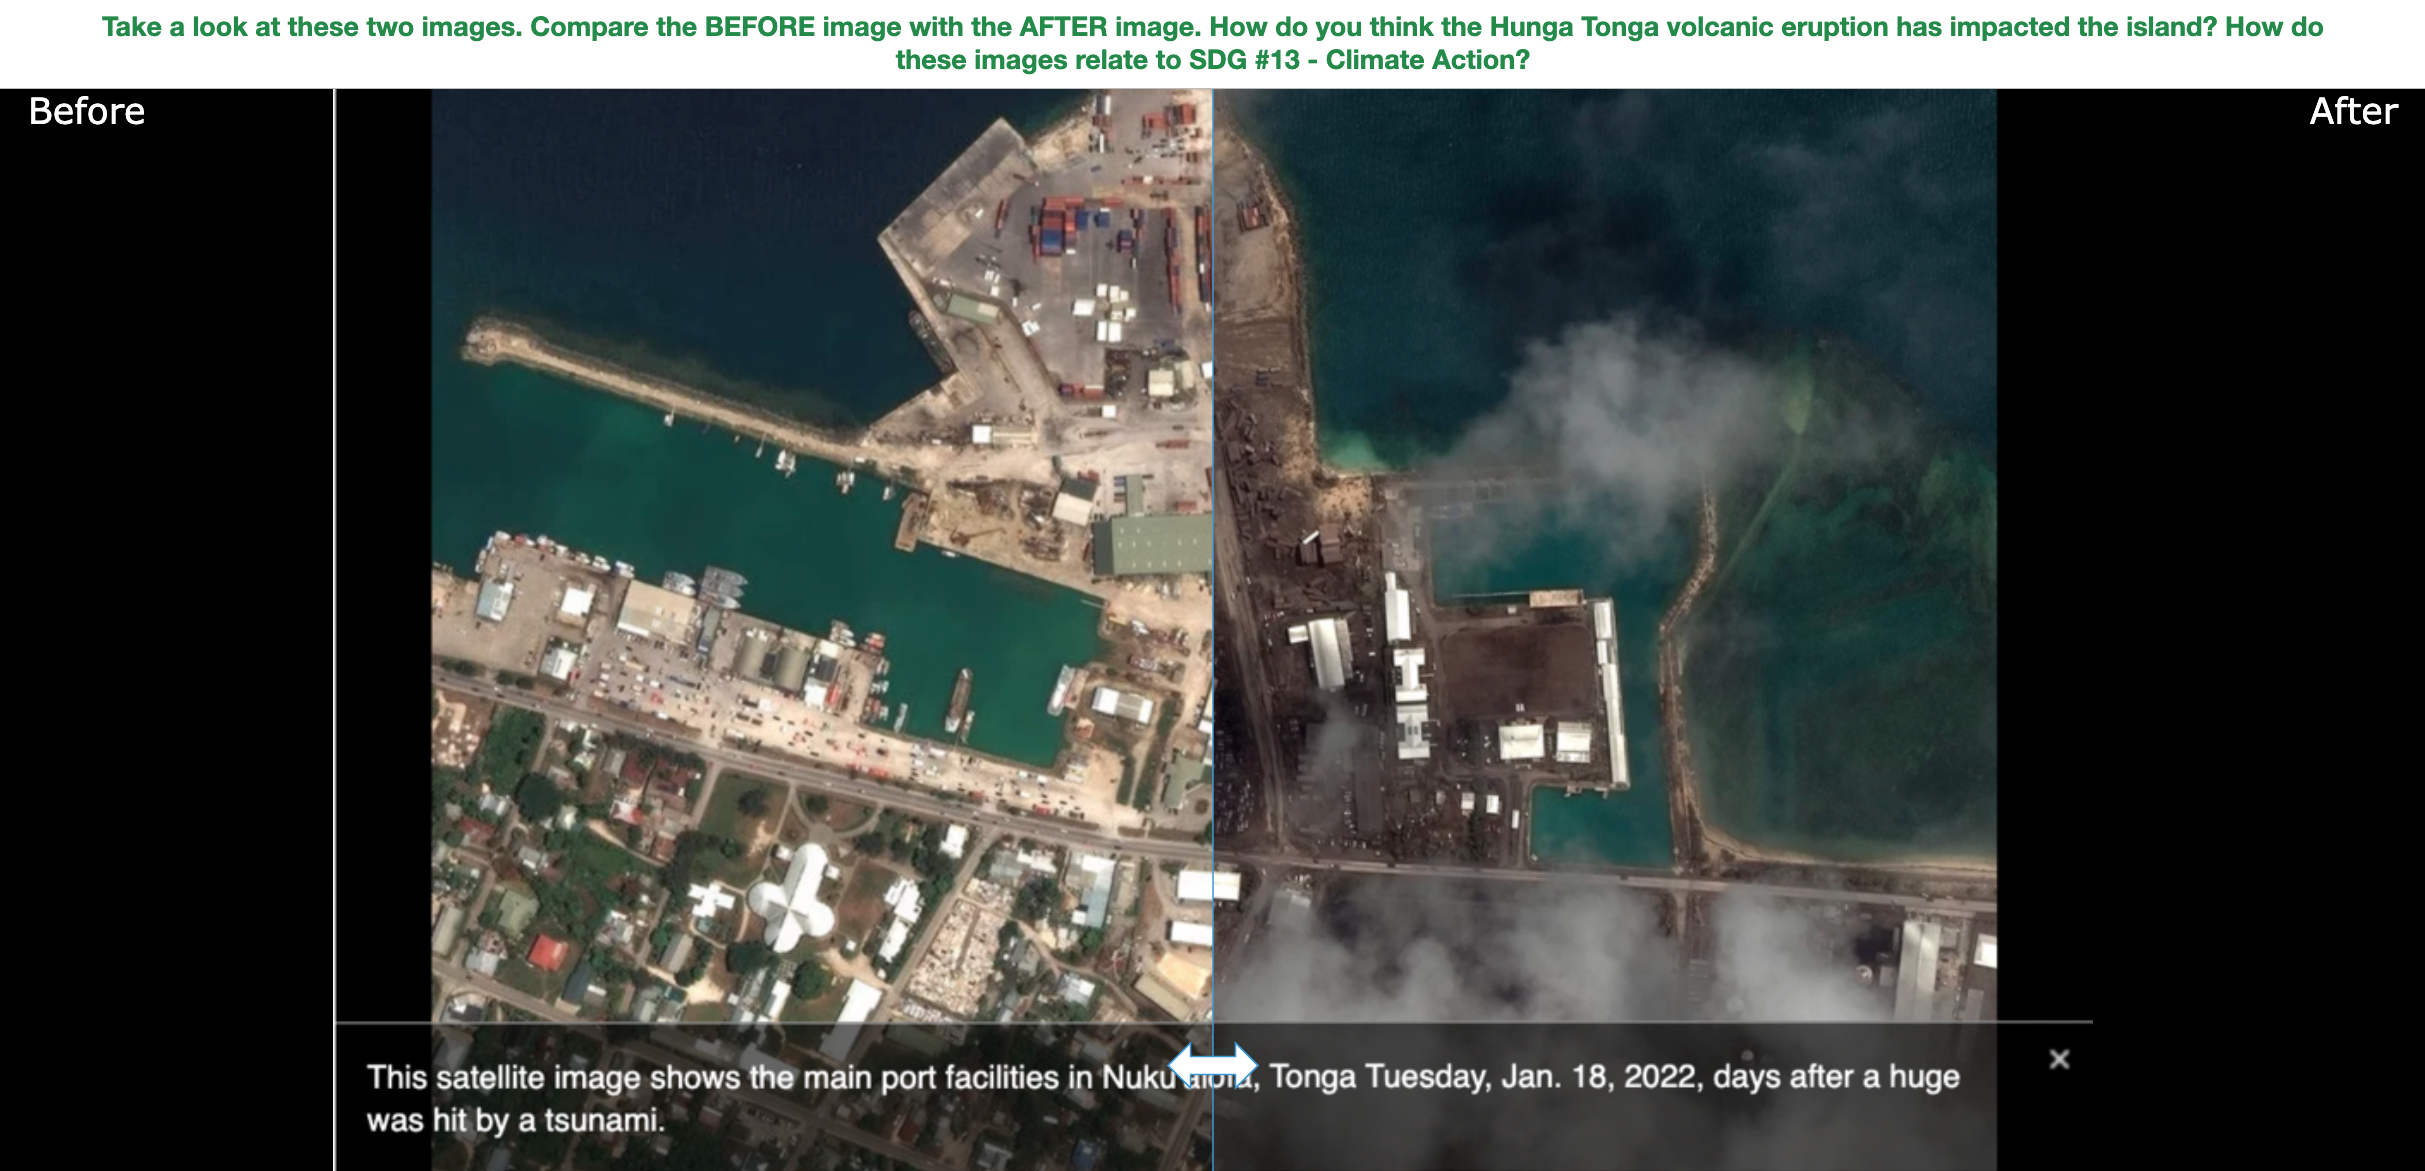
💡 Pro tip: Instead of giving your image activity a title, use this area to ask your students a question so you can evoke a discussion or start a meaningful dialogue.
21. Compare maps and dates for history
Facilitate an exploration of historical events and the aftermath. Students are presented with two maps depicting the same region at different points in history, accompanied by corresponding dates. Using the slider, students can compare the maps to observe changes in borders, landmarks, and geographical features.
Prompt students to analyze the significance of these changes in relation to historical events and cultural developments. This activity encourages students to draw connections between past events and present-day realities, fostering a holistic understanding of historical contexts.
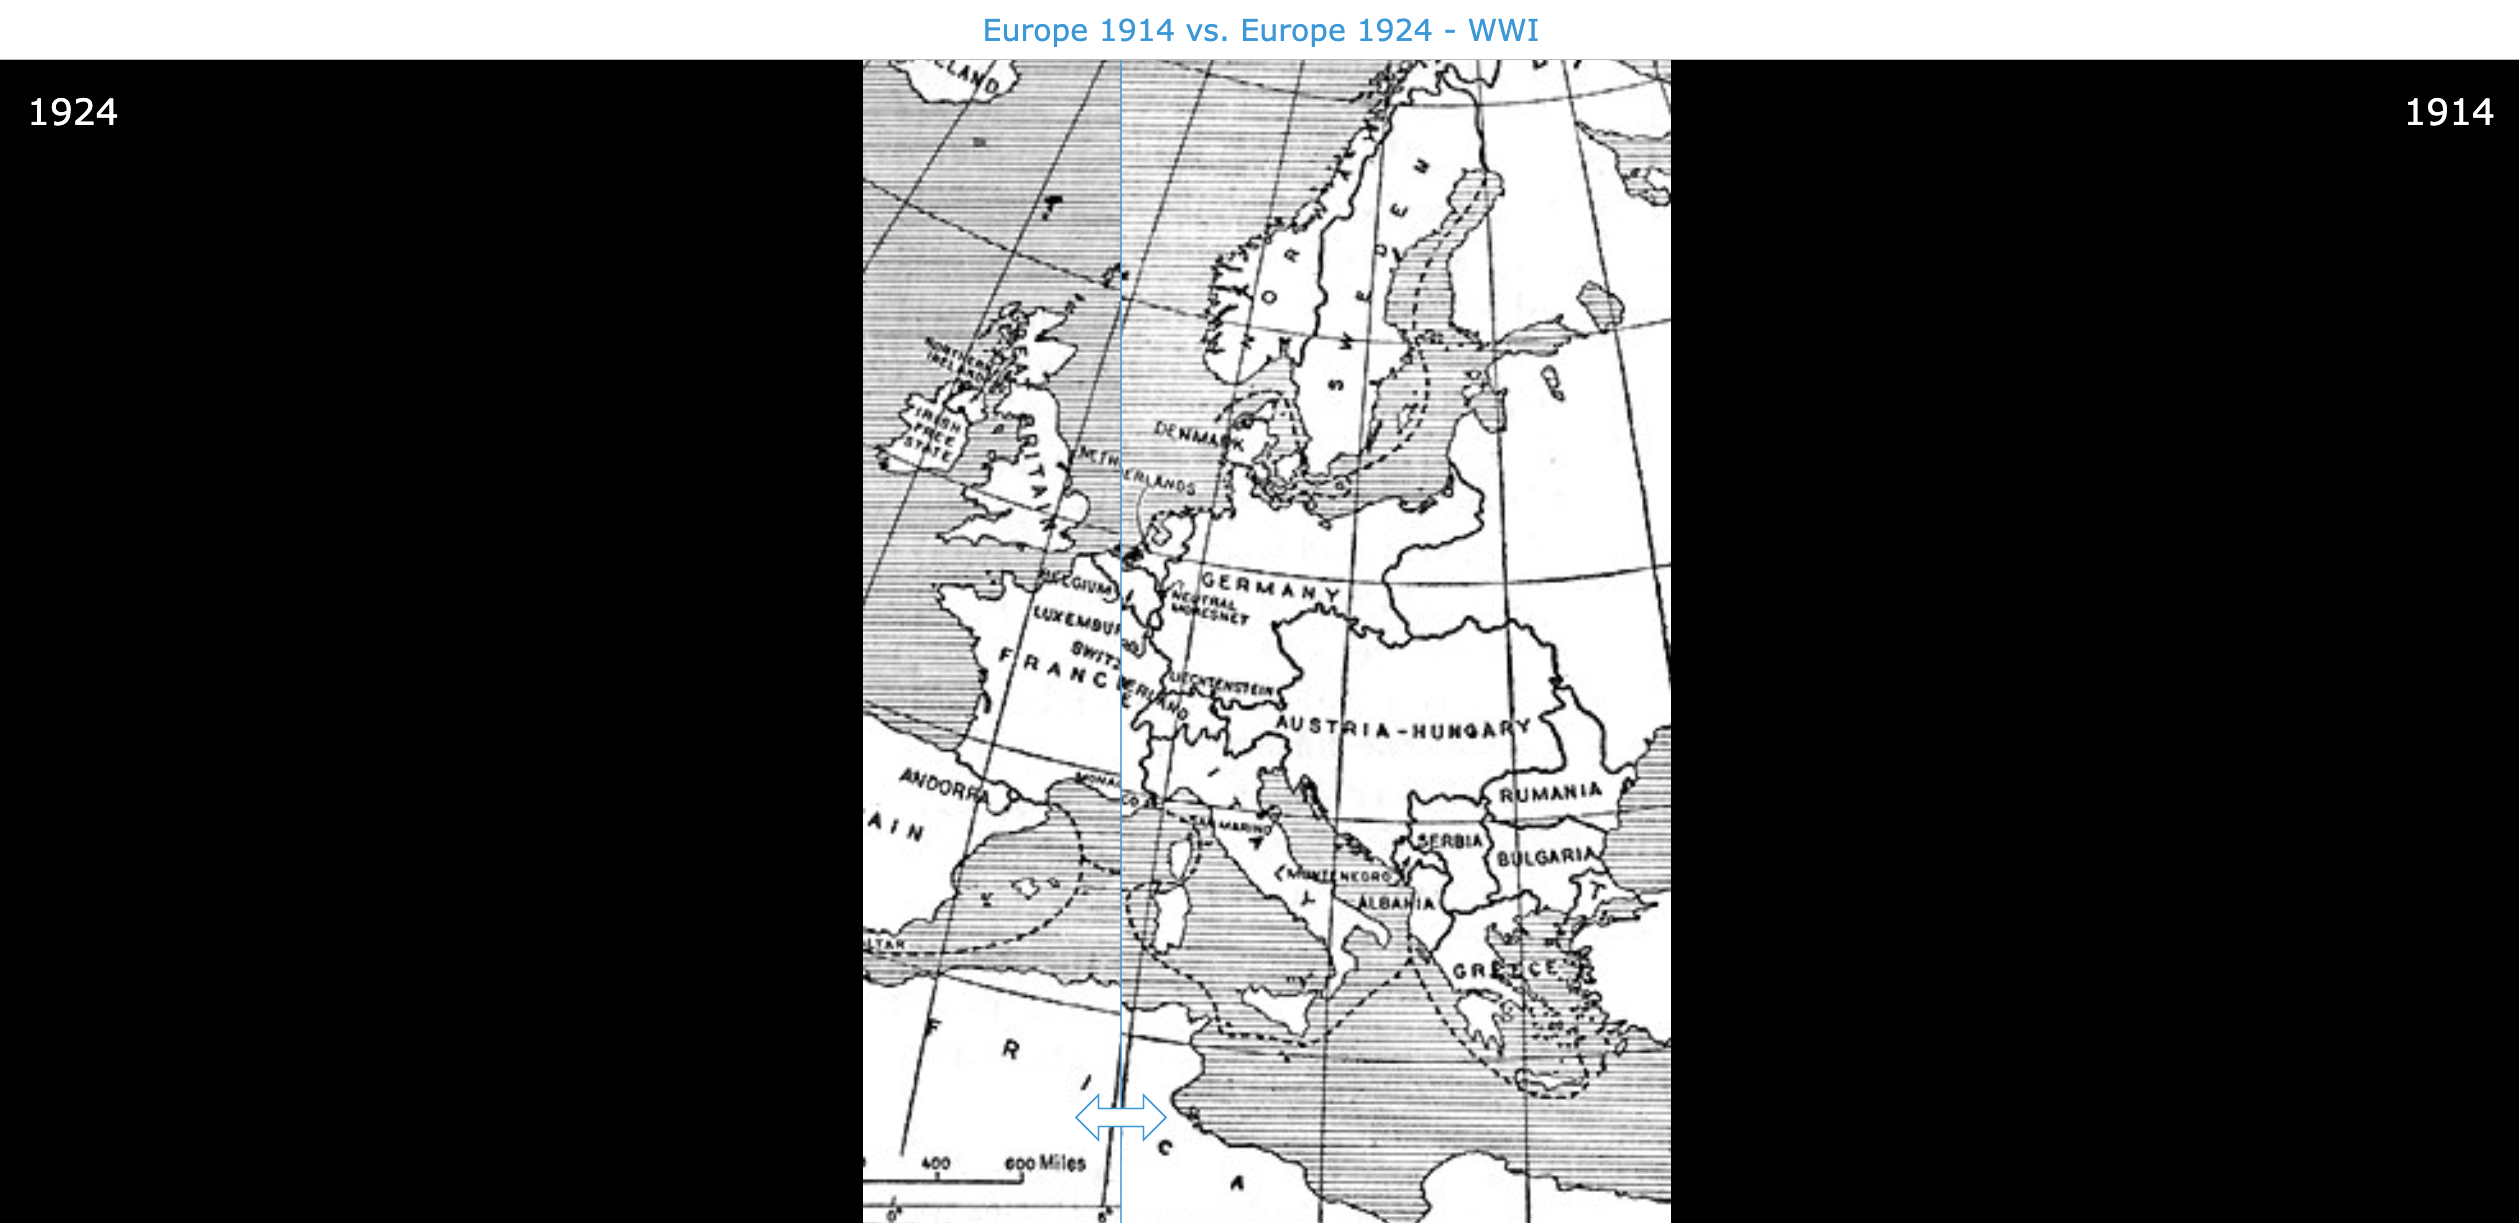
💡 Pro tip: Use websites such as “Old maps online” to find and compare maps for your history course.
22. Practice labeling images
Using the Before/After image widgets, you can facilitate interactive exercises aimed at reinforcing students’ labeling skills. Students are presented with two images, one unlabeled and one labeled, related to a specific topic or concept. Using the slider, students compare the unlabeled and labeled images to identify and practice corresponding elements.
Teachers can provide guidance and feedback as students practice labeling various components, such as anatomical structures, geographical features, or scientific diagrams. Students develop their observational skills, vocabulary, and comprehension of visual information. This activity fosters active learning and retention as students recognize and describe key elements within images.
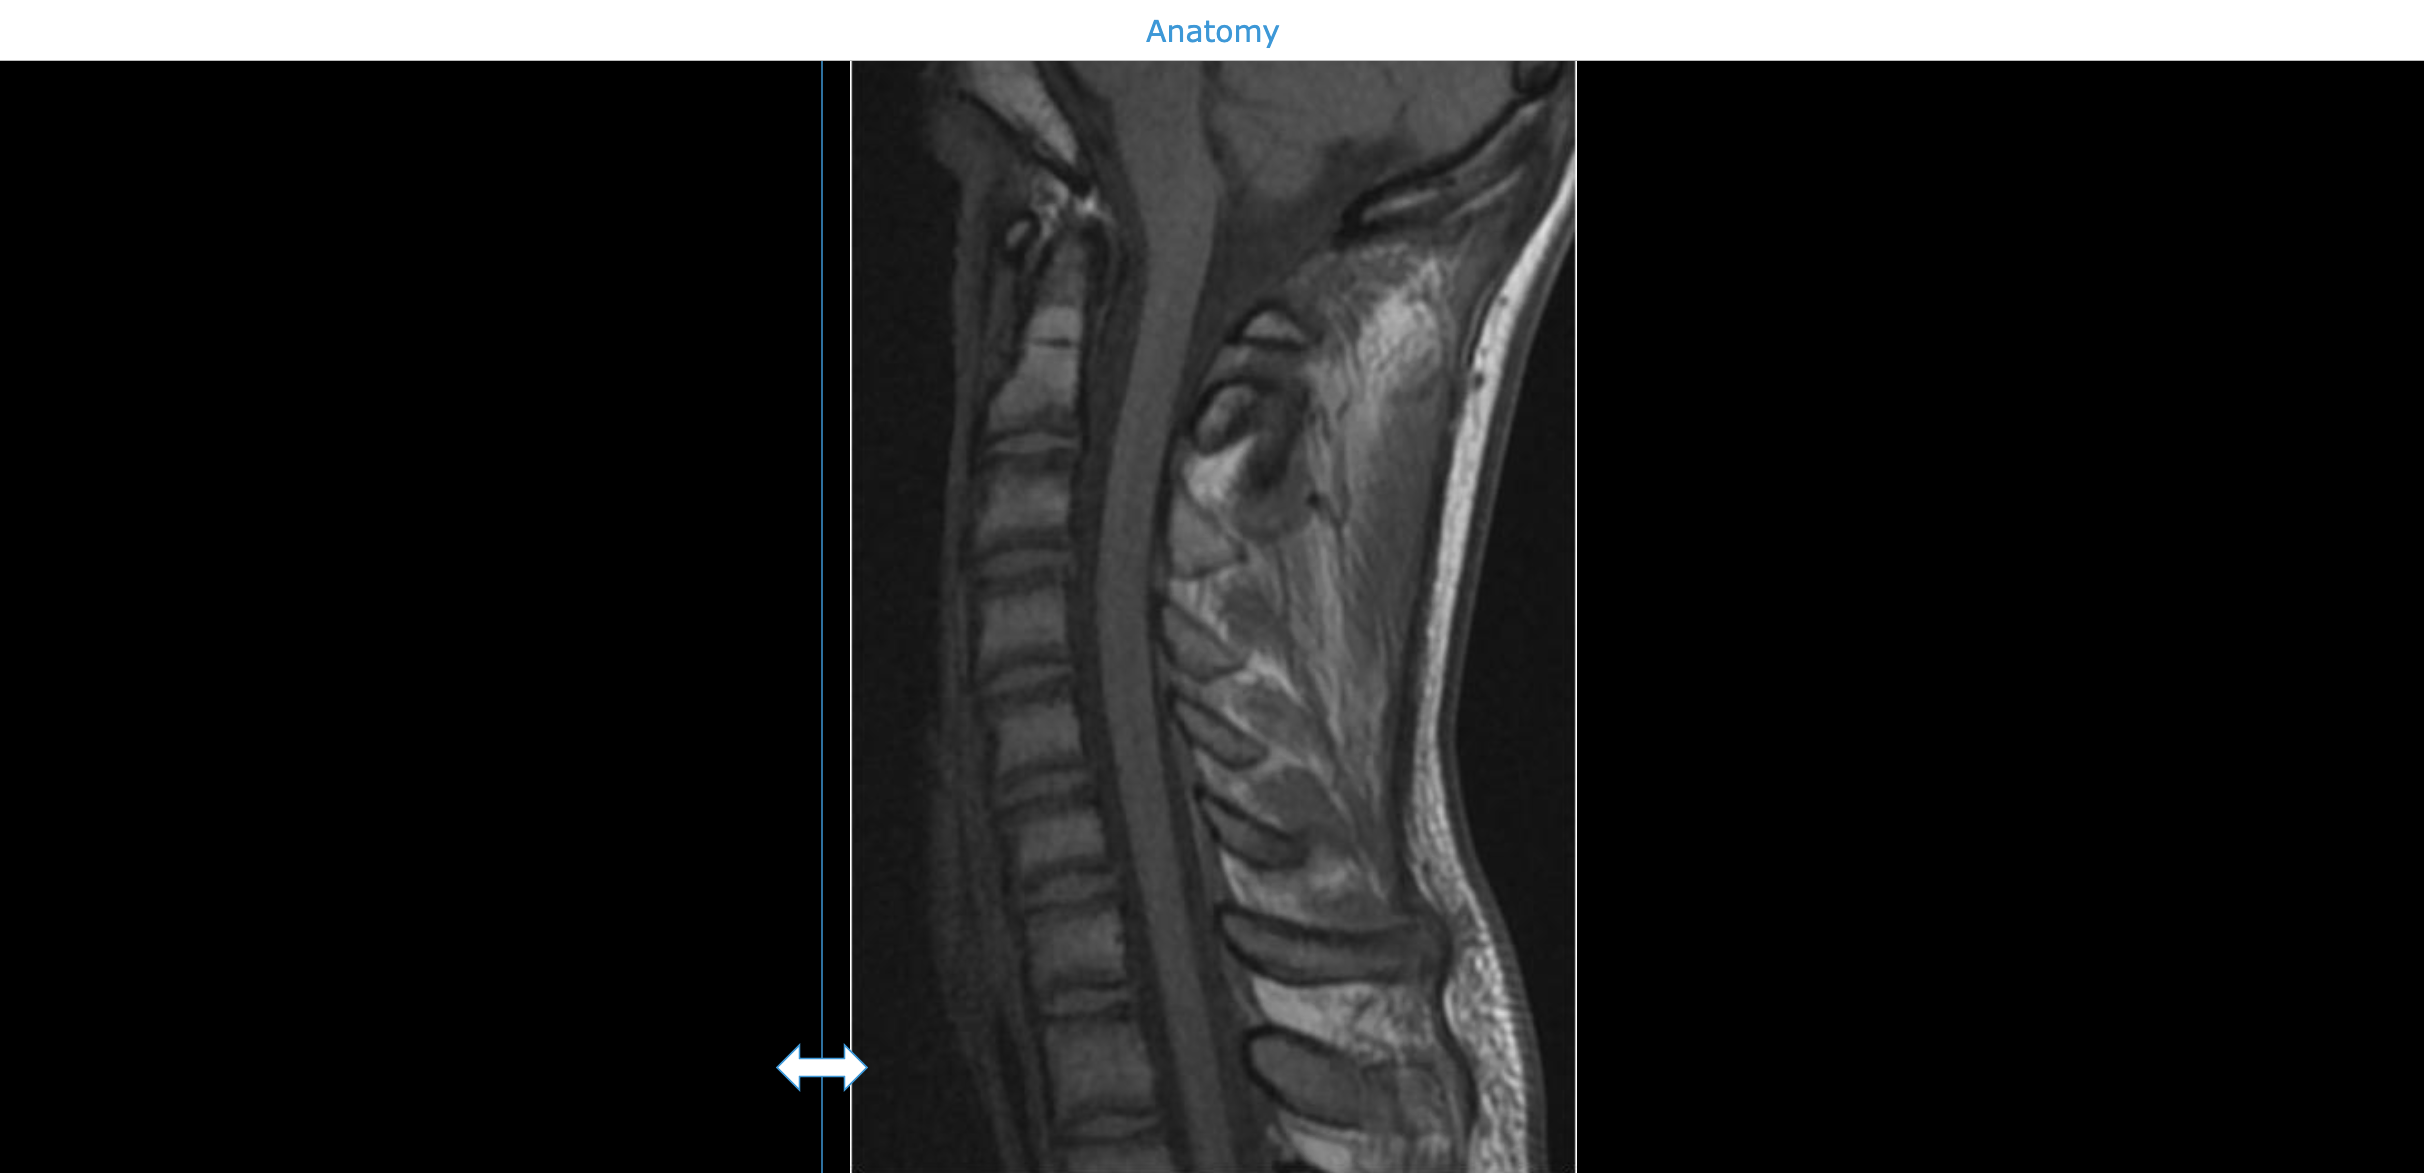
💡 Pro tip: Use editing tools such as Canva or Adobe Express to label your image.
23. Compare maps and dates for Geography
Use two images to encourage exploration of geographical changes throughout the years. Students are presented with two maps of the same area but from different time periods, accompanied by corresponding dates. Students can compare the maps to observe changes in geography, such as landmasses, coastlines, deforestation, and other natural changes over time.
Guide your students in analyzing the significance of these changes in relation to historical events, human activities, and natural phenomena. Through this activity, students develop spatial awareness, critical thinking skills, and an understanding of the dynamic nature of geography. This interactive approach enhances students’ appreciation of how geographical features evolve and impact human societies and the environment.
Go check out the activity below, showing the significant changes over time on the Colombia Glacier. Ask your students to discuss the images. What are the causes, how do these natural processes work, and more?
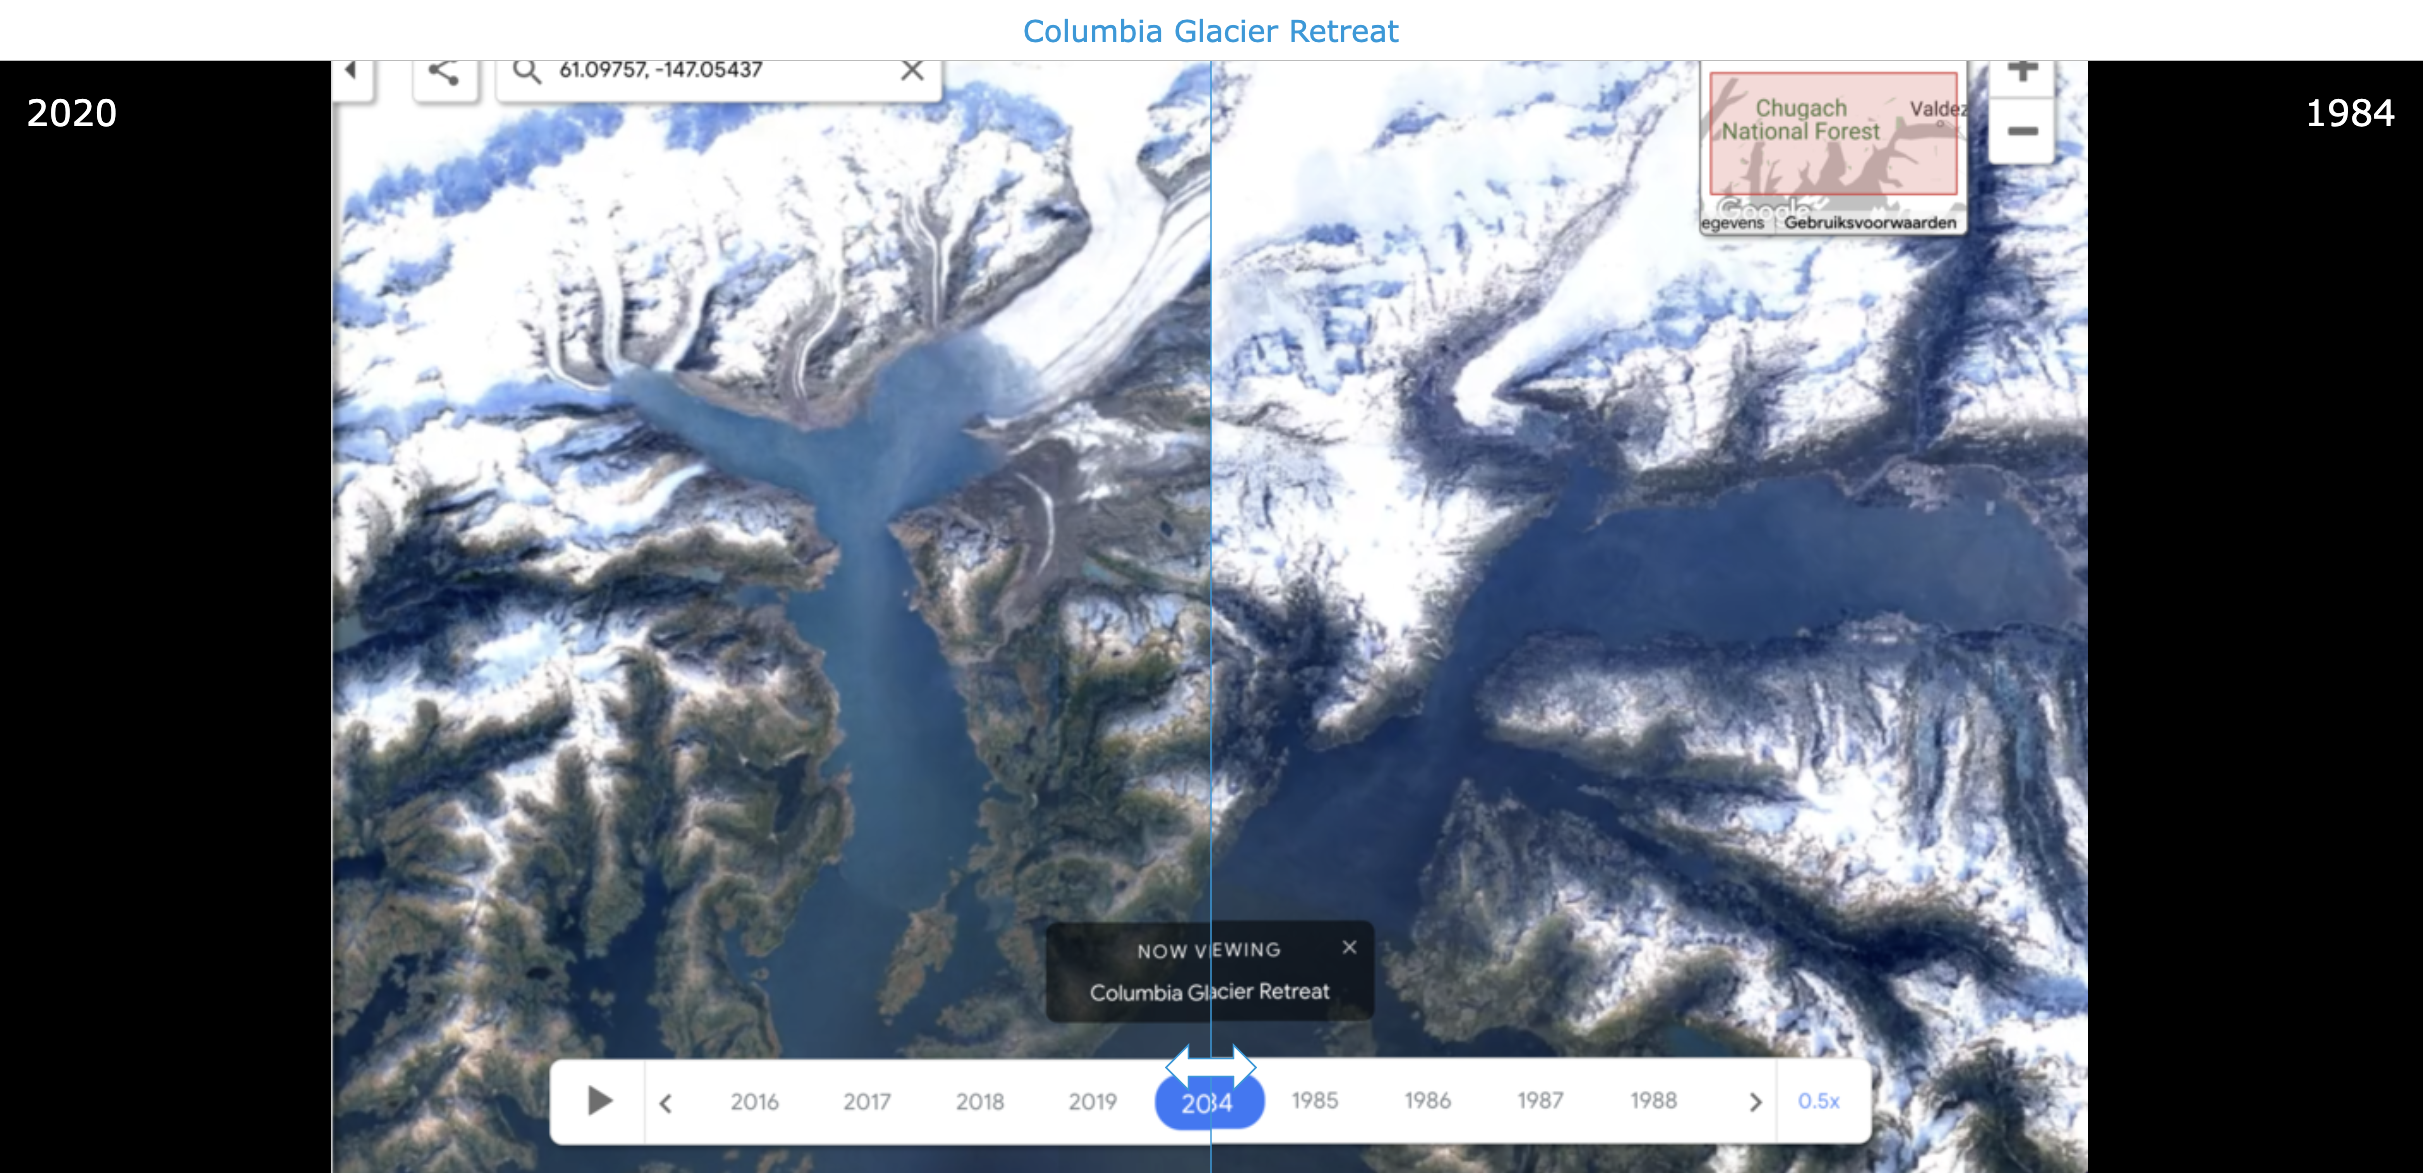
💡 Pro tip: Check this video and learn to get updated Google Earth visuals from certain places over time. You’ll see it’s a bit outdated, but the instructions are still correct. Bonus! Google Earth creates some ready-to-use time lapses you can use in a Before/After widget when explaining topics like global warming, deforestation, mining, bushfires, urban growth, and more!

The Frame Sequence Widget
Create a digital lesson showing a sequence of related pictures with an explanation. Students can easily move back and forth within the image sequence.
24. Chronologically order historical events
Use the Frame Sequence Widgets to present a series of related pictures depicting key moments in history. Each image is accompanied by an explanation or description of the historical event it represents. Students can navigate through the sequence, moving back and forth to explore the chronological progression of events.
By arranging the images in chronological order, students gain a visual understanding of the sequence of historical events and their interconnectedness. This interactive format allows students to engage actively with the material, facilitating comprehension and retention of historical timelines and narratives.
Go check the example below. 👇
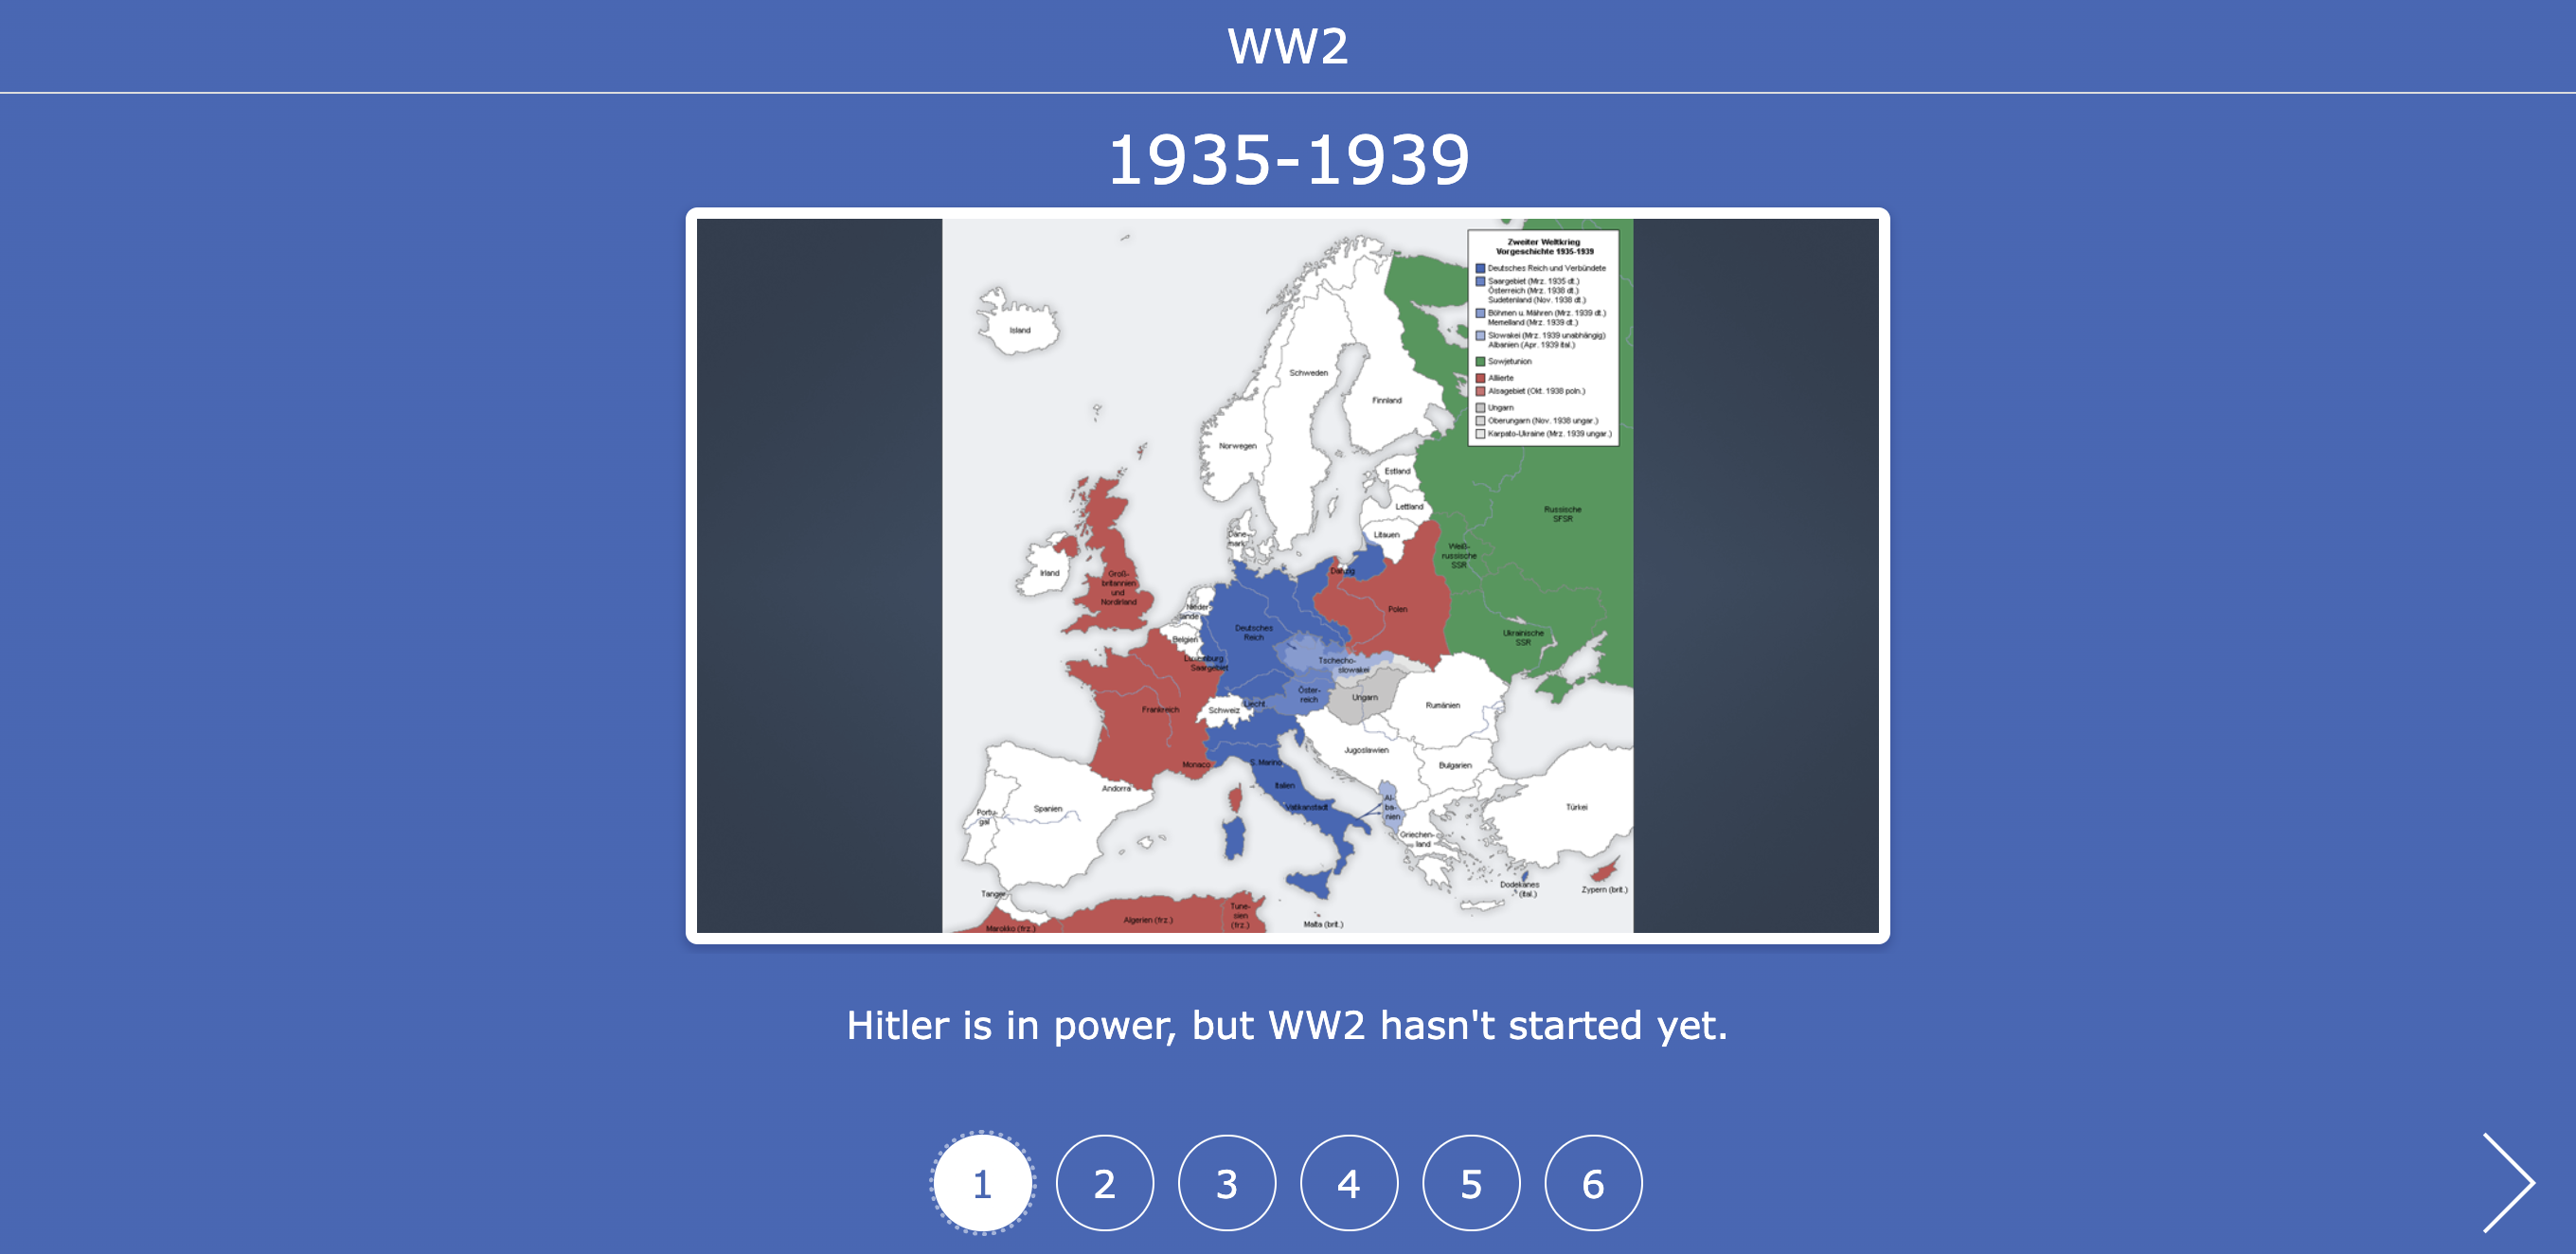
💡 Pro tip: This website, Running Reality, gives you a good overview of historical maps throughout different time periods.
25. Introduce new terminology by storytelling
Craft engaging narratives that introduce and contextualize new terms or concepts. Each frame in the sequence corresponds to a segment of the story, featuring images and descriptions that illustrate the usage of specific terminology. Students follow along as the story unfolds, encountering new terms in a meaningful context.
By weaving terminology into a cohesive narrative, teachers provide students with memorable examples and connections, aiding comprehension and retention. The interactive nature of the widget allows students to navigate the story at their own pace, pausing to review and reinforce their understanding of key terms.
Make sure to check the example below 👇
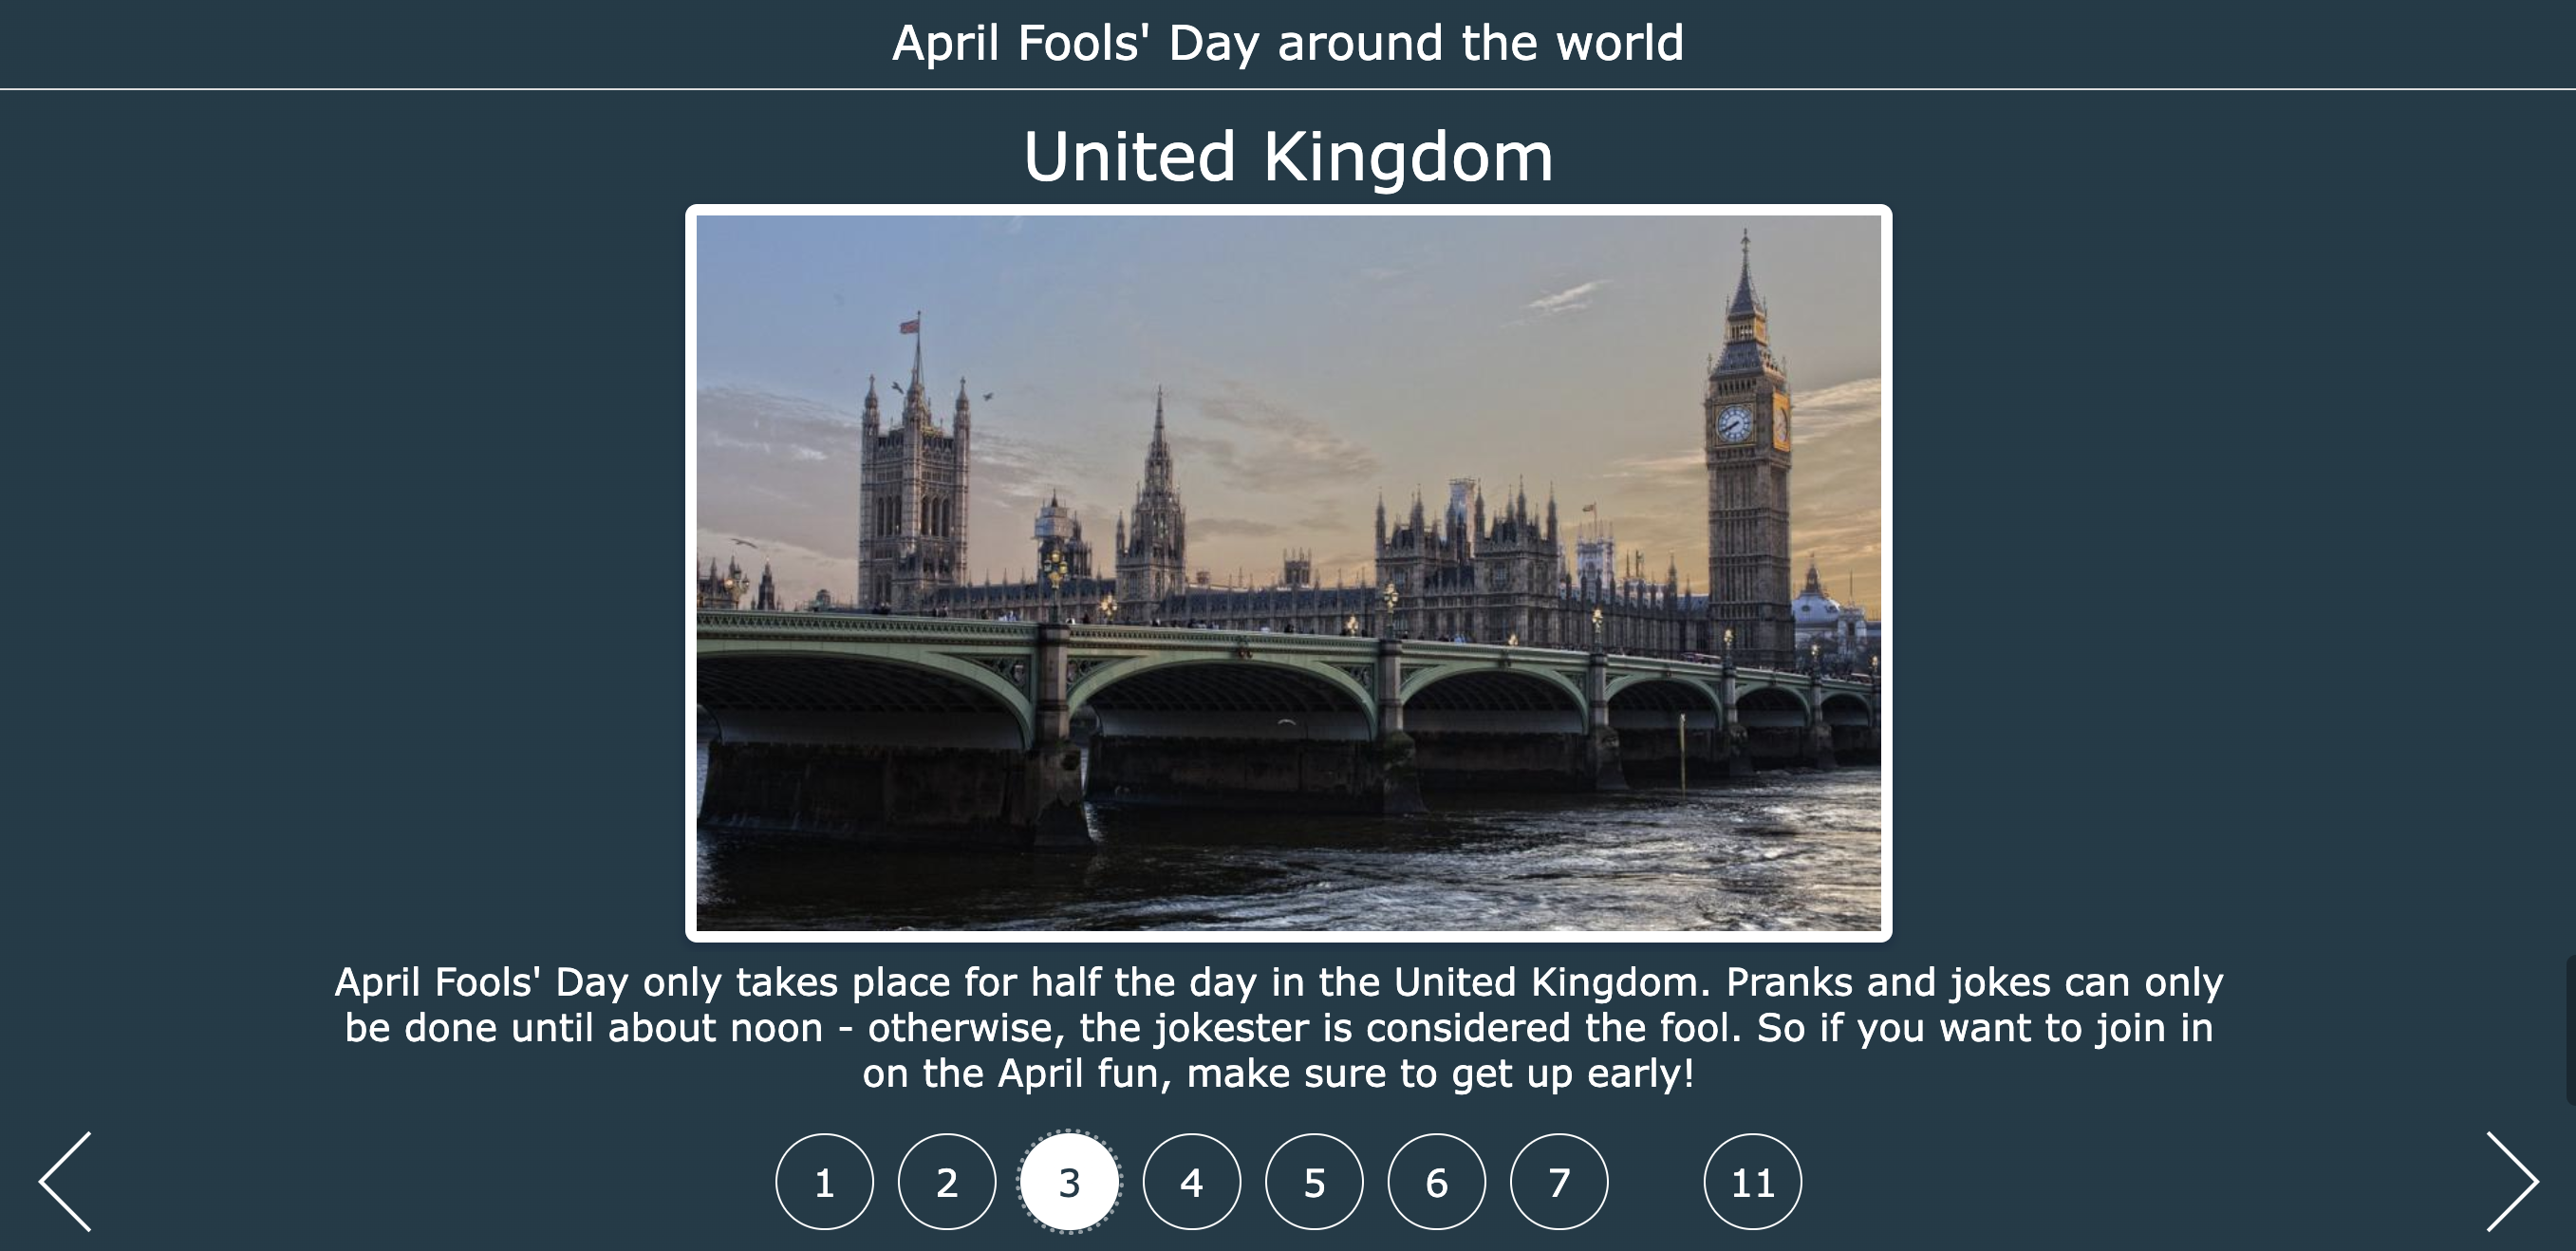
26. Create a compare-carousel
Design a dynamic comparison activity with the Frame Sequence widget! Each frame in the carousel presents paired images, graphs, or data sets representing contrasting concepts, phenomena, or perspectives. Students navigate through the carousel, viewing and analyzing each image to identify similarities and differences with the previous and next image.
In the lesson example below, students compare how one concept - April Fools’ Day - is celebrated differently in other countries.
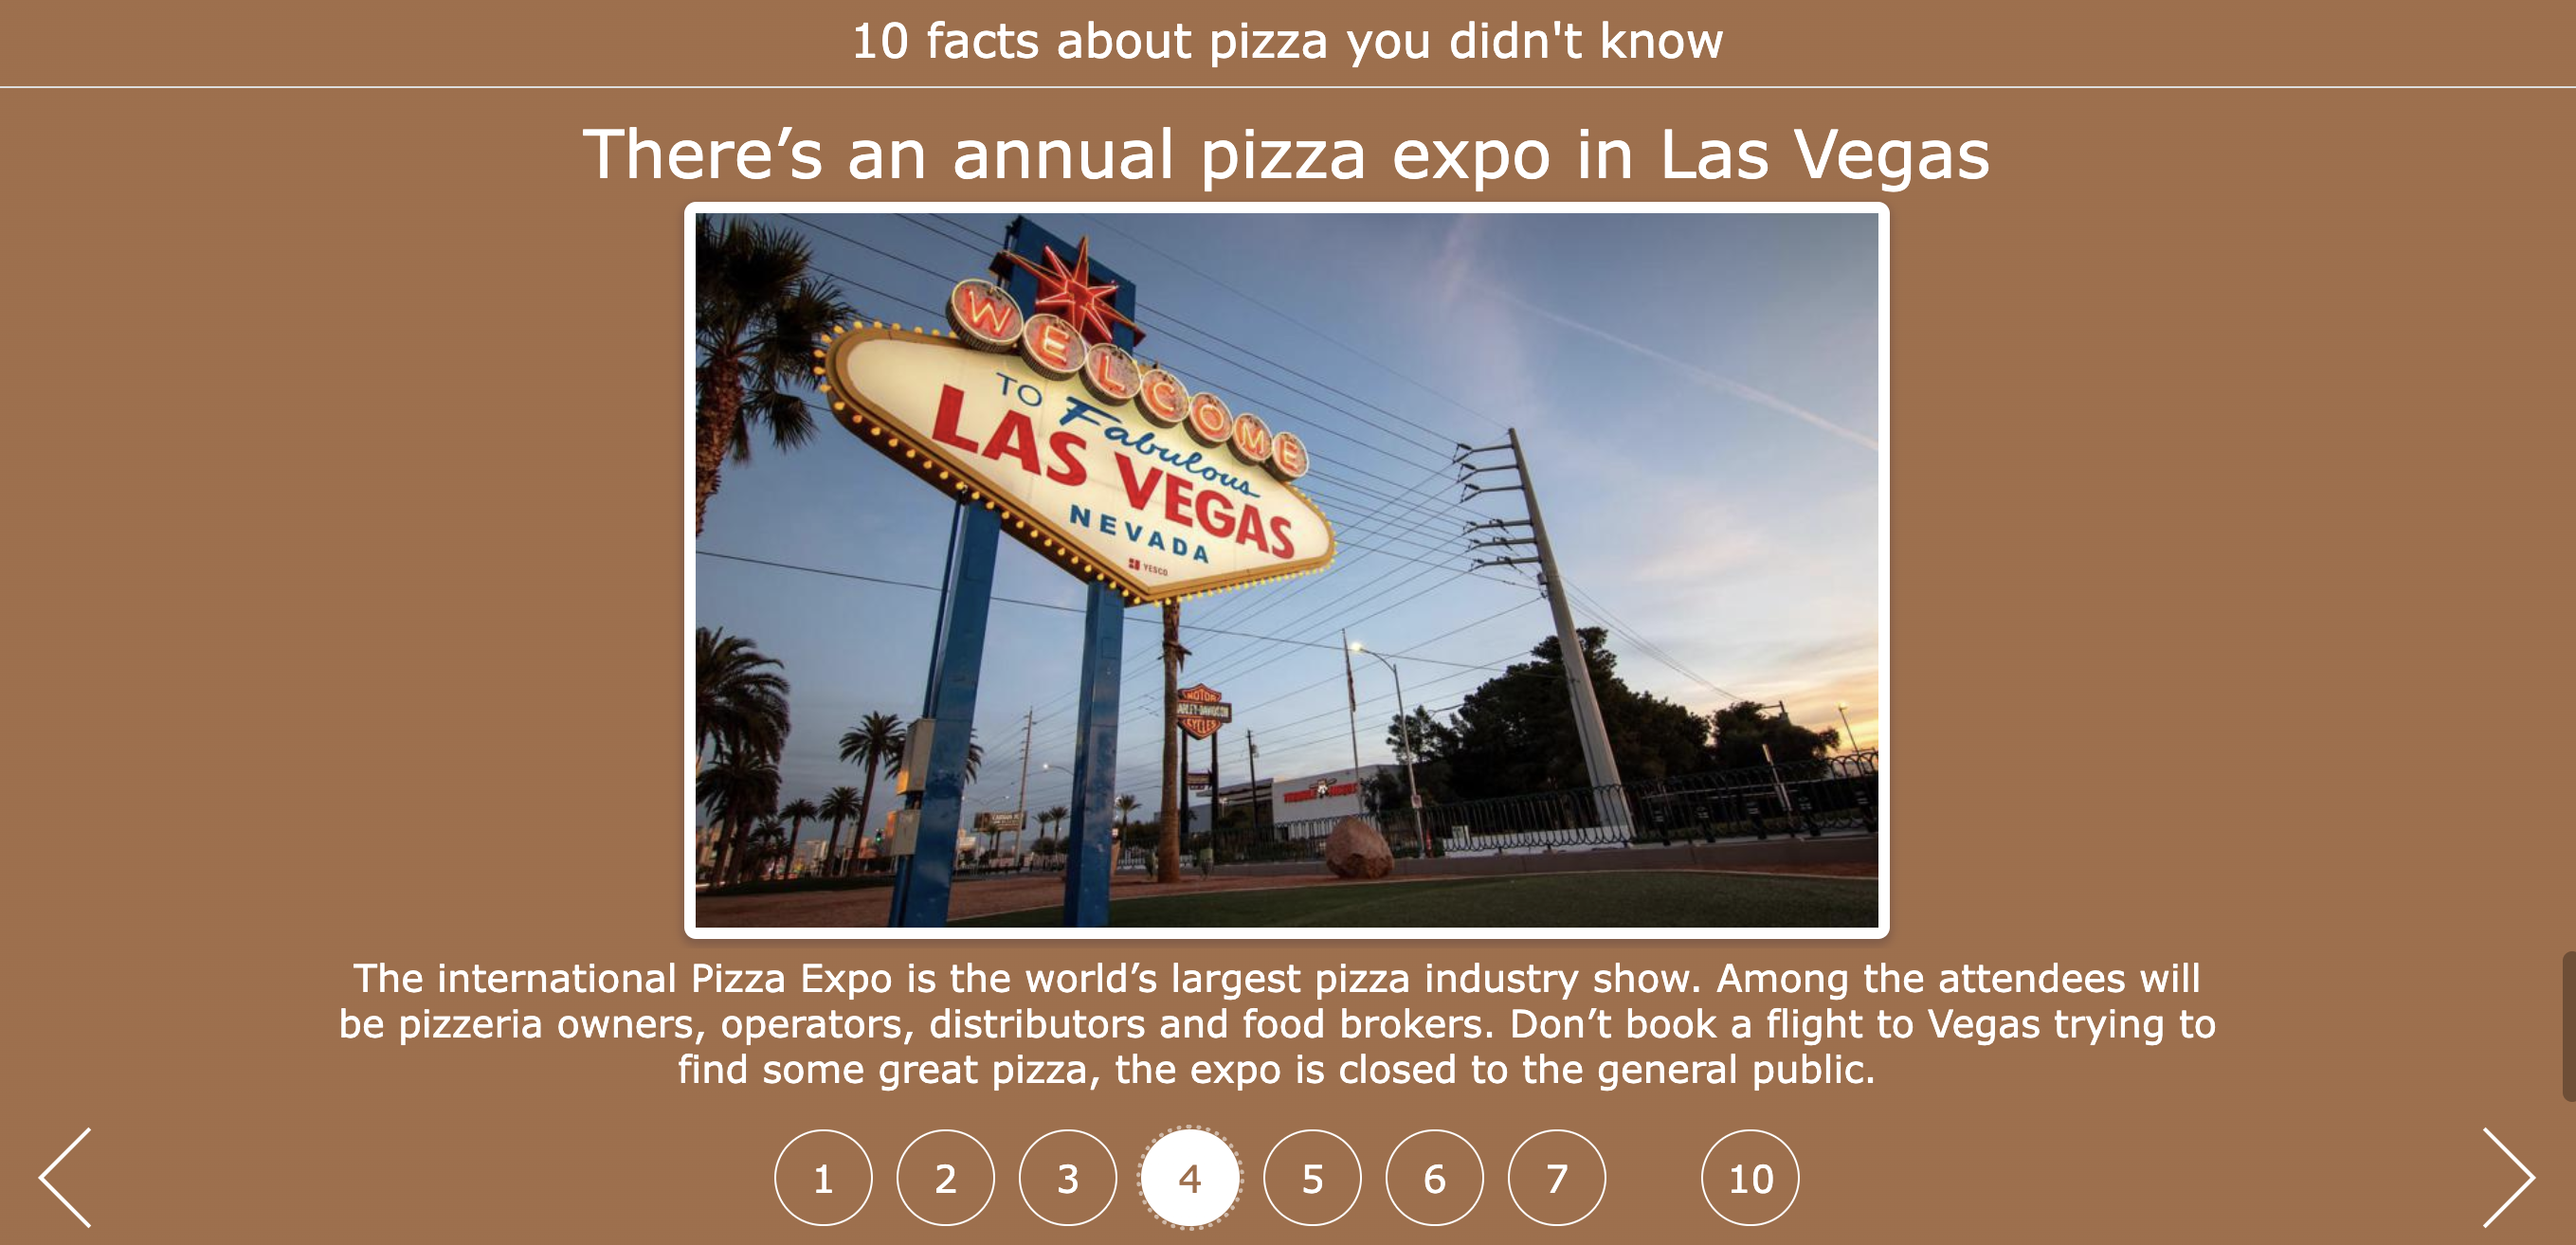
27. Create additional resources
You can also compile supplementary materials to complement lesson content with a Frame Sequence widget. It’s a bonus for students who finish practicing early. Check the example below, which can be shared with students after a pizza cooking class or a course about Italy!

The 3D Widget
A 3D file viewer supporting various file formats.
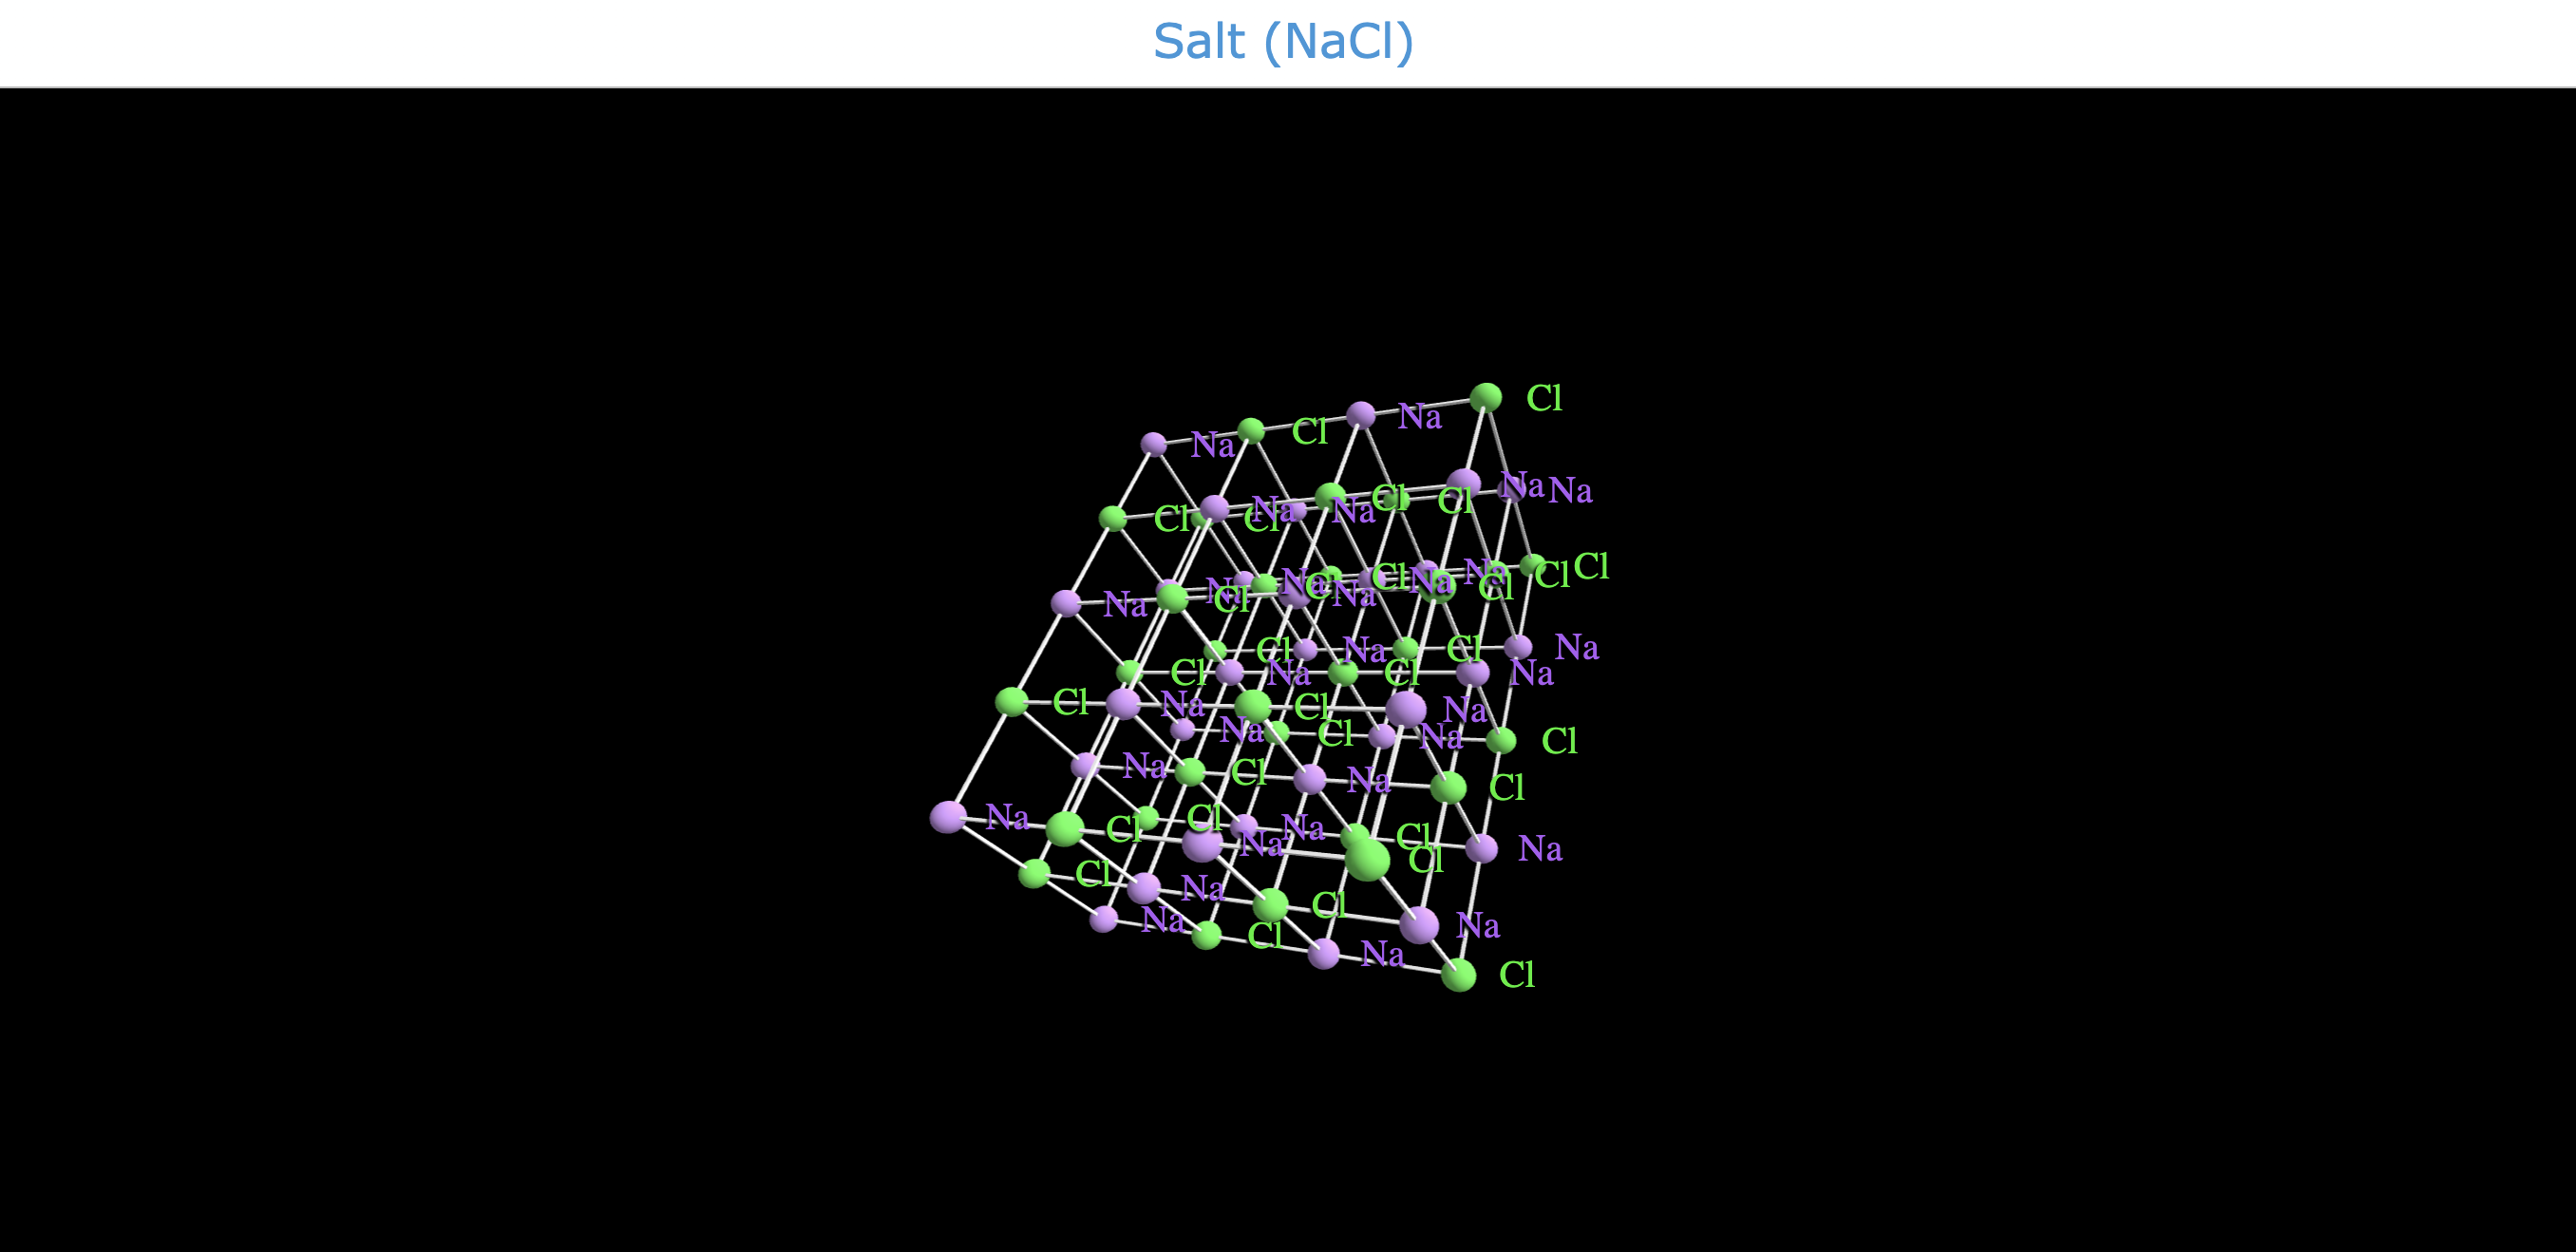
28. Molecular Structure Visualization
Introduce molecular biology or chemical concepts by visualizing complex molecular structures with the 3D widget. Teachers can provide interactive models of molecules such as DNA, proteins, and enzymes. Students can rotate, zoom, and examine molecular structures to understand their composition, function, and interactions. This hands-on approach fosters visual learning and facilitates comprehension of molecular principles.
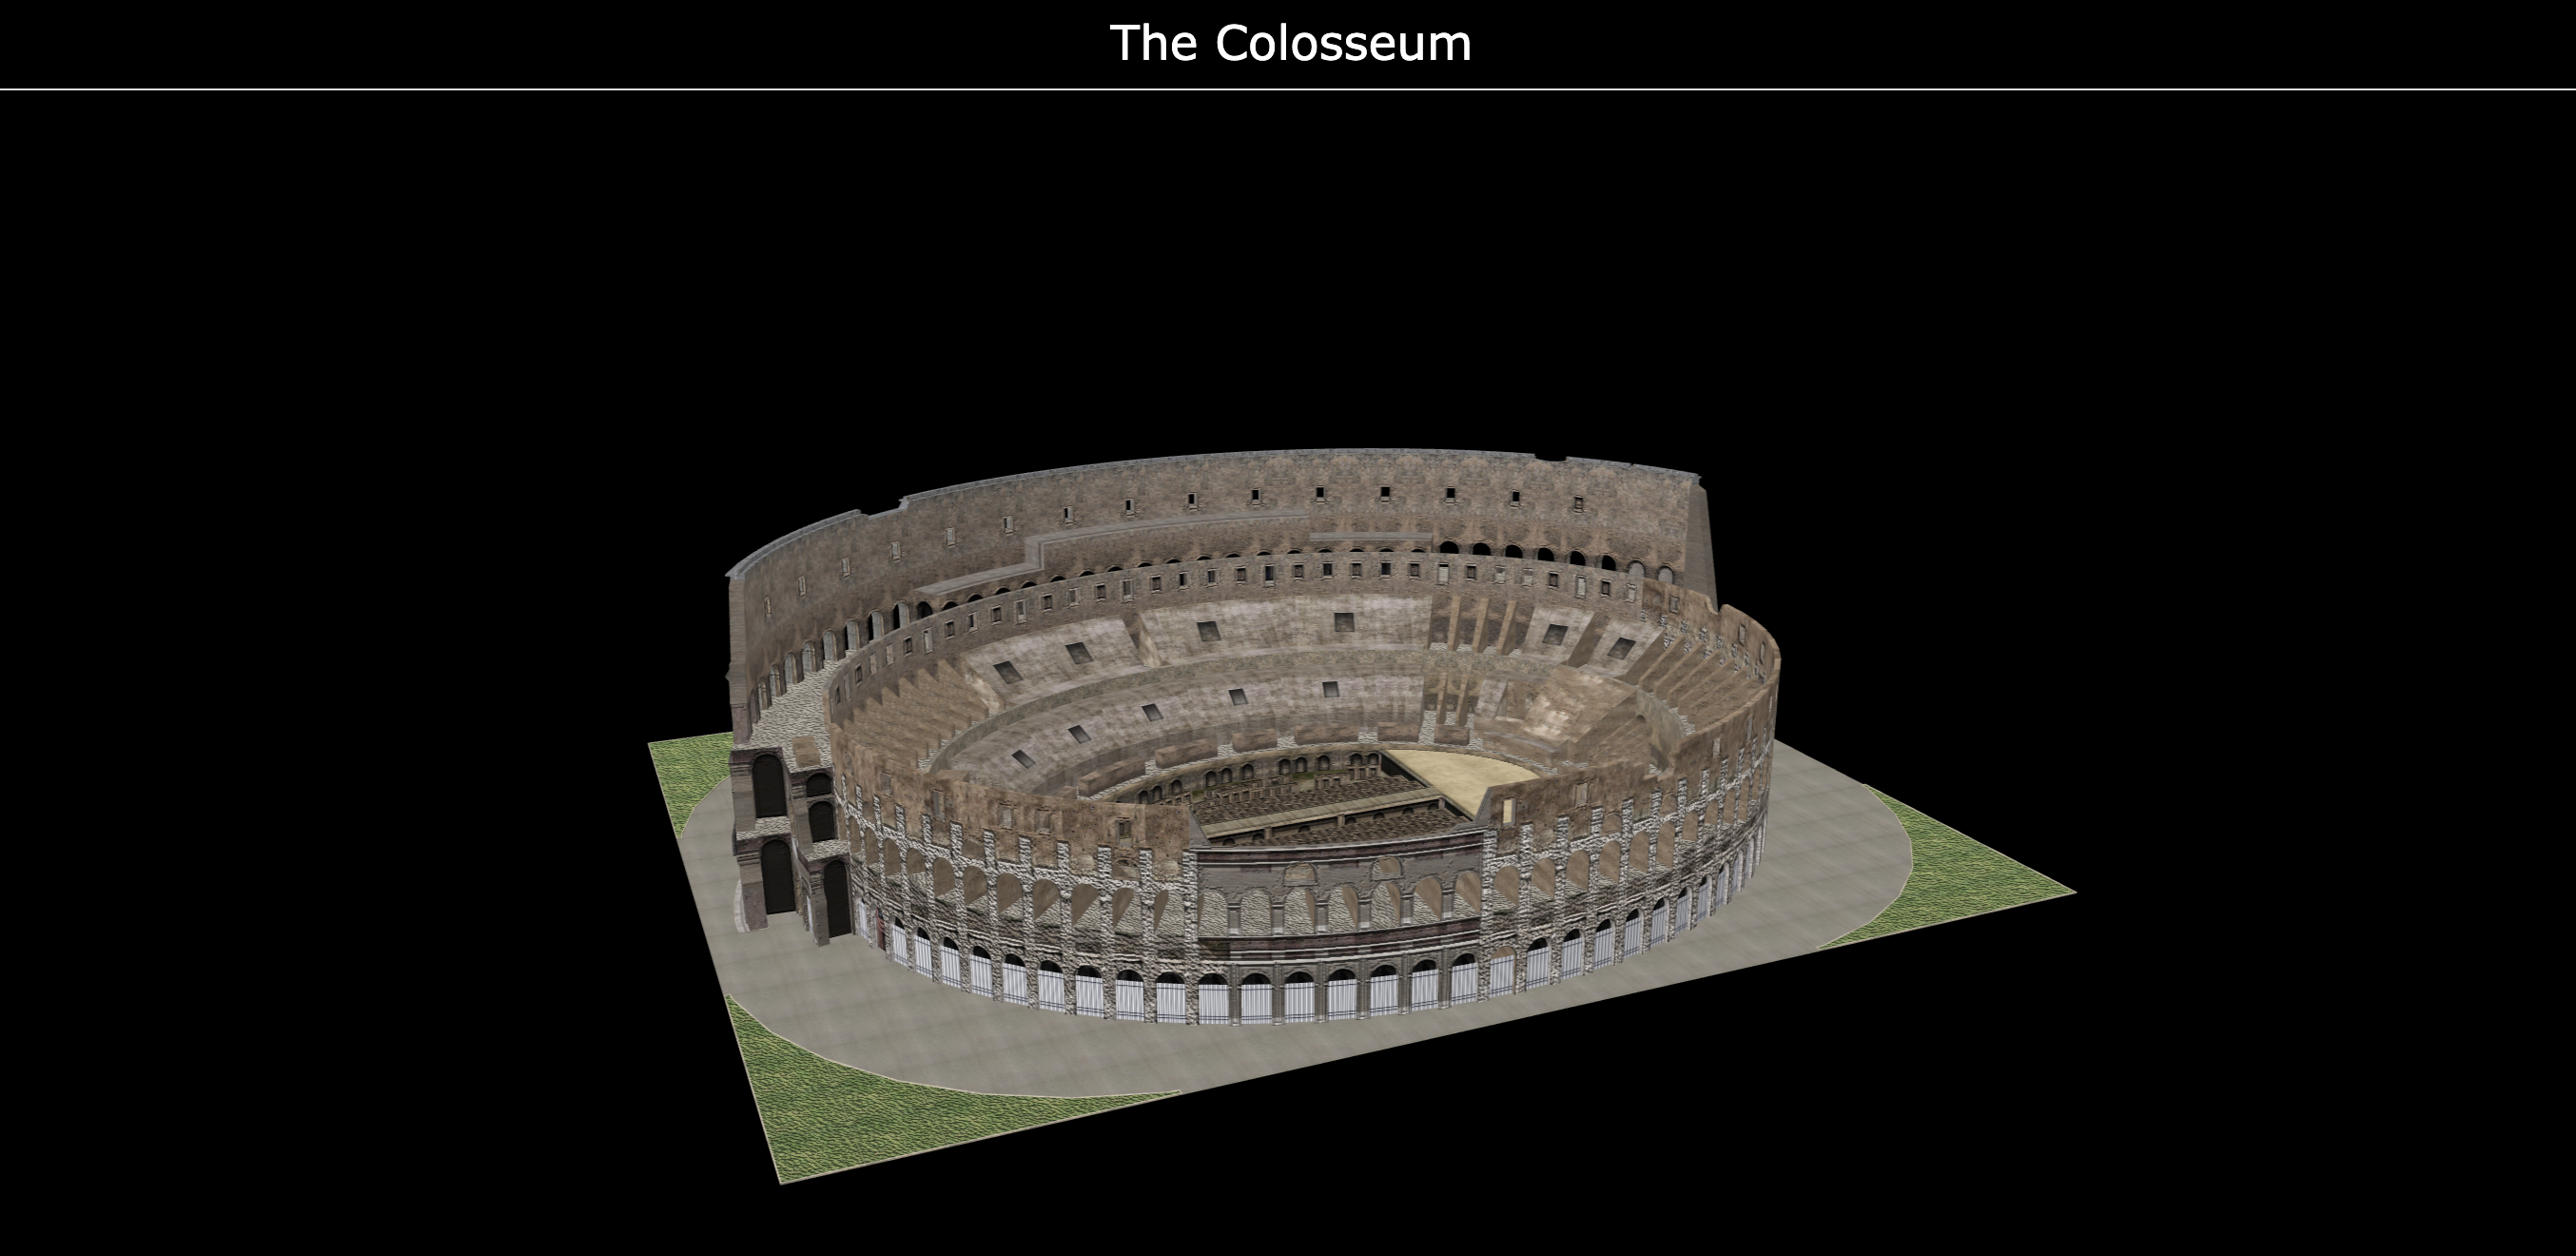
29. Historical Artifact Analysis
Engage students in historical inquiry by presenting 3D models of artifacts or buildings from different time periods and cultures. Teachers can curate virtual collections of artifacts such as ancient pottery, weapons, tools, and artworks or buildings like the colosseum in the example. Students can explore these artifacts/ buildings in detail, analyze their design or architecture, materials, and cultural significance, and draw conclusions about past civilizations. This activity promotes critical thinking and historical empathy.
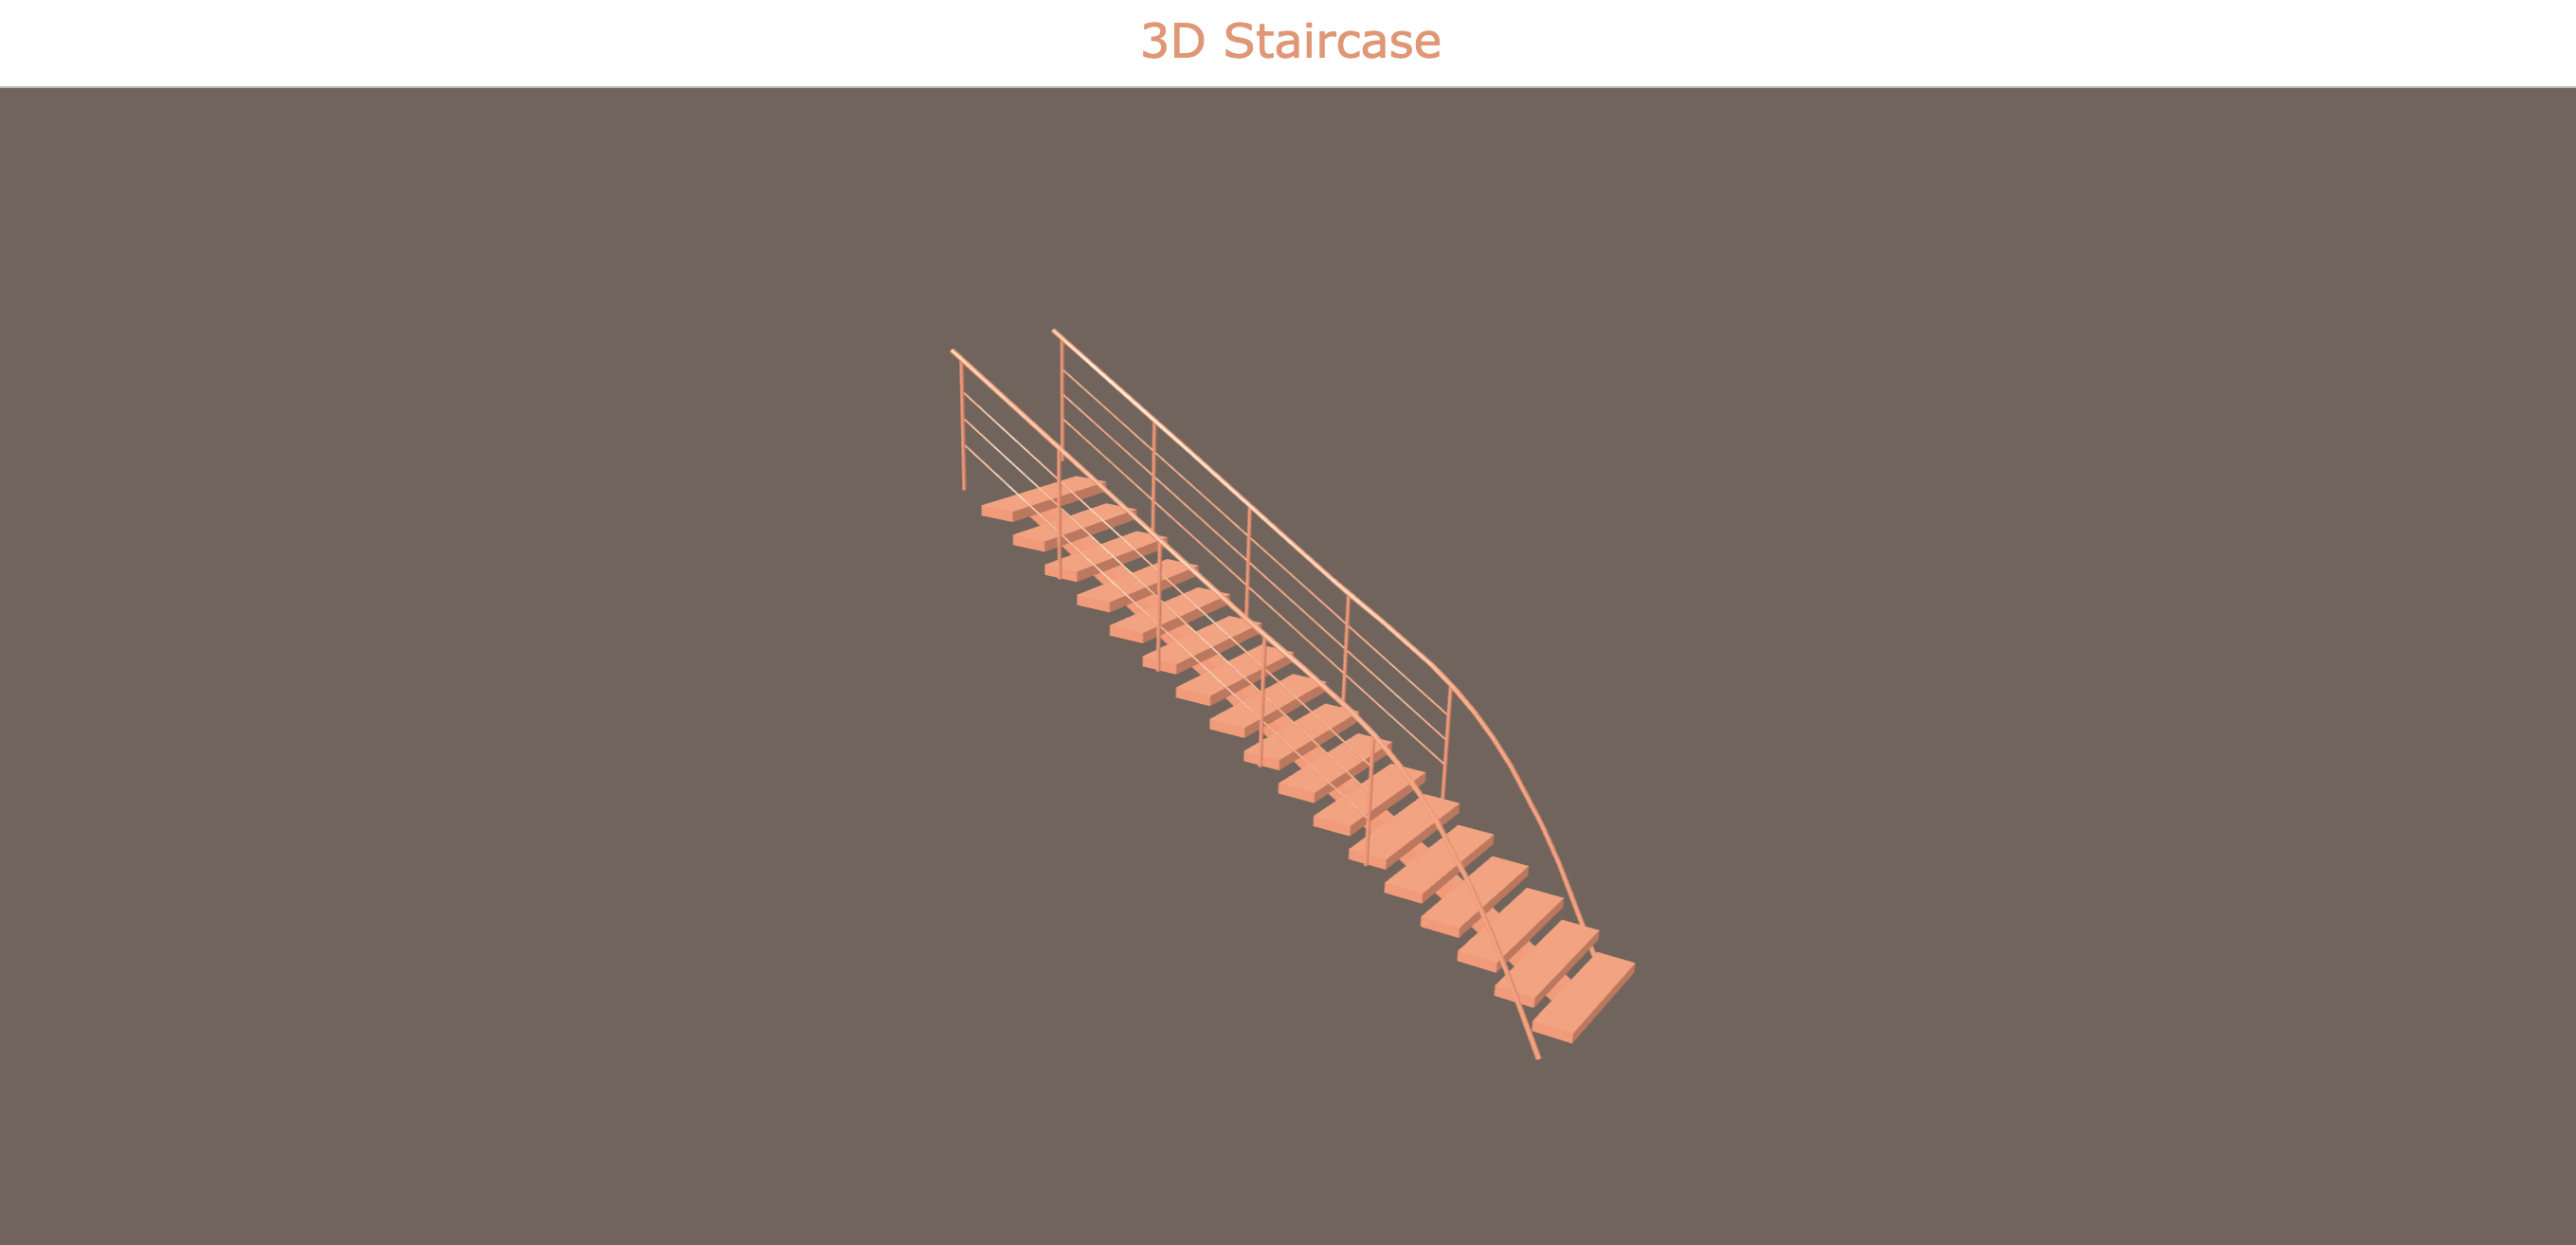
30. Architectural Design and Engineering
Render objects like in the example - a staircase - in the 3D widget. Students can study the design and construction of the staircase, including different types (e.g., straight, spiral, curved), materials used, and structural elements such as steps, handrails, and supports. They can explore how changes in dimensions and materials affect the stability, safety, and aesthetics of staircases. Additionally, students can design and prototype their own staircase models.
Wrap up
That’s it! I hope this collection of 40 online lesson activities for young learners inspired you to digitize parts of your lessons and engage your younger learners. From interactive learning games for young learners and immersive storytelling to hands-on exercises, these activities are designed to spark curiosity and foster a love for learning. With this comprehensive kindergarten resource, you’ll be well-equipped to create dynamic and memorable educational experiences for your young students. Here’s to a classroom filled with joy, creativity, and endless discovery!
Remember to navigate to this BookWidgets group to find all the free kindergarten lessons I just shared.
Want to learn more about creating engaging lesson activities with BookWidgets?
✔️ Follow BookWidgets on X / Twitter and LinkedIn and join our teacher community on Facebook!
✔️ And, be sure to connect with me on LinkedIn! 👋

